跳到主要内容

Deep Dive Developing a React TypeScript Application for Google Maps

· 阅读需 4 分钟

Choosing the Right React Library for Google Maps​

There are two popular libraries for integrating Google Maps into React applications:

1. react-google-maps-api​

Features:​

  • Built with TypeScript support out of the box.
  • Highly optimized for performance.
  • Provides detailed type definitions for Google Maps API objects and events.
  • Supports SSR (Server-Side Rendering) and lazy loading of the Google Maps API.

Pros:​

  • Excellent TypeScript support.
  • Well-maintained and frequently updated.
  • Extensive documentation and examples.

Cons:​

  • Requires a steeper learning curve due to its focus on optimization and customization.

2. @react-google-maps/api​

Features:​

  • A modern, lightweight alternative to react-google-maps-api.
  • Provides a simple and intuitive API for Google Maps integration.
  • Supports TypeScript.
  • Optimized for performance with lazy loading and minimal re-renders.

Pros:​

  • Lightweight and fast.
  • Easy to use with minimal boilerplate.
  • Excellent TypeScript support.

Cons:​

  • Less mature compared to react-google-maps-api.
  • Fewer community resources and examples.

Recommendation:​

For most applications, react-google-maps-api is the preferred choice due to its robust TypeScript support and active development. However, for simpler projects, @react-google-maps/api may be sufficient.


Key Considerations for Google Maps Event Handling​

1. Event Compatibility​

Google Maps provides different event types for various objects. Ensure the event you are attaching is supported by the target object. For example:

  • Polygon and Polyline support the rightclick event.
  • MVCArray does not support rightclick, making it challenging to attach such an event directly to a vertex.

Tip:​

Always consult the Google Maps JavaScript API documentation to verify event compatibility.

2. Modern GUI Concepts​

When building interactions, remember:

  • Many devices, such as iPads and smartphones, lack traditional mouse functionality.
  • Avoid relying on events like rightclick for core features. Instead, design user interfaces with touch and gesture interactions in mind.

3. Event Attributes​

Google Maps events like MapMouseEvent or PolyMouseEvent lack a button attribute to identify the mouse button used. Instead, use the domEvent property for this information.

Example:​

polygon.addListener("mousedown", (event: google.maps.PolyMouseEvent) => {
const mouseEvent = event.domEvent as MouseEvent;
if (mouseEvent.button === 0) {
console.log("Left mouse button clicked");
} else if (mouseEvent.button === 2) {
console.log("Right mouse button clicked");
}
});

Example: Attaching Event Listeners to Map Objects​

Below is a React component for managing drawing tools and attaching event listeners to polygons and polylines.

import React, { useEffect, useRef, useCallback, useState } from "react";

const addPathListeners = (path: google.maps.MVCArray<google.maps.LatLng>) => {
path.forEach((_, index) => {
google.maps.event.addListener(path, "mouseover", () => {
console.log(`Mouse over vertex ${index}`);
document.body.style.cursor = "pointer";
});

google.maps.event.addListener(path, "mouseout", () => {
document.body.style.cursor = "default";
});
});
};

const attachListenersToEditablePolygon = (polygon: google.maps.Polygon) => {
const path = polygon.getPath();

addPathListeners(path);

google.maps.event.addListener(path, "insert_at", () => addPathListeners(path));
google.maps.event.addListener(path, "remove_at", () => addPathListeners(path));
google.maps.event.addListener(path, "set_at", () => addPathListeners(path));
};

const MapDrawingManager: React.FC<{ mapRef: React.RefObject<google.maps.Map | null> }> = ({ mapRef }) => {
const drawingManagerRef = useRef<google.maps.drawing.DrawingManager | null>(null);

const handlePolygonComplete = useCallback((polygon: google.maps.Polygon) => {
polygon.setOptions({
fillColor: "#0000FF80",
strokeColor: "#0000FF",
strokeWeight: 4,
editable: true,
});

attachListenersToEditablePolygon(polygon);
}, []);

useEffect(() => {
if (mapRef.current && !drawingManagerRef.current) {
const manager = new google.maps.drawing.DrawingManager({
drawingMode: google.maps.drawing.OverlayType.POLYGON,
drawingControl: true,
});

google.maps.event.addListener(manager, "polygoncomplete", handlePolygonComplete);

manager.setMap(mapRef.current);
drawingManagerRef.current = manager;

return () => {
manager.setMap(null);
drawingManagerRef.current = null;
};
}
}, [mapRef, handlePolygonComplete]);

return null;
};

export default MapDrawingManager;

Migrating from google.maps.marker to advancedmarker​

Google has deprecated the google.maps.marker class in favor of the new advancedmarker class. The advancedmarker class offers improved performance and additional features, making it the recommended choice for new projects.

Key Differences:​

  • Performance: advancedmarker is optimized for better performance, especially in applications with a large number of markers.
  • Features: advancedmarker supports advanced features like custom HTML content and improved event handling.

Migration Steps:​

  1. Update Imports: Replace google.maps.marker with google.maps.advancedmarker.
  2. Refactor Code: Update your code to use the new advancedmarker API. This may involve changes to how you create, configure, and interact with markers.
  3. Test Thoroughly: Ensure that your application works as expected after the migration.

Example:​

// Old way using google.maps.marker
const marker = new google.maps.Marker({
position: { lat: -34.397, lng: 150.644 },
map: mapRef.current,
});

// New way using google.maps.advancedmarker
const advancedMarker = new google.maps.advancedmarker.AdvancedMarker({
position: { lat: -34.397, lng: 150.644 },
map: mapRef.current,
});

Best Practices​

  1. Design for Touch-First: Avoid interactions relying on mouse-specific events like rightclick.
  2. Event Verification: Confirm the compatibility of events with the target object.
  3. TypeScript Usage: Leverage TypeScript for better type safety and developer experience.
  4. Code Modularity: Organize logic into reusable functions, such as addPathListeners.
  5. Migrate to advancedmarker: Update your code to use the new advancedmarker class for better performance and features.

Building a Google Maps Application with React and TypeScript

· 阅读需 3 分钟

Prerequisites​

  • Node.js installed (version 14 or higher).
  • npm or yarn for package management.
  • A Google Cloud Platform (GCP) account to obtain the API Key and set up the Map ID.

Project Setup​

  1. Create a React Application:

    npx create-react-app google-maps-app --template typescript
    cd google-maps-app
  2. Install Required Dependencies:

    npm install @react-google-maps/api
    npm install react-hook-form
  3. Setup Google Cloud Platform:

    • Enable the Maps JavaScript API:
      1. Go to the Google Cloud Console.
      2. Create a new project or select an existing one.
      3. Navigate to APIs & Services > Library and enable the Maps JavaScript API.
    • Generate an API Key:
      1. Go to APIs & Services > Credentials and create an API Key.
      2. Restrict the API Key to ensure security by specifying HTTP referrers (your domain or localhost).
    • Create a Map ID:
      1. Go to Google Maps Platform > Maps > Map Management.
      2. Create a new Map ID and configure it with desired styles and settings.

Project Structure​

google-maps-app/
├── public/
├── src/
│ ├── components/
│ │ ├── MapContainer.tsx
│ │ ├── SearchBox.tsx
│ ├── App.tsx
│ ├── index.tsx
│ ├── types/
│ │ ├── index.d.ts
│ ├── utils/
│ ├── mapUtils.ts

Coding the Application​

Step 1: Setup TypeScript Types​

Create src/types/index.d.ts to define types for the Google Maps objects:

declare global {
interface Window {
google: any;
}
}

export interface MarkerData {
position: google.maps.LatLngLiteral;
title: string;
}

Step 2: Utility Functions​

Create src/utils/mapUtils.ts to define helper functions:

export const loadGoogleMapsScript = (apiKey: string): Promise<void> => {
return new Promise((resolve, reject) => {
const script = document.createElement('script');
script.src = `https://maps.googleapis.com/maps/api/js?key=${apiKey}&libraries=places`;
script.async = true;
script.defer = true;
script.onload = () => resolve();
script.onerror = (e) => reject(e);
document.head.appendChild(script);
});
};

Step 3: Map Container​

Create src/components/MapContainer.tsx:

import React, { useEffect, useRef, useState } from 'react';
import { MarkerData } from '../types';

type MapContainerProps = {
apiKey: string;
mapId: string;
};

const MapContainer: React.FC<MapContainerProps> = ({ apiKey, mapId }) => {
const mapRef = useRef<HTMLDivElement>(null);
const [map, setMap] = useState<google.maps.Map | null>(null);
const [markers, setMarkers] = useState<google.maps.Marker[]>([]);

useEffect(() => {
const initMap = async () => {
try {
await loadGoogleMapsScript(apiKey);
if (mapRef.current) {
const mapInstance = new google.maps.Map(mapRef.current, {
center: { lat: 37.7749, lng: -122.4194 },
zoom: 12,
mapId: mapId,
});
setMap(mapInstance);
}
} catch (error) {
console.error('Failed to load Google Maps:', error);
}
};

initMap();
}, [apiKey, mapId]);

const addMarker = (markerData: MarkerData) => {
if (map) {
const marker = new google.maps.marker.AdvancedMarkerElement({
map,
position: markerData.position,
title: markerData.title,
});
setMarkers((prev) => [...prev, marker]);
}
};

return <div ref={mapRef} style={{ width: '100%', height: '500px' }} />;
};

export default MapContainer;

Create src/components/SearchBox.tsx:

import React, { useEffect, useRef } from 'react';

type SearchBoxProps = {
onPlaceSelected: (place: google.maps.places.PlaceResult) => void;
};

const SearchBox: React.FC<SearchBoxProps> = ({ onPlaceSelected }) => {
const inputRef = useRef<HTMLInputElement>(null);

useEffect(() => {
if (inputRef.current) {
const autocomplete = new google.maps.places.Autocomplete(inputRef.current);
autocomplete.addListener('place_changed', () => {
const place = autocomplete.getPlace();
if (place) {
onPlaceSelected(place);
}
});
}
}, []);

return <input ref={inputRef} type="text" placeholder="Search places..." />;
};

export default SearchBox;

Step 5: Combine Components​

Update src/App.tsx:

import React, { useState } from 'react';
import MapContainer from './components/MapContainer';
import SearchBox from './components/SearchBox';
import { MarkerData } from './types';

const App: React.FC = () => {
const [markers, setMarkers] = useState<MarkerData[]>([]);
const apiKey = 'YOUR_GOOGLE_MAPS_API_KEY';
const mapId = 'YOUR_MAP_ID';

const handlePlaceSelected = (place: google.maps.places.PlaceResult) => {
if (place.geometry?.location) {
const markerData = {
position: {
lat: place.geometry.location.lat(),
lng: place.geometry.location.lng(),
},
title: place.name || '',
};
setMarkers((prev) => [...prev, markerData]);
}
};

return (
<div>
<SearchBox onPlaceSelected={handlePlaceSelected} />
<MapContainer apiKey={apiKey} mapId={mapId} />
</div>
);
};

export default App;

Running the Application​

  1. Replace YOUR_GOOGLE_MAPS_API_KEY and YOUR_MAP_ID in App.tsx with your actual values.
  2. Start the application:
    npm start
  3. Open http://localhost:3000 in your browser.

Resolving Dependency Issues in useEffect for a React Application

· 阅读需 6 分钟

Last week, I was tasked with building a Parameters.tsx component, and let me tell you, the struggle was real! I got completely entangled in a web of useEffect dependencies. It was like trying to untangle a Christmas tree of wires! 🎄 But hey, I finally emerged victorious (mostly) and learned some valuable lessons along the way. Here's the story...

The Product Requirement​

  1. Initializes a table with passed-in parameters (Record<string, string>).
  2. Allows in-place editing of table rows.
  3. Automatically persists updated parameters to local storage, using a passed-in URL as the key.

Implementation​

The implementation involves two useEffect hooks:

  1. First useEffect: Loads the passed-in parameters into the table.
  2. Second useEffect: Saves the updated parameters to local storage whenever the user makes changes to the table rows.

The Problem​

The key issue arises from the second useEffect. Since the URL (used as the storage key) is passed into the component, it was added as a dependency. This caused unintended behavior when switching endpoints, leading to:

  • Saving the parameters of a previous endpoint under the new endpoint's URL.

Scenario Details​

When switching endpoints, the restfulEndpointUrl (passed-in URL) changes. Since the URL is used as the key for saving parameters to local storage, it was added as a dependency to the second useEffect. However, this led to incorrect behavior:

  • When the URL changes, the useEffect is triggered.
  • At this point, the table still contains the parameters of the previous endpoint.
  • As a result, the parameters of the previous endpoint are saved under the new endpoint’s URL, which is incorrect.

Why This Happens​

The useEffect hook runs whenever any of its dependencies change. By including restfulEndpointUrl in the dependency array, the useEffect is triggered when the URL changes, even though the table content hasn’t been updated yet.


Root Cause: Unnecessary Dependencies in useEffect​

Let’s break down why adding restfulEndpointUrl as a dependency caused the issue:

  1. How useEffect Dependencies Work
    The dependencies in the useEffect array dictate when the hook is re-triggered. By including restfulEndpointUrl, the persistence logic was unnecessarily invoked whenever the URL changed.

  2. Incorrect State Handling
    When the URL changed, the persistence logic was triggered prematurely, using the outdated state of rows, leading to data being saved under the incorrect key.

Impact of This Bug​

Here’s a sequence of events that led to the bug:

1. restfulEndpointUrl = "endpoint_1"
- Rows initialized and saved correctly under "endpoint_1".
2. restfulEndpointUrl changes to "endpoint_2"
- useEffect triggers immediately.
- Old rows (from "endpoint_1") are saved under "endpoint_2".
3. User edits table.
- New rows are saved under "endpoint_2", but previous data is corrupted.

Solution: Leveraging useRef​

To fix this, we need to ensure that the persistence logic only runs when rows changes, and not when the URL changes. This can be achieved by:

  1. Removing restfulEndpointUrl from the dependency array of the useEffect that handles persistence.
  2. Using a useRef to always access the latest URL without triggering the useEffect.

The useRef hook provides a solution by holding a mutable reference to the latest URL without triggering re-renders or re-triggering the useEffect. Here’s why it works:

  • Avoiding Dependencies: By using useRef, we avoid adding restfulEndpointUrl to the dependency array. The persistence logic is now triggered only when rows change.
  • Always Up-to-Date: Updating the useRef in its own useEffect ensures it always holds the latest URL.

Why useRef Fixes the Problem​

The useRef hook allows us to store a mutable value that persists across renders without causing re-renders. By storing the URL in a ref, we can:

  • Access the latest URL value without adding it as a dependency to useEffect.
  • Ensure that the persistence logic only runs when rows changes, avoiding incorrect saves.

Code Comparison​

Before Fixing​

const [rows, setRows] = useState<Row[]>([]);

// Initialize rows
useEffect(() => {
const initialRows = Object.entries(initialParams).map(([key, value]) => ({
selected: true,
key,
value,
description: "",
}));
setRows(initialRows);
}, [initialParams]);

// Persist changes
useEffect(() => {
if (restfulEndpointUrl) {
const params = rows
.filter((row) => row.selected && row.key)
.reduce((acc, row) => {
acc[row.key] = row.value;
return acc;
}, {});

LocalStorageHelper.setParams(restfulEndpointUrl, params);
}
}, [rows, restfulEndpointUrl]); // restfulEndpointUrl as a dependency causes issues

After Fixing​

const [rows, setRows] = useState<Row[]>([]);
const restfulEndpointUrlRef = useRef(restfulEndpointUrl);

// Update ref when URL changes
useEffect(() => {
restfulEndpointUrlRef.current = restfulEndpointUrl;
}, [restfulEndpointUrl]);

// Initialize rows
useEffect(() => {
const initialRows = Object.entries(initialParams).map(([key, value]) => ({
selected: true,
key,
value,
description: "",
}));
setRows(initialRows);
}, [initialParams]);

// Persist changes
useEffect(() => {
const params = rows
.filter((row) => row.selected && row.key)
.reduce((acc, row) => {
acc[row.key] = row.value;
return acc;
}, {});

LocalStorageHelper.setParams(restfulEndpointUrlRef.current, params);
}, [rows]); // URL dependency removed

Sequence Diagram: Before the Fix​

sequenceDiagram
participant User
participant Component
participant LocalStorage

User->>Component: Switches Endpoint
Component->>Component: restfulEndpointUrl changes
Component->>Component: useEffect (persistence) triggers
Component->>Component: Table still contains params of previous endpoint
Component->>LocalStorage: Incorrect params saved under new endpoint's URL

Explanation​

  1. The user switches the endpoint.
  2. The restfulEndpointUrl changes.
  3. The useEffect (persistence) triggers because restfulEndpointUrl is a dependency.
  4. The table still contains the parameters of the previous endpoint.
  5. The incorrect parameters are saved under the new endpoint’s URL.

Sequence Diagram: After the Fix​

sequenceDiagram
participant User
participant Component
participant LocalStorage

User->>Component: Switches Endpoint
Component->>Component: restfulEndpointUrl changes
Component->>Component: ref updated with new URL
Component->>Component: Table updated with new endpoint's params
User->>Component: Edits Table
Component->>Component: useEffect (persistence) triggers
Component->>LocalStorage: Correct params saved under new endpoint's URL

Explanation​

  1. The user switches the endpoint.
  2. The restfulEndpointUrl changes.
  3. The ref is updated with the new URL.
  4. The table is updated with the new endpoint’s parameters.
  5. The user edits the table.
  6. The useEffect (persistence) triggers because rows changed.
  7. The correct parameters are saved under the new endpoint’s URL.

Key Differences in the Diagrams​

Before the FixAfter the Fix
useEffect triggers when restfulEndpointUrl changes.useEffect triggers only when rows changes.
Incorrect parameters are saved because the table hasn’t been updated yet.Correct parameters are saved because the table is updated before persistence.
restfulEndpointUrl is a dependency in useEffect.restfulEndpointUrl is stored in a ref and not a dependency in useEffect.


Key Takeaways​

Why Unnecessary Dependencies Are Problematic​

  1. They can cause re-triggers in useEffect that don’t align with the intended logic.
  2. This often leads to outdated or incorrect state usage.

Why useRef Is the Solution​

  1. useRef provides a mutable container that doesn’t cause re-renders or hook re-triggers.
  2. It allows us to maintain the latest value of a variable without adding it to useEffect dependencies.

Conclusion​

Using useEffect effectively requires careful consideration of its dependencies. In this case, leveraging useRef eliminated unnecessary triggers, ensuring the correct behavior when switching endpoints. This approach is a best practice for similar scenarios where state changes need to be decoupled from unrelated external variables.

Deep Dive into Local Storage Usage in React with TypeScript

· 阅读需 4 分钟

Local storage is a simple yet powerful tool for persisting data in web applications. In this article, we'll explore every detail of local storage usage in React with TypeScript, including best practices, sample code, and test cases. The illustrations are based on the latest versions of React (18.x) and TypeScript (5.x).


What is Local Storage?​

Local storage is a web API that allows developers to store key-value pairs in a web browser. The data persists even after the browser is closed, making it ideal for saving user preferences, authentication tokens, and other non-sensitive data.

Key Characteristics of Local Storage:​

  • Synchronous API: Operations are blocking.
  • Storage Limit: Approximately 5MB per domain.
  • Data Lifetime: Persists until explicitly deleted.
  • Data Scope: Accessible only within the same origin.

Using Local Storage in React with TypeScript​

1. Basic CRUD Operations​

Local storage provides three core methods:

  • localStorage.setItem(key, value)
  • localStorage.getItem(key)
  • localStorage.removeItem(key)

Example: Wrapper Utility for Local Storage​

We can create a type-safe utility to handle common operations:

// utils/localStorage.ts
export class LocalStorageHelper {
static setItem<T>(key: string, value: T): void {
localStorage.setItem(key, JSON.stringify(value));
}

static getItem<T>(key: string): T | null {
const value = localStorage.getItem(key);
return value ? JSON.parse(value) as T : null;
}

static removeItem(key: string): void {
localStorage.removeItem(key);
}
}

Test Cases​

Using Jest, we can write unit tests to validate the utility:

// utils/localStorage.test.ts
import { LocalStorageHelper } from "./localStorage";

describe("LocalStorageHelper", () => {
beforeEach(() => {
localStorage.clear();
});

it("should set and retrieve an item", () => {
LocalStorageHelper.setItem("key", { name: "John" });
const item = LocalStorageHelper.getItem<{ name: string }>("key");
expect(item).toEqual({ name: "John" });
});

it("should return null for non-existent keys", () => {
const item = LocalStorageHelper.getItem("nonexistent");
expect(item).toBeNull();
});

it("should remove an item", () => {
LocalStorageHelper.setItem("key", "value");
LocalStorageHelper.removeItem("key");
const item = LocalStorageHelper.getItem("key");
expect(item).toBeNull();
});
});

2. Integrating Local Storage in React Components​

Example: Using Local Storage with useState​

// components/Counter.tsx
import React, { useState, useEffect } from "react";
import { LocalStorageHelper } from "../utils/localStorage";

const Counter: React.FC = () => {
const [count, setCount] = useState<number>(() => {
return LocalStorageHelper.getItem<number>("count") || 0;
});

useEffect(() => {
LocalStorageHelper.setItem("count", count);
}, [count]);

return (
<div>
<h1>Counter: {count}</h1>
<button onClick={() => setCount((prev) => prev + 1)}>Increment</button>
<button onClick={() => setCount((prev) => prev - 1)}>Decrement</button>
</div>
);
};

export default Counter;

Test Cases​

// components/Counter.test.tsx
import React from "react";
import { render, screen, fireEvent } from "@testing-library/react";
import Counter from "./Counter";

describe("Counter Component", () => {
it("should initialize with value from local storage", () => {
localStorage.setItem("count", "5");
render(<Counter />);
expect(screen.getByText(/Counter: 5/i)).toBeInTheDocument();
});

it("should increment the counter", () => {
render(<Counter />);
fireEvent.click(screen.getByText(/Increment/i));
expect(screen.getByText(/Counter: 1/i)).toBeInTheDocument();
});

it("should decrement the counter", () => {
render(<Counter />);
fireEvent.click(screen.getByText(/Decrement/i));
expect(screen.getByText(/Counter: -1/i)).toBeInTheDocument();
});
});

3. React Hooks for Local Storage​

We can create a custom hook to encapsulate the logic for interacting with local storage.

Example: Custom Hook​

// hooks/useLocalStorage.ts
import { useState } from "react";

function useLocalStorage<T>(key: string, initialValue: T) {
const [storedValue, setStoredValue] = useState<T>(() => {
try {
const item = localStorage.getItem(key);
return item ? JSON.parse(item) : initialValue;
} catch (error) {
console.error("Error reading localStorage key", key, error);
return initialValue;
}
});

const setValue = (value: T) => {
try {
setStoredValue(value);
localStorage.setItem(key, JSON.stringify(value));
} catch (error) {
console.error("Error setting localStorage key", key, error);
}
};

return [storedValue, setValue] as const;
}

export default useLocalStorage;

Usage Example​

// components/ThemeSwitcher.tsx
import React from "react";
import useLocalStorage from "../hooks/useLocalStorage";

const ThemeSwitcher: React.FC = () => {
const [theme, setTheme] = useLocalStorage<string>("theme", "light");

return (
<div className={`theme-${theme}`}>
<h1>Current Theme: {theme}</h1>
<button onClick={() => setTheme("light")}>Light</button>
<button onClick={() => setTheme("dark")}>Dark</button>
</div>
);
};

export default ThemeSwitcher;

4. Best Practices for Local Storage in React​

  1. Avoid Storing Sensitive Data: Local storage is not secure; avoid storing sensitive information like passwords or tokens.
  2. Validate Stored Data: Always validate and sanitize data retrieved from local storage.
  3. Error Handling: Wrap local storage operations in try-catch blocks to handle potential errors.
  4. Abstract Logic: Use utilities or hooks to encapsulate local storage interactions for reusability and type safety.
  5. Synchronize Across Tabs: Use the storage event to synchronize data across multiple tabs.

Example: Tab Synchronization​

// hooks/useSyncLocalStorage.ts
import { useEffect } from "react";

export function useSyncLocalStorage(key: string, callback: (newValue: string | null) => void) {
useEffect(() => {
const handler = (event: StorageEvent) => {
if (event.key === key) {
callback(event.newValue);
}
};

window.addEventListener("storage", handler);
return () => window.removeEventListener("storage", handler);
}, [key, callback]);
}

Deep Dive: Modal Dialog Mechanism in React Applications

· 阅读需 5 分钟

Modal dialogs are a common UI pattern used to display important information, collect user input, or confirm actions. In React applications, implementing a modal dialog involves managing state, rendering the dialog conditionally, and ensuring proper styling and positioning. This article explores the modal dialog mechanism in React, using the popular react-modal library as an example. We'll also provide a complete testing setup to ensure the modal works as expected.


Table of Contents​

  1. Introduction to Modal Dialogs
  2. Key Concepts in Modal Dialogs
  3. Using react-modal in React
  4. Styling and Positioning the Modal
  5. Ensuring Proper Z-Index
  6. Testing Modal Dialogs
  7. Conclusion

1. Introduction to Modal Dialogs​

A modal dialog is a UI component that overlays the main application content, forcing the user to interact with it before continuing. Modal dialogs are commonly used for:

  • Alerts and confirmations
  • Form inputs
  • Loading indicators
  • Error messages

In React, modal dialogs are typically implemented using state to control their visibility and lifecycle.


2. Key Concepts in Modal Dialogs​

a. State Management​

The visibility of a modal dialog is controlled by a boolean state variable (e.g., isOpen). When isOpen is true, the modal is rendered; otherwise, it is hidden.

b. Conditional Rendering​

The modal is rendered conditionally based on the state variable. This ensures that the modal is only added to the DOM when needed.

c. Focus Management​

Modals should trap focus within their content to ensure accessibility. This prevents users from interacting with the background content while the modal is open.

d. Z-Index​

The modal's z-index must be higher than the parent component's z-index to ensure it appears on top of other elements.

e. Escape Key Handling​

Users should be able to close the modal by pressing the Escape key.


3. Using react-modal in React​

react-modal is a popular library for creating accessible and customizable modal dialogs in React. Below is an example of how to use it:

Installation​

npm install react-modal

Example Code​

import React, { useState } from "react";
import Modal from "react-modal";

// Set the app element for accessibility (required by react-modal)
Modal.setAppElement("#root");

const App = () => {
const [isOpen, setIsOpen] = useState(false);

const openModal = () => setIsOpen(true);
const closeModal = () => setIsOpen(false);

return (
<div>
<button onClick={openModal}>Open Modal</button>

<Modal
isOpen={isOpen}
onRequestClose={closeModal}
contentLabel="Example Modal"
style={{
overlay: {
backgroundColor: "rgba(0, 0, 0, 0.5)",
zIndex: 1000, // Ensure the modal is on top
},
content: {
width: "400px",
height: "200px",
margin: "auto",
padding: "20px",
borderRadius: "8px",
boxShadow: "0 4px 6px rgba(0, 0, 0, 0.1)",
},
}}
>
<h2>Modal Title</h2>
<p>This is the modal content.</p>
<button onClick={closeModal}>Close</button>
</Modal>
</div>
);
};

export default App;

4. Styling and Positioning the Modal​

a. Custom Styles​

react-modal allows you to customize the modal's appearance using the style prop. The overlay style controls the background overlay, while the content style controls the modal's content.

b. Centering the Modal​

To center the modal, set the margin property of the content style to auto.

c. Responsive Design​

Use CSS media queries to adjust the modal's size and position for different screen sizes.


5. Ensuring Proper Z-Index​

The z-index property is crucial for ensuring the modal appears on top of other elements. Here's how to handle it:

a. Set a High Z-Index for the Modal​

<Modal
isOpen={isOpen}
style={{
overlay: {
zIndex: 1000, // Higher than other elements
},
}}
/>

b. Ensure Parent Components Have Lower Z-Index​

If the parent component has a high z-index, the modal will not appear on top. For example:

.parent-component {
z-index: 10; /* Lower than the modal's z-index */
}

6. Testing Modal Dialogs​

Testing modal dialogs ensures they work as expected in different scenarios. Below is an example of testing a modal dialog using react-testing-library.

Installation​

npm install @testing-library/react @testing-library/jest-dom

Testing Code​

import React from "react";
import { render, screen, fireEvent } from "@testing-library/react";
import Modal from "react-modal";
import App from "./App";

// Mock react-modal
jest.mock("react-modal", () => {
const Modal = ({ isOpen, children }) => (isOpen ? <div>{children}</div> : null);
return Modal;
});

describe("Modal Dialog", () => {
it("opens and closes the modal", () => {
render(<App />);

// Modal should not be visible initially
expect(screen.queryByText("Modal Title")).not.toBeInTheDocument();

// Open the modal
fireEvent.click(screen.getByText("Open Modal"));
expect(screen.getByText("Modal Title")).toBeInTheDocument();

// Close the modal
fireEvent.click(screen.getByText("Close"));
expect(screen.queryByText("Modal Title")).not.toBeInTheDocument();
});
});

7. Conclusion​

Modal dialogs are a powerful tool for enhancing user interaction in React applications. By understanding key concepts like state management, conditional rendering, focus trapping, and z-index, you can create accessible and user-friendly modals. The react-modal library simplifies the process, and proper testing ensures your modals work as expected in all scenarios.


Additional Resources​

Run a Proxy Server with cors-anywhere

· 阅读需 3 分钟

1. Install Node.js​

  • Ensure you have Node.js installed on your machine. You can download it from nodejs.org.
  • Verify the installation by running:
    node -v
    npm -v

2. Create a New Directory for Your Proxy Server​

  • Create a new directory for your proxy server:
    mkdir cors-proxy-server
    cd cors-proxy-server

3. Initialize a New Node.js Project​

  • Initialize a new Node.js project:
    npm init -y
  • This will create a package.json file.

4. Install cors-anywhere​

  • Install the cors-anywhere package:
    npm install cors-anywhere

5. Create the Proxy Server Script​

  • Create a new file named server.js in the project directory:
    touch server.js
  • Add the following code to server.js:

server.js (JavaScript Implementation)​

Here’s the complete implementation of the proxy server in JavaScript:

const cors_proxy = require("cors-anywhere");

// Define the host and port for the proxy server
const host = "127.0.0.1"; // Localhost
const port = 8080; // Port to run the proxy

// Create and start the proxy server
cors_proxy
.createServer({
originWhitelist: [], // Allow all origins (you can restrict this to specific domains)
requireHeader: ["origin", "x-requested-with"], // Require these headers
removeHeaders: ["cookie", "cookie2"], // Remove sensitive headers
})
.listen(port, host, () => {
console.log(`CORS Anywhere proxy server is running on http://${host}:${port}`);
});

6. Run the Proxy Server​

  • Start the proxy server:
    node server.js
  • You should see the following output:
    CORS Anywhere proxy server is running on http://127.0.0.1:8080

Using the Proxy Server in Your Application​

Once the proxy server is running, you can use it in your application to bypass CORS restrictions.

Example: Fetching Data in a React Application​

const proxyUrl = "http://127.0.0.1:8080/"; // Your local proxy server
const apiUrl = "https://dog.ceo/api/breeds/list/all"; // The API you want to access

fetch(proxyUrl + apiUrl)
.then((response) => response.json())
.then((data) => console.log(data))
.catch((error) => console.error("Error:", error));

Summary of Steps​

  1. Install Node.js and initialize a new project.
  2. Install the cors-anywhere package.
  3. Create a server.js file with the proxy server implementation.
  4. Run the proxy server using node server.js.
  5. Use the proxy server in your application by prefixing your API URL with the proxy URL.

Notes​

  • Security: By default, the proxy server allows all origins (originWhitelist: []). You can restrict this to specific domains for better security.
  • Production: Running a local proxy server is fine for development, but for production, consider deploying the proxy server to a cloud service (e.g., Heroku, Vercel) or using a backend server as a middleman.
  • Rate Limits: Some APIs may have rate limits or restrictions on the number of requests you can make. Be mindful of this when using a proxy.

This setup will allow you to bypass CORS restrictions and make API requests from your application during development.

TypeScript interface vs class vs type

· 阅读需 5 分钟

In TypeScript, interface, class, and type are all used to define the shape of objects, but they serve different purposes and have different use cases. Let's delve into each of them in detail, including real-world scenarios with sample code, and discuss their pros and cons.

1. Interface​

An interface is a way to define a contract for the shape of an object. It can describe the structure of an object, including properties and methods, but it cannot contain implementation details.

Sample Code:​

// Defining an interface
interface User {
id: number;
name: string;
email: string;
isActive: boolean;
getDetails(): string;
}

// Implementing the interface in a class
class RegisteredUser implements User {
id: number;
name: string;
email: string;
isActive: boolean;

constructor(id: number, name: string, email: string, isActive: boolean) {
this.id = id;
this.name = name;
this.email = email;
this.isActive = isActive;
}

getDetails(): string {
return `ID: ${this.id}, Name: ${this.name}, Email: ${this.email}, Active: ${this.isActive}`;
}
}

// Using the class
const user = new RegisteredUser(1, "John Doe", "john@example.com", true);
console.log(user.getDetails()); // Output: ID: 1, Name: John Doe, Email: john@example.com, Active: true

Pros:​

  • Contract Definition: Interfaces are great for defining contracts that classes or objects must adhere to.
  • Extensibility: You can extend interfaces using the extends keyword, which allows for composition of types.
  • Readability: Interfaces are often more readable and easier to understand than type aliases, especially for complex object shapes.

Cons:​

  • No Implementation: Interfaces cannot contain implementation details, so they are limited to defining the shape of objects.
  • Cannot Be Used for Primitive Types: Interfaces cannot be used to define types for primitive values (e.g., string, number).

2. Class​

A class in TypeScript is a blueprint for creating objects. It can define both the structure and the behavior of objects. Classes can implement interfaces and can also be extended.

Sample Code:​

// Defining a class
class Product {
id: number;
name: string;
price: number;

constructor(id: number, name: string, price: number) {
this.id = id;
this.name = name;
this.price = price;
}

getDiscountedPrice(discount: number): number {
return this.price * (1 - discount);
}
}

// Extending a class
class Electronics extends Product {
warrantyPeriod: number;

constructor(id: number, name: string, price: number, warrantyPeriod: number) {
super(id, name, price);
this.warrantyPeriod = warrantyPeriod;
}

getWarrantyDetails(): string {
return `Warranty Period: ${this.warrantyPeriod} years`;
}
}

// Using the class
const laptop = new Electronics(1, "Laptop", 1000, 2);
console.log(laptop.getDiscountedPrice(0.1)); // Output: 900
console.log(laptop.getWarrantyDetails()); // Output: Warranty Period: 2 years

Pros:​

  • Implementation: Classes can contain both properties and methods, allowing for full implementation of behavior.
  • Inheritance: Classes can be extended, allowing for code reuse and hierarchical relationships.
  • Encapsulation: Classes support encapsulation through access modifiers like private, protected, and public.

Cons:​

  • Complexity: Classes can become complex, especially when dealing with inheritance and polymorphism.
  • Performance: Classes can introduce some overhead compared to plain objects, especially in scenarios where you don't need the full OOP features.

3. Type​

A type in TypeScript is a way to create a new name for a type. It can be used to alias existing types, combine types, or create complex types. Unlike interfaces, types can represent primitive types, union types, and intersection types.

Sample Code:​

// Defining a type alias
type Point = {
x: number;
y: number;
};

// Using the type alias
const origin: Point = { x: 0, y: 0 };

// Defining a union type
type Status = "active" | "inactive" | "pending";

// Using the union type
let userStatus: Status = "active";

// Defining an intersection type
type User = {
id: number;
name: string;
};

type Admin = {
permissions: string[];
};

type AdminUser = User & Admin;

// Using the intersection type
const admin: AdminUser = {
id: 1,
name: "Admin",
permissions: ["read", "write"],
};

Pros:​

  • Flexibility: Types are very flexible and can be used to create complex types, including unions, intersections, and primitive types.
  • Alias Existing Types: Types can be used to alias existing types, making code more readable and maintainable.
  • No Declaration Merging: Unlike interfaces, types do not support declaration merging, which can be a pro in scenarios where you want to avoid accidental type extensions.

Cons:​

  • No Extensibility: Types cannot be extended or merged like interfaces. If you need to extend a type, you need to create a new type that includes the original type.
  • Less Readable for Complex Objects: For complex object shapes, interfaces are often more readable and easier to understand than types.

Summary​

  • Interface: Best for defining contracts for object shapes, especially when you want to enforce a structure across multiple classes or objects.
  • Class: Best for defining both the structure and behavior of objects, especially when you need inheritance, encapsulation, and polymorphism.
  • Type: Best for creating complex types, including unions, intersections, and aliases for existing types.

Each of these constructs has its own strengths and weaknesses, and the choice between them depends on the specific requirements of your project.

Comparison: interface, type, and class​

Featureinterfacetypeclass
Object shapes✅ Yes✅ Yes✅ Yes
Unions/Intersections❌ Limited✅ Fully supported❌ Limited
Extending existing types✅ Can extend multiple interfaces✅ Supports unions and intersections for combining types✅ Can extend other classes and implement interfaces
Declaration merging✅ Yes (interfaces with the same name merge automatically)❌ No❌ No
Runtime presence❌ Does not exist in runtime❌ Does not exist in runtime✅ Yes (exists in runtime as JavaScript classes)
Instantiable (e.g., via new)❌ No❌ No✅ Yes
Implementation❌ Cannot contain implementation details❌ Cannot contain implementation details✅ Can contain implementation details (methods, properties, etc.)
Inheritance❌ No❌ No✅ Supports inheritance using extends
Encapsulation❌ No❌ No✅ Supports encapsulation through access modifiers (private, protected, public)
Polymorphism❌ No❌ No✅ Supports polymorphism through method overriding and interface implementation
Performance✅ Lightweight (only type checking)✅ Lightweight (only type checking)❌ Slightly heavier due to runtime presence and additional features (inheritance, encapsulation)
Readability✅ Often more readable for complex object shapes❌ Can become less readable for complex object shapes✅ Often more readable for complex object shapes with behavior
Use CaseBest for defining contracts for object shapes, especially when enforcing structure across multiple classes/objectsBest for creating complex types, including unions, intersections, and aliases for existing typesBest for defining both the structure and behavior of objects, especially when you need inheritance, encapsulation, and polymorphism

Using print for Python Debugging? You're Outdated!

· 阅读需 4 分钟

In Python development practice, debugging is an indispensable part of the process. If you rely on print() statements to trace the execution flow of your program, you might encounter persistent exceptions that are difficult to pinpoint even after multiple code reviews. This is often due to the limitations of this debugging method as the terminal output grows, making it hard to correlate outputs with their corresponding function calls. This article introduces the IceCream library, a specialized debugging tool that significantly enhances debugging efficiency, making the entire process more systematic and standardized.

print() is the most basic output function in Python and is the preferred debugging tool for most developers. However, when dealing with complex function calls and data structures, this method often leads to cluttered output, reducing debugging efficiency. The ic() function from the IceCream library is optimized for debugging scenarios, providing more practical features.

Basic Debugging Example - Using print​

def add(x, y):
return x + y

# Using print() for function debugging
print(add(10, 20)) # Output: 30
print(add(30, 40)) # Output: 70

The main issue with this traditional method is that when there are many output results, it becomes difficult to intuitively associate the output values with their corresponding function calls. Additional manual explanations are required.

Using ic for Debugging​

from icecream import ic

# Using ic() for function debugging
ic(add(10, 20))
ic(add(30, 40))

Output:

ic| add(10, 20): 30
ic| add(30, 40): 70

By using the ic() function, each output clearly displays the complete information of the function call, including the function name, parameter values, and return results. This output format is particularly suitable for debugging complex sequences of function calls, allowing for quick problem identification.

Core Advantages of the ic Function​

  1. Detailed Execution Information Tracking

    The ic() function not only displays the execution results but also fully records the operation process, eliminating the need for manually writing debugging information and improving debugging efficiency.

    def multiply(a, b):
    return a * b

    ic(multiply(5, 5))

    Output:

    ic| multiply(5, 5): 25
  2. Integration of Debugging and Assignment Operations

    One notable feature of the ic() function is its support for simultaneous debugging and variable assignment, which is not possible with traditional print() functions:

    # print() method
    result = print(multiply(4, 6)) # Output: 24
    print(result) # Output: None

    # ic() method
    result = ic(multiply(4, 6)) # Output: ic| multiply(4, 6): 24
    print(result) # Output: 24

    Using the ic() function, you can not only view debugging information but also correctly obtain and store the return value, which is particularly useful during debugging.

  3. Visualization of Data Structure Access

    When dealing with data structures like dictionaries, the ic() function provides clearer access information:

    data = {'a': 1, 'b': 2, 'c': 3}

    # Using ic() to track data access
    ic(data['a'])

    Output:

    ic| data['a']: 1

    The output clearly shows the access path and result, helping to understand the data operation process.

  4. Optimization of Complex Data Structure Display

    When dealing with nested dictionaries or JSON-like complex data structures, the ic() function provides better readability through structured formatting:

    complex_data = {
    "name": "John",
    "age": 30,
    "languages": ["Python", "JavaScript"]
    }

    ic(complex_data)

    The output uses structured formatting with color differentiation, significantly enhancing the readability of complex data structures, facilitating quick location and analysis of data.

Advanced Features of the IceCream Library​

In addition to basic debugging functions, the IceCream library offers a series of advanced features that can be customized according to specific needs:

  1. Dynamic Control of Debugging Output

    During development, you can dynamically control the output of debugging information as needed:

    ic.disable() # Pause debugging output
    ic(multiply(3, 3)) # No output here

    ic.enable() # Resume debugging output
    ic(multiply(3, 3)) # Output: ic| multiply(3, 3): 9
  2. Custom Configuration of Output Format

    IceCream supports custom output formats, allowing you to adjust the output method according to project requirements:

    def log_to_file(text):
    with open("debug.log", "a") as f:
    f.write(text + "\n")

    ic.configureOutput(prefix="DEBUG| ", outputFunction=log_to_file)

    ic(multiply(7, 7))

    This configuration can redirect debugging information to a log file and add a custom prefix, facilitating subsequent log analysis.

Conclusion​

Although the print() function is widely used as a basic debugging tool in Python, it has obvious limitations in complex development scenarios. The IceCream library effectively addresses the shortcomings of traditional debugging methods by providing more professional debugging tools. Its rich features, flexible configuration options, and clear output format can significantly enhance the debugging efficiency of Python programs. In practical development, using the ic() function properly not only helps developers locate and solve problems faster but also improves code maintainability.

Setting up Node.js development environment in Windows

· 阅读需 4 分钟

1. Install Node.js​

  1. Download Node.js from the official website. Use the LTS version for stability.
  2. Install Node.js by running the installer and ensure you check the box to install npm (Node Package Manager).
  3. Verify the installation:
    node -v
    npm -v

2. Install Yarn (Optional)​

While npm is included with Node.js, Yarn is a popular alternative for managing dependencies.

  1. Install Yarn globally:
    npm install --global yarn
  2. Verify the installation:
    yarn -v

3. Install Git​

  1. Download and install Git from git-scm.com.
  2. During installation, choose "Git Bash Here" and "Use Git from the Command Prompt."
  3. Verify Git installation:
    git --version

4. Install Visual Studio Code​

  1. Download and install VS Code.
  2. Install the following extensions in VS Code:
    • ESLint: Linting and code quality.
    • Prettier: Code formatting.
    • TypeScript: Provides TypeScript language features.
    • React Developer Tools: Debugging React apps.
    • REST Client: For testing APIs.

5. Setup Node.js + TypeScript Project​

Step 1: Initialize the Project​

  1. Create a new folder for your project:
    mkdir my-node-react-app
    cd my-node-react-app
  2. Initialize the project with Yarn or npm:
    yarn init -y
    # OR
    npm init -y

Step 2: Install TypeScript​

  1. Install TypeScript and Node.js types as dev dependencies:
    yarn add -D typescript @types/node
  2. Create a tsconfig.json:
    npx tsc --init

Example tsconfig.json:

{
"compilerOptions": {
"target": "ESNext",
"module": "ESNext",
"lib": ["ESNext", "DOM"],
"strict": true,
"esModuleInterop": true,
"skipLibCheck": true,
"moduleResolution": "Node",
"resolveJsonModule": true,
"outDir": "./dist",
"rootDir": "./src",
"baseUrl": "./",
"paths": {
"@/*": ["src/*"]
}
},
"include": ["src"],
"exclude": ["node_modules", "dist"]
}

Step 3: Setup Front-End (React + Vite)​

  1. Create the React front-end:
    yarn create vite react-frontend --template react-ts
  2. Navigate to the front-end folder:
    cd react-frontend
  3. Install dependencies for React development:
    yarn add react react-dom
    yarn add -D @types/react @types/react-dom eslint prettier
  4. Install additional libraries:
    yarn add axios zustand zod clsx @tanstack/react-query

Step 4: Setup Back-End (Node.js)​

  1. Navigate back to the root directory.
  2. Create a folder for the back-end:
    mkdir backend
    cd backend
  3. Install Express and related types:
    yarn add express
    yarn add -D @types/express nodemon
  4. Create a src folder and start building your API:
    mkdir src
    touch src/index.ts

Example src/index.ts:

import express from 'express';

const app = express();
app.use(express.json());

app.get('/api', (req, res) => {
res.send('Hello from the back-end!');
});

const PORT = 3001;
app.listen(PORT, () => {
console.log(`Server is running on http://localhost:${PORT}`);
});
  1. Add a nodemon script to automatically restart the server during development:
    "scripts": {
    "dev": "nodemon src/index.ts"
    }

Step 5: Configure Path Aliases​

  1. Add the following to both react-frontend and backend projects' tsconfig.json:

    "paths": {
    "@/*": ["src/*"]
    }
  2. In Vite's vite.config.ts for the front-end, install and configure vite-tsconfig-paths:

    yarn add -D vite-tsconfig-paths

    vite.config.ts:

    import { defineConfig } from 'vite';
    import react from '@vitejs/plugin-react';
    import tsconfigPaths from 'vite-tsconfig-paths';

    export default defineConfig({
    plugins: [react(), tsconfigPaths()],
    });

Step 6: Setup Docker​

  1. Create a Dockerfile in the root directory for both front-end and back-end.

Front-End Dockerfile:

FROM node:18-alpine

WORKDIR /app
COPY package.json yarn.lock ./
RUN yarn install
COPY . .
CMD ["yarn", "dev"]

Back-End Dockerfile:

FROM node:18-alpine

WORKDIR /app
COPY package.json yarn.lock ./
RUN yarn install
COPY . .
CMD ["yarn", "dev"]
  1. Create a docker-compose.yml:
version: '3.8'
services:
frontend:
build:
context: ./react-frontend
ports:
- "5173:5173"
backend:
build:
context: ./backend
ports:
- "3001:3001"

Step 7: Debugging in VS Code​

  1. Install the Remote - Containers extension in VS Code.

  2. Create a .devcontainer folder in the root directory.

  3. Add a devcontainer.json:

    {
    "name": "Node.js Dev",
    "dockerComposeFile": "docker-compose.yml",
    "service": "frontend",
    "workspaceFolder": "/app",
    "extensions": [
    "dbaeumer.vscode-eslint",
    "esbenp.prettier-vscode"
    ],
    "settings": {
    "terminal.integrated.shell.linux": "/bin/bash"
    }
    }
  4. Reopen the project in the container using the Command Palette (Ctrl + Shift + P).


8. Start Development​

  1. Start the Docker containers:
    docker-compose up --build
  2. Access the front-end at http://localhost:5173 and the back-end at http://localhost:3001.

Project Structure​

my-node-react-app/
├── backend/
│ ├── src/
│ │ └── index.ts
│ ├── package.json
│ └── tsconfig.json
├── react-frontend/
│ ├── src/
│ │ ├── App.tsx
│ │ ├── main.tsx
│ │ └── ...
│ ├── package.json
│ ├── tsconfig.json
│ └── vite.config.ts
├── docker-compose.yml
└── .devcontainer/
└── devcontainer.json

Plain Language Explanation of Large Models

· 阅读需 21 分钟

Introduction​

This document aims to provide a detailed explanation of the current mainstream large model architectures, such as the Transformer architecture. We will cover various aspects from a technical overview, architecture introduction to specific model implementations. Through this document, we hope to provide readers with a comprehensive understanding, helping them grasp the working principles of large models and enhance their technical foundation for communicating with clients. This document is suitable for individuals interested in large models.

Paper Introduction​

Paper Title: Attention is all you need

Release Date: 2017/06/12

Published By: Google, University of Toronto

Brief Summary: The progenitor of all LLMs, the foundational architecture for a new era in NLP.

Chinese Summary: Traditional sequence-to-sequence models use complex recurrent or convolutional neural networks, including encoders and decoders. The best-performing models connect the encoder and decoder through attention mechanisms.

The author's team proposes a new simple network structure, Transformer, which is entirely based on attention mechanisms and no longer uses recurrence and convolution.

Experiments on two machine translation tasks show that these models perform superiorly in quality and are easier to parallelize, significantly reducing the training time required.

The model achieved 28.4 BLEU on the WMT 2014 English-German translation task, over 2 BLEU higher than the best existing results (including ensemble models). On the WMT 2014 English-French translation task, the model achieved a new single-model best BLEU score of 41.8 after training on eight GPUs for 3.5 days, with training costs only a fraction of the best models in the literature.

The Transformer demonstrates generalization capabilities across other tasks, whether with extensive or limited training data, successfully applied to English constituency parsing.

Paper Link: Attention Is All You Need

Core Technology: Model Architecture (here, leave a general impression of encode + decode)
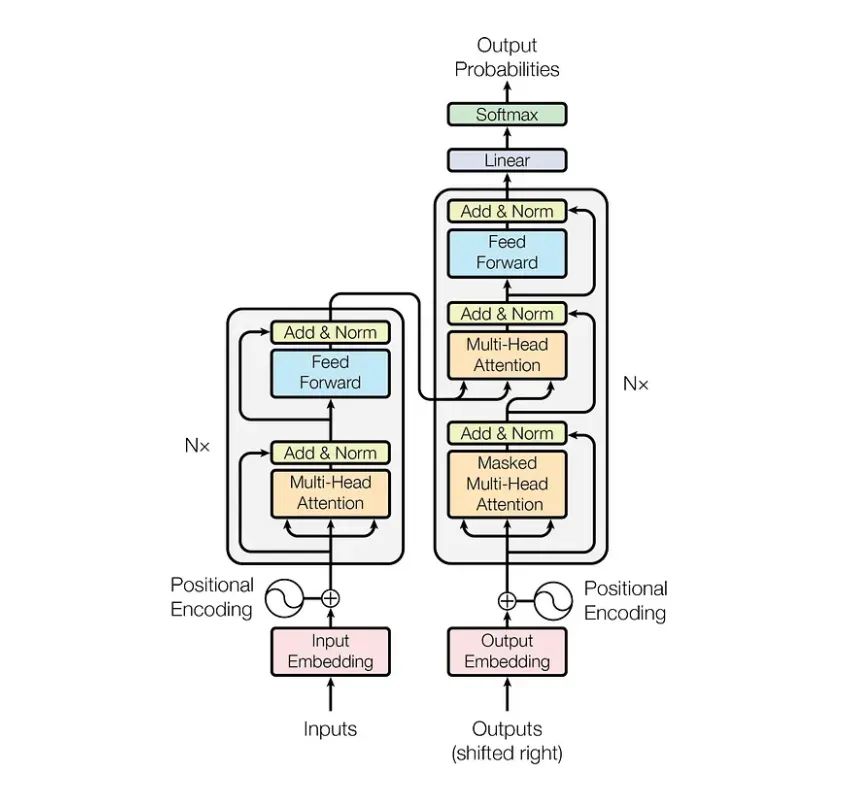
Model Architecture

LLM in Brief​

Many believe that large models can directly answer questions or engage in conversations. However, their core function is to predict the next likely word, or "Token," based on the input text. This predictive ability makes LLMs excel in various applications, including but not limited to:

  • Text Generation: LLMs can generate coherent and meaningful text passages for writing assistance, content creation, etc.
  • Question Answering Systems: By understanding the context of a question, LLMs can generate accurate answers, widely used in intelligent customer service and information retrieval.
  • Translation: LLMs can perform high-quality language translation based on context, supporting multilingual communication.
  • Text Summarization: LLMs can extract key content from long documents to generate concise summaries, facilitating quick understanding.
  • Dialogue Systems: LLMs can simulate human conversations, providing natural and smooth interaction experiences, applied in chatbots and virtual assistants.

By understanding the concept of Tokens, we can better grasp the working principles of LLMs and their powerful capabilities in practical applications.

Token​

Example​

When discussing Tokens, it's impossible not to mention a recent low-level error in a large model: "How many 'r's are in 'Strawberry'?"

Strawberry

After the ridicule, people calmed down and began to think: what is the essence behind this low-level error?

It is generally believed that it is the fault of Tokenization.

In China, Tokenization is often translated as "word segmentation." This translation is somewhat misleading because the Tokens in Tokenization do not necessarily refer to words; they can also be punctuation marks, numbers, or parts of a word. For example, in a tool provided by OpenAI, the word "Strawberry" is divided into three Tokens: Str-aw-berry. In this case, asking the AI large model to count how many 'r's are in the word is indeed a challenge for it.

To let everyone intuitively see the world of text in the eyes of large models, Karpathy specially wrote a small program to represent Tokens with emojis.
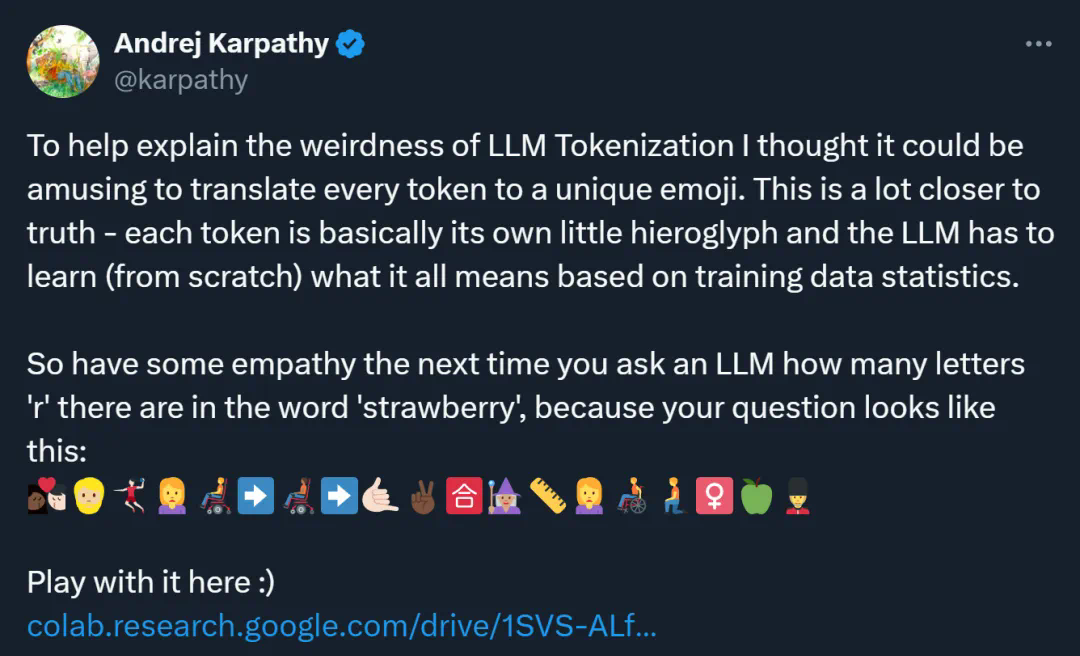
Tokens With Emojis

Attempt​

A Token is the basic unit of text that LLMs understand. Although it is convenient to consider a Token as a word, for LLMs, the goal is to encode text as efficiently as possible. Therefore, in many cases, a Token represents a character sequence shorter or longer than an entire word. Punctuation marks and spaces are also represented as Tokens, either individually or combined with other characters. Each Token in the LLM vocabulary has a unique identifier, usually a number. LLMs use tokenizers to convert regular text strings into equivalent lists of Token numbers.

import tiktoken

# Get the encoder for the GPT-2 model
encoding = tiktoken.encoding_for_model("gpt-2")

# Encode example sentence
encoded_text = encoding.encode("A journey of a thousand miles begins with a single step.")
print(encoded_text)

# Decode back to original text
decoded_text = encoding.decode(encoded_text)
print(decoded_text)

# Encode and decode individual tokens
print(encoding.decode([32])) # 'A'
print(encoding.decode([7002])) # ' journey'
print(encoding.decode([286])) # 'of'

# Encode the word "thousand"
thousand_encoded = encoding.encode("thousand")
print(thousand_encoded)

# Decode the encoded result of "thousand"
print(encoding.decode([400])) # 'th'
print(encoding.decode([29910])) # 'ousand'

[32, 7002, 286, 257, 7319, 4608, 6140, 351, 257, 2060, 2239, 13]
A journey of a thousand miles begins with a single step.
A
journey
of
[400, 29910]
th
ousand

Predicting the Next Token​

As mentioned above, given a piece of text, the task of a language model is to predict the next Token. If expressed in Python pseudocode, it looks like this:

predictions = predict_next_token(['A', 'journey', 'of', 'a'])

Here, the predict_next_token function receives a series of input Tokens converted from a user-provided prompt. In this example, we assume each word constitutes a separate Token. In reality, each Token is encoded as a number rather than being directly passed into the model as text. The output of the function is a data structure containing the probability values for each possible Token in the vocabulary to appear after the current input sequence.

The language model needs to learn to make such predictions through a training process. During training, the model is exposed to a large amount of text data, learning language patterns and rules. After training, the model can use the learned knowledge to estimate the probability of the next Token for any given Token sequence.

To generate continuous text, the model needs to repeatedly call itself, generating a new Token each time and adding it to the existing sequence until the preset length is reached. Below is a more detailed Python pseudocode showing this process:

def generate_text(prompt, num_tokens, hyperparameters):
tokens = tokenize(prompt) # Convert prompt to a list of Tokens
for _ in range(num_tokens): # Repeat for the specified number of Tokens
predictions = predict_next_token(tokens) # Get predictions for the next Token
next_token = select_next_token(predictions, hyperparameters) # Select the next Token based on probabilities
tokens.append(next_token) # Add the selected Token to the list
return ''.join(tokens) # Merge the Token list into a string

# Helper function to select the next Token
def select_next_token(predictions, hyperparameters):
# Adjust Token selection using strategies like temperature, top-k, or top-p
# Implementation details depend on the specific hyperparameter settings
pass

In this code, the generate_text function accepts a prompt string, the number of Tokens to generate, and a set of hyperparameters as input. The tokenize function is responsible for converting the prompt into a list of Tokens, while the select_next_token function selects the next Token based on the predicted probability distribution. By adjusting the hyperparameters in select_next_token, such as temperature, top-k, and top-p, the diversity and creativity of the generated text can be controlled. As the loop iterates, new Tokens are continuously added to the sequence, eventually forming coherent text output.

Model Training​

Imagine we are training a model to predict the next word in a sentence. This is like playing a word-guessing game where the model needs to guess the next word based on the words already present. For a simplified vocabulary, let's assume there are only five words:

['I', 'you', 'love', 'oranges', 'grapes']

We do not consider spaces and punctuation, focusing only on these words.

We have three sentences as training data:

  • I love oranges
  • I love grapes
  • you love oranges

We can imagine a 5x5 table where each cell represents the number of times one word follows another. This table might look like this:
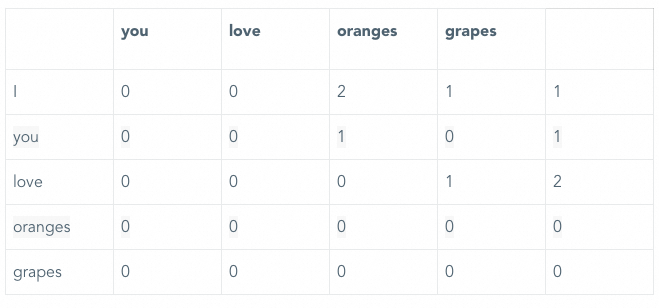
Cell Matrix

In this example, "I" is followed by "love" twice, and "love" is followed by "oranges" once and "grapes" twice. To make this table useful, we need to convert these counts into probabilities so that the model can predict the likelihood of the next word. For example, the probability of "oranges" following "love" is 1/3 (about 33.3%), and the probability of "grapes" following "love" is 2/3 (about 66.7%).

However, we encounter a problem: "oranges" and "grapes" do not appear after other words. This means that without additional information, the model will not be able to predict what might follow these words. To solve this problem, we can assume that any word in the vocabulary might follow any other word, although this is not perfect, it ensures that the model can make predictions even with limited training data.

In the real world, large language models (LLMs) use vast amounts of training data, reducing the chances of such "gaps" occurring. However, due to the infrequent occurrence of certain word combinations in the training data, LLMs may perform poorly in some cases, resulting in generated text that is grammatically correct but logically flawed or inconsistent. This phenomenon is sometimes referred to as "model hallucination."

Context Window​

In previous discussions, we mentioned using Markov chains to train small models, which rely on only the last Token to predict the next Token. This means that any text before the last Token does not affect the prediction, so the context window is very small, only one Token. Due to the small context window, the model easily "forgets" previous information, leading to generated text that lacks consistency, jumping from one word to another.

Improving the Context Window​

To improve the model's prediction quality, we can try to increase the size of the context window. For example, if we use a two-Token context window, we need to build a larger probability matrix where each row represents all possible two-Token sequences. For a five-Token vocabulary, this will add 25 rows (5^2). Each time the predict_next_token() function is called, the last two Tokens of the input will be used to find the corresponding row in the probability table.

However, even with a two-Token context window, the generated text may still lack coherence. To generate more consistent and meaningful text, the context window size needs to be further increased. For example, increasing the context window to three Tokens will increase the number of rows in the probability table to 125 (5^3), but this is still insufficient to generate high-quality text.

As the context window increases, the size of the probability table grows exponentially. Taking the GPT-2 model as an example, it uses a 1024-Token context window. If we were to implement such a large context window using Markov chains as in the previous example, each row of the probability table would need to represent a sequence of length between 1 and 1024 Tokens. For a vocabulary of 5 Tokens, the number of possible sequences is 5^1024, an astronomical number. This number is so large that it is impractical to store and process such a massive probability table. Therefore, Markov chains face serious scalability issues when dealing with large context windows.

From Markov Chains to Neural Networks​

Clearly, the probability table method is infeasible when dealing with large context windows. We need a more efficient method to predict the next Token. This is where neural networks come into play. Neural networks are special functions that accept input data, perform a series of calculations, and then output predictions. For language models, the input is a series of Tokens, and the output is the probability distribution of the next Token.

The key to neural networks lies in their parameters. These parameters are gradually adjusted during training to optimize the model's prediction performance. The training process involves extensive mathematical operations, including forward propagation and backpropagation. Forward propagation refers to the input data passing through the network's layers to generate predictions; backpropagation adjusts the network's parameters based on the difference between the predictions and the true labels to reduce errors.

Modern language models, such as GPT-2, GPT-3, and GPT-4, use very deep neural networks with hundreds of millions or even trillions of parameters. The training process for these models is very complex and usually takes weeks or even months. Despite this, well-trained LLMs maintain high coherence and consistency in text generation, thanks to their powerful context understanding and generation capabilities.

Transformer and Attention Mechanism​

The Transformer is one of the most popular neural network architectures, particularly suited for natural language processing tasks. The core feature of the Transformer model is its attention mechanism. The attention mechanism allows the model to dynamically focus on different parts of the input sequence when processing it, thereby better capturing context information.

The attention mechanism was initially applied to machine translation tasks to help the model identify key information in the input sequence. Through the attention mechanism, the model can "focus" on important Tokens in the input sequence, thereby generating more accurate translation results. In language generation tasks, the attention mechanism plays an equally important role, enabling the model to consider multiple Tokens in the context window when generating the next Token, thereby generating more coherent and meaningful text.

In summary, although Markov chains provide a simple method for text generation, they have obvious limitations when dealing with large context windows. Modern language models overcome these limitations by using neural networks and attention mechanisms, achieving efficient and high-quality text generation.
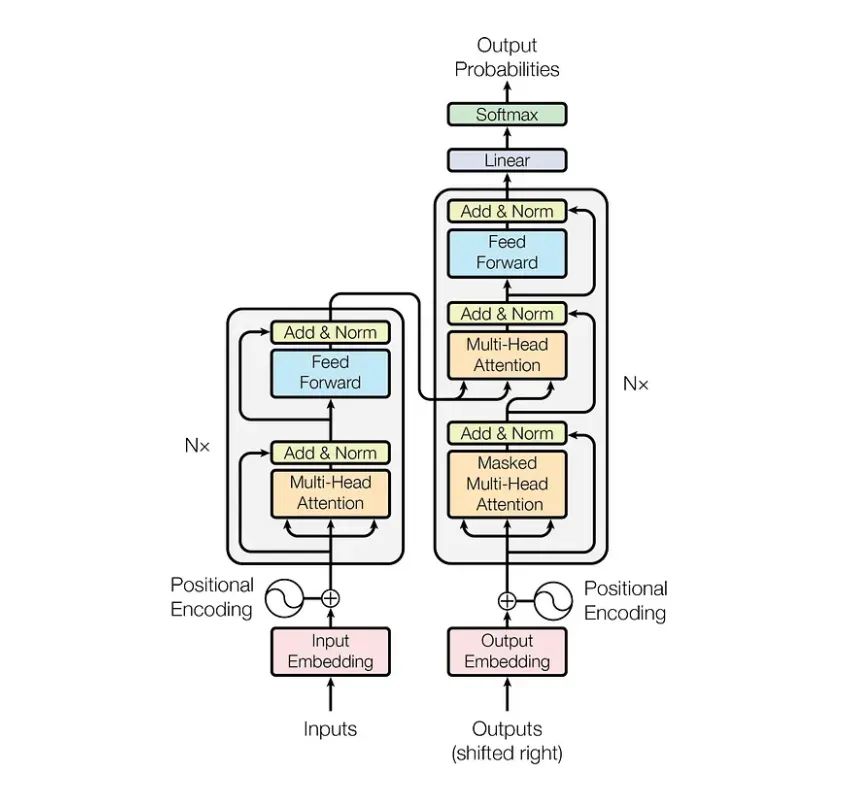
Framework-05

Returning to the framework diagram, the input representation x of a word in the Transformer is obtained by adding the word Embedding and the position Embedding (Positional Encoding).

There are many ways to obtain the word Embedding, such as using pre-trained algorithms like Word2Vec, Glove, or training it in the Transformer.

In addition to the word Embedding, the Transformer also uses position Embedding to represent the position of a word in the sentence. Because the Transformer does not use an RNN structure but uses global information, it cannot utilize the order information of words, which is very important for NLP. Therefore, the Transformer uses position Embedding to preserve the relative or absolute position of words in the sequence.

In short: taking "apple" as an example

In "There are apples and bananas in the fruit store," "apple" refers to the fruit, while in "The store has just launched the latest Apple 16," "apple" represents the brand.

Self-Attention (Self-Attention Mechanism)​

Self Attention

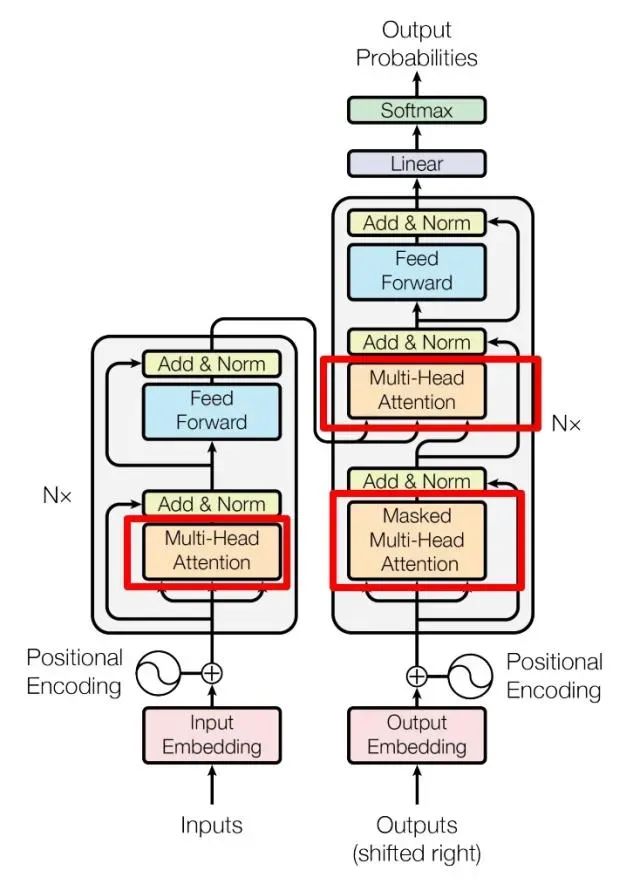
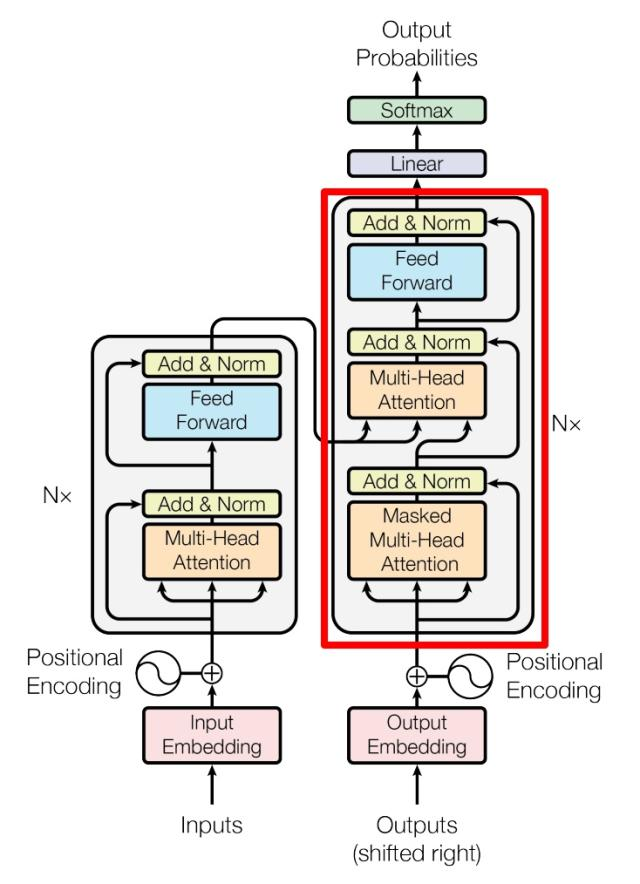
The above image is the internal structure diagram of the Transformer in the paper, with the left side being the Encoder block and the right side being the Decoder block. The part circled in red is Multi-Head Attention, which consists of multiple Self-Attention layers. It can be seen that the Encoder block contains one Multi-Head Attention, while the Decoder block contains two Multi-Head Attention (one of which uses Masked). Above the Multi-Head Attention is an Add & Norm layer, where Add represents a residual connection (Residual Connection) to prevent network degradation, and Norm represents Layer Normalization to normalize the activation values of each layer.

Since Self-Attention is the key point of the Transformer, we focus on Multi-Head Attention and Self-Attention. First, let's take a detailed look at the internal logic of Self-Attention.

Of course, we can understand the Self-Attention mechanism in a more concise way.

Self-Attention Introduction​

Self-Attention is a method that allows the model to focus on different parts of the sequence data when processing it, especially suitable for handling long texts. It achieves this by calculating the relevance between each element in the sequence and all other elements.

Workflow​

  1. Transformation:

    • Each input element (such as a word) is transformed into three vectors: Query (query), Key (key), and Value (value). These vectors are obtained by multiplying the input vector by three different weight matrices WQ, WK, and WV.
  2. Calculate Attention Scores:

    • For each element, use its Query vector to perform dot product operations with the Key vectors of all other elements, obtaining a list of scores. This score represents the relevance of the current element to all other elements.
  3. Normalization:

    • Normalize these scores through the softmax function to obtain a probability distribution, representing the attention weights of the current element to all other elements.
  4. Weighted Sum:

    • Use these attention weights to perform a weighted sum of the Value vectors of all elements, obtaining the final output vector.

Formula​

Suppose the input sequence is X = [x1, x2, ..., xn], where each xi is a vector.

  1. Transformation:

Transformation

  1. Calculate Attention Scores:

Calculate Attention

where dk is the dimension of the Key vector.

  1. Normalization: Attention Weights = softmax(Scores)

  2. Weighted Sum: Output = Attention Weights · V

Multi-Head Attention​

  • Multi-Head Attention is designed to allow the model to capture information from multiple different perspectives. Specifically, multiple Self-Attention layers (each called a "head") are run in parallel, and then all heads' outputs are concatenated and passed through a linear transformation.

Summary​

  • Self-Attention allows the model to focus on different parts of the sequence, thereby better capturing long-range dependencies.
  • Multi-Head Attention enhances the model's expressive power by using multiple Self-Attention layers, allowing it to consider information from multiple perspectives.

Add & Norm and Feed Forward​

Add & Norm (Residual Connection and Layer Normalization)​

Residual Connection​

  • Purpose: The residual connection helps in training deep networks by allowing the gradient to flow directly through the network, mitigating the vanishing gradient problem.
  • Operation: The residual connection adds the input of a layer directly to its output: [ \text{Output} = F(x) + x ] where ( F(x) ) is the output of the layer.

Layer Normalization​

  • Purpose: Layer normalization stabilizes the training process by normalizing the activations of each layer, ensuring that the mean and variance of the activations remain consistent.
  • Operation: For each sample in the batch, layer normalization normalizes the activations across the feature dimension: [ \text{LayerNorm}(x) = \frac{x - \mu}{\sigma} \cdot \gamma + \beta ] where ( \mu ) and ( \sigma ) are the mean and standard deviation of the activations, and ( \gamma ) and ( \beta ) are learnable parameters.

Combined Use​

  • Steps:

    1. First, calculate the output ( F(x) ) of a layer.
    2. Add the input ( x ) to ( F(x) ), obtaining ( y = F(x) + x ).
    3. Perform layer normalization on ( y ) to obtain the final output.

Feed Forward Neural Network​

Purpose​

  • Add Nonlinearity: Makes the model more flexible, capable of handling more complex data.

Structure​

  • Two-Layer Fully Connected Network:

    1. The first layer: Transform the input through a linear transformation (multiply by a matrix), then process it with the ReLU activation function.
    2. The second layer: Transform it again through a linear transformation (multiply by another matrix).

Summary​

  • Add & Norm: Through residual connections and layer normalization, the model becomes more stable and trains faster.
  • Feed Forward: Through a two-layer fully connected network, it adds flexibility to the model, enabling it to handle more complex data.

Decoder Structure​

Decoder Structure

The red part in the above image is the structure of the Transformer's Decoder block, similar to the Encoder block but with some differences:

  • Contains two Multi-Head Attention layers.
  • The first Multi-Head Attention layer uses a Masked operation.
  • The second Multi-Head Attention layer's K, V matrices use the Encoder's encoded information matrix C for calculation, while Q uses the output of the previous Decoder block for calculation.
  • Finally, a Softmax layer calculates the probability of the next translated word.

Appendix​

# Import necessary libraries
import torch
import torch.nn as nn
import torch.optim as optim
import math

# Define the positional encoding layer, used to add positional information to the input sequence
class PositionalEncoding(nn.Module):
def __init__(self, d_model, max_len=5000):
super(PositionalEncoding, self).__init__()
# Initialize the positional encoding tensor
pe = torch.zeros(max_len, d_model)
position = torch.arange(0, max_len, dtype=torch.float).unsqueeze(1)
div_term = torch.exp(torch.arange(0, d_model, 2).float() * (-math.log(10000.0) / d_model))
# Calculate the sine and cosine values
pe[:, 0::2] = torch.sin(position * div_term)
pe[:, 1::2] = torch.cos(position * div_term)
pe = pe.unsqueeze(0).transpose(0, 1)
# Register the positional encoding as a buffer
self.register_buffer('pe', pe)

def forward(self, x):
# Add the positional encoding to the input
x = x + self.pe[:x.size(0), :]
return x

# Define the Transformer-based model class
class TransformerModel(nn.Module):
def __init__(self, input_dim, output_dim, d_model=512, nhead=8, num_encoder_layers=6, dim_feedforward=2048, dropout=0.1):
super(TransformerModel, self).__init__()
self.model_type = 'Transformer'
# Define the embedding layer
self.embedding = nn.Embedding(input_dim, d_model)
# Define the positional encoding layer
self.pos_encoder = PositionalEncoding(d_model)
# Define the encoder layers
encoder_layers = nn.TransformerEncoderLayer(d_model, nhead, dim_feedforward, dropout)
self.transformer_encoder = nn.TransformerEncoder(encoder_layers, num_encoder_layers)
self.d_model = d_model
# Define the decoder layer
self.decoder = nn.Linear(d_model, output_dim)
# Initialize the weights
self.init_weights()

def init_weights(self):
initrange = 0.1
self.embedding.weight.data.uniform_(-initrange, initrange)
self.decoder.bias.data.zero_()
self.decoder.weight.data.uniform_(-initrange, initrange)

def forward(self, src, src_mask):
# Embed the input and multiply by the square root of d_model
src = self.embedding(src) * math.sqrt(self.d_model)
src = self.pos_encoder(src)
# Encode the input
output = self.transformer_encoder(src, src_mask)
# Decode the output
output = self.decoder(output)
return output

# Generate a triangular matrix as a mask
def generate_square_subsequent_mask(sz):
mask = (torch.triu(torch.ones(sz, sz)) == 1).transpose(0, 1)
mask = mask.float().masked_fill(mask == 0, float('-inf')).masked_fill(mask == 1, float(0.0))
return mask

# Example usage
input_dim = 1000 # Vocabulary size
output_dim = 1000 # Output dimension
seq_length = 10 # Sequence length

# Create a model instance
model = TransformerModel(input_dim=input_dim, output_dim=output_dim)

# Example data
src = torch.randint(0, input_dim, (seq_length, 32)) # (sequence length, batch size)
src_mask = generate_square_subsequent_mask(seq_length)

# Forward propagation
output = model(src, src_mask)
print(output.shape) # Expected output: [sequence length, batch size, output dimension]

# Define a simple loss function and optimizer for training
criterion = nn.CrossEntropyLoss()
optimizer = optim.Adam(model.parameters(), lr=0.001)

# Example training loop
for epoch in range(10): # Number of iterations
optimizer.zero_grad()
output = model(src, src_mask)
loss = criterion(output.view(-1, output_dim), src.view(-1))
loss.backward()
optimizer.step()
print(f"Epoch {epoch+1}, Loss: {loss.item()}")