跳到主要内容

10 篇博文 含有标签「keycloak」

查看所有标签

Inside the WhereQ Universe: One Identity, Many Apps, Open APIs

· 阅读需 7 分钟

The WhereQ Universe is not a single product — it is a living ecosystem of independent applications that share one identity layer, one set of engineering conventions, and an increasingly open set of APIs. This post walks through how the pieces fit together: why authentication lives in a single place, how the apps expose data to customers, and where LLM agents and MCP fit into the picture.

Deep Dive into Keycloak II

· 阅读需 5 分钟

Answer:​

OAuth2 is an authorization framework — it gives applications access to protected resources via access tokens. OIDC is an authentication layer built on top of OAuth2 — it provides identity information by adding ID tokens, user info endpoint, and standardized flows.

You use OAuth2 when an app needs permissions You use OIDC when an app needs login + identity.


2. How does Keycloak handle session management compared to stateless JWT systems?

Answer:​

Keycloak maintains a server-side session for each authenticated user. Even though it issues JWTs, it “peeks” into the token’s session ID to enforce logout and token invalidation. This means:

  • Keycloak can force logout of any user
  • Admin can revoke access tokens instantly
  • Tokens are short-lived; refresh tokens renew them

Stateless JWT-only systems cannot revoke tokens without additional infrastructure.


3. What’s the purpose of a Keycloak Realm?

Answer:​

A Realm is an isolated authentication domain. Each realm has:

  • its own clients
  • identity providers
  • users
  • roles
  • token settings

Realms do not share users. This isolates tenants for multi-tenant apps.


4. Explain the OAuth2 Authorization Code Flow with PKCE.

Answer:​

Used by public clients (SPA, mobile). Steps:

  1. Client generates a code verifier and challenge
  2. User is redirected to Keycloak login
  3. After successful login, Keycloak returns an authorization code
  4. Client exchanges the code for tokens including the code verifier
  5. Keycloak recomputes the challenge to verify request integrity

PKCE prevents code interception attacks.


5. What Keycloak feature would you use for Single Sign-On across multiple apps?

Answer:​

SSO session + OIDC Authorization Code Flow. Apps use the same Keycloak realm; once the user is logged into one app, Keycloak issues tokens to others without re-authentication.


6. How do you configure role-based access control in Keycloak?

Answer:​

  • Create realm roles or client roles
  • Map roles to users or groups
  • Configure clients to include roles in tokens (scope + mappers)
  • Your service enforces authorization based on the roles claim in JWT

7. What is the difference between Realm Roles and Client Roles?

Answer:​

  • Realm roles are global across the entire realm
  • Client roles belong to a specific client (service)

Client roles prevent namespace collisions and support service-specific authorization.


8. How do you secure a Spring Boot REST API using Keycloak?

Answer:​

For Spring Security 6 / Boot 3:

  1. Use the OAuth2 Resource Server starter
  2. Configure issuer-uri pointed to Keycloak realm
  3. Enable JWT validation
  4. Add authorization rules based on roles in JWT

Resource server verifies tokens by fetching Keycloak’s public keys (JWKS).


9. What are Keycloak Identity Providers?

Answer:​

Identity Providers allow Keycloak to delegate login to external systems like:

  • Google
  • GitHub
  • Azure AD
  • Another Keycloak realm

Keycloak becomes an identity broker.


10. How does token revocation work in Keycloak?

Answer:​

Keycloak stores sessions server-side. When an admin revokes tokens or logs a user out:

  • Active tokens become invalid
  • Refresh token rotation prevents re-use
  • Next request with old token fails with 401

This is a major advantage over purely stateless JWT systems.


11. What is Offline Session and Offline Token?

Answer:​

Offline tokens are long-lived refresh tokens not tied to active user sessions. Useful for background jobs or CLI tools. Users do not need to stay logged in.


12. How do you integrate Keycloak with an API Gateway (e.g., Kong, Nginx, Spring Cloud Gateway)?

Answer:​

Use the gateway as an OAuth2 resource server. It:

  • validates JWTs from Keycloak
  • checks scopes/roles
  • forwards authorized requests to microservices
  • optionally strips sensitive headers

Microservices behind the gateway become stateless and do not validate tokens directly.


13. What is the Keycloak Admin API used for?

Answer:​

Automating user and client management:

  • create/update users
  • reset passwords
  • assign roles
  • manage groups
  • manage clients
  • trigger impersonation

Often used in CI/CD or multi-tenant systems.


14. How would you scale Keycloak for production?

Answer:​

  • Run multiple Keycloak nodes behind a load balancer
  • Use a shared database (PostgreSQL recommended)
  • Use sticky sessions only if needed (usually not needed post-Keycloak 17+)
  • Enable cross-node session cache with Infinispan
  • Offload static content via reverse proxy

Keycloak 21+ with Quarkus has much lower memory footprint and better clustering.


15. What are the common pitfalls when integrating SPAs (React) with Keycloak?

Answer:​

  1. Storing tokens insecurely (never use localStorage → use memory with silent refresh).
  2. Using Implicit Flow (deprecated).
  3. Not handling token refresh properly.
  4. Not using PKCE.
  5. Not validating roles on backend.

Best practice: React = public client using Authorization Code + PKCE.


16. How do service-to-service calls work with Keycloak?

Answer:​

Use Client Credentials Flow:

  • No user involved
  • The client authenticates with client secret
  • Keycloak returns an access token
  • Service uses token to call downstream service

This is machine-to-machine authentication.


17. What’s the difference between Access Token and ID Token?

Answer:​

  • Access token = permissions for APIs (authorization)
  • ID token = identity info about the user (authentication)

APIs should ignore ID tokens.


18. How do you restrict which scopes a client may request?

Answer:​

Use Client Scopes:

  • Default client scopes
  • Optional client scopes
  • Protocol mappers to include additional claims
  • Scope parameter to control token content

This prevents over-privileged tokens.


19. What is the Keycloak Token Exchange?

Answer:​

Allows exchanging one token for another. Use cases:

  • service-to-service delegation
  • switching realms
  • getting a token for another client
  • impersonation workflows

Powerful in microservice architectures.


20. How do you debug token validation issues?

Steps to answer:​

  1. Decode token using JWT.io
  2. Verify issuer (iss) matches realm
  3. Confirm audience (aud) includes client ID
  4. Check signature using JWKS
  5. Check token expiration
  6. Check scope/roles included

Most validation failures come from misconfigured issuer-uri or missing mappers.

Keyclock Revocation Mechanism

· 阅读需 4 分钟

⭐ Senior-Level Answer​

Keycloak maintains a server-side Session Store (in-memory or distributed depending on the cluster). This enables Keycloak to centrally track active user sessions including:

  • Each login session
  • Access tokens issued
  • Refresh tokens issued
  • Client sessions
  • Offline sessions
  • Device-specific sessions

When a user logs out or an admin revokes access, Keycloak performs:​

1. Session invalidation in the Session Store​

Keycloak marks the user session as invalid inside its central session map:

session_id -> state = INVALID

This invalidation immediately affects:

  • All clients (web apps, mobile apps, services)
  • All sessions (browser, mobile, REST clients)
  • All tokens linked to the session

This is because all tokens in Keycloak are tied to a Keycloak session ID (sid claim).


2. Refresh Token Blacklist / revocation​

Keycloak stores refresh tokens in a server-side token store (unlike fully stateless JWT systems).

When the user logs out:

  • All refresh tokens belonging to the session are invalidated.
  • Any refresh request with those tokens is rejected.

This blocks all new access tokens across all devices.


3. Token Introspection (for OAuth2 Introspection clients)​

If a client uses token_introspection:

/protocol/openid-connect/token/introspect

Keycloak will return:

"active": false

as soon as the session is invalidated.

This enables immediate revocation for “online” services.


4. Realm-wide or client-side Revocation Events​

Keycloak issues revocation events when:

  • Admin revokes all sessions
  • Client is removed
  • Roles or permissions change
  • User is disabled

Clients using Keycloak Adapters (Tomcat, Spring, Node, Quarkus) receive the event and invalidate local caches of tokens.


⭐ Why Keycloak Can Do This (Technical Reason)

Because Keycloak is NOT fully stateless. It manages a stateful authentication session, and tokens reference that session.

Therefore, revocation propagates instantly and globally.


🔥 Q2 — Why can’t typical stateless JWT systems revoke access as effectively?

⭐ Senior-Level Answer​

A typical stateless JWT architecture uses self-contained JWTs:

  • Token verification is done by services locally via public key.
  • Services do not contact the authorization server again after token issuance.

This means:

❌ Once a JWT is issued, it cannot be revoked until it expires​

Unless you add non-standard extensions.

❌ No central session store​

There is nowhere to mark a session as invalid.

❌ No refresh token blacklist​

Unless implemented manually with a database or Redis.

❌ No push revocation events to API clients​

(Standard OAuth2 libraries don’t have this built in.)


💥 Final summary:​

Keycloak (stateful + centralized session model)​

✔ Server-side session invalidation ✔ Refresh token revocation ✔ Token introspection ✔ Push revocation events to adapters ✔ Offline session management ✔ Works across multiple devices, browsers, apps ✔ Suitable for enterprise SSO

Common JWT-only stateless systems​

❌ No central session ❌ Cannot revoke tokens already issued ❌ Must wait until token expiration ❌ Must manually implement token blacklist ❌ Cannot force logout across multiple clients

This difference is fundamental to why enterprises choose Keycloak.


🔥 Q3 — How does Keycloak ensure cluster-wide revocation in HA mode?

⭐ Senior-Level Answer​

Keycloak in cluster mode (Infinispan or newer methods) shares:

  • User sessions
  • Client sessions
  • Offline sessions
  • Login failure counters
  • Revocation timestamps

All nodes listen to Infinispan cache events.

So when one node invalidates a session:

cluster-broadcast:
event = session-revocation
sid = 7ab3...

Every node immediately removes the session from its local cache.

This ensures revocation is cluster-wide and instantaneous.


🔥 Q4 — How does Keycloak reduce the JWT statelessness problem?

⭐ Keycloak issues stateless JWT access tokens but:​

1. They have short TTL (5–15 minutes recommended) So compromise window is small.

2. They are always tied to a session (sid claim).

3. They can be introspected by resource servers if required.

Keycloak combines:

  • Stateless JWT access tokens (performance)
  • Stateful refresh token & session management (security)

This hybrid model is why Keycloak works well for enterprise.


🔥 Q5 — How to architect revocation-sensitive microservices with Keycloak?

⭐ Best practice​

Token TypeRecommended Use
Access Token (JWT)Short TTL (2–10 min), stateless verification
Refresh TokenManaged by Keycloak; revocation effective
Token IntrospectionOnly for zero-trust or sensitive APIs
Keycloak AdaptersTo receive push revocation events

Your services should not store long-lived sessions themselves. Let Keycloak handle that.

Beat Practices of Keycloak Production Configuration

· 阅读需 6 分钟

1. Hostname Configuration in keycloak.conf​

The hostname setting in keycloak.conf is mandatory for production deployments if Keycloak needs to generate URLs (e.g., for redirects, emails, or tokens). This ensures that Keycloak uses the correct public-facing URL (e.g., www.keytomarvel.com) instead of the internal server address.

  • Why is it important?

    • Keycloak uses the hostname to construct URLs for redirects, emails, and tokens.
    • If not set, Keycloak might generate URLs using the internal server IP or hostname, which won’t work for external clients.
  • Example Configuration:

    hostname=www.keytomarvel.com

2. Proxy Configuration in keycloak.conf​

Since NGINX is handling HTTPS termination, you need to configure Keycloak to trust the proxy. This is done using the proxy setting.

  • proxy=edge Configuration:

    proxy=edge
    • proxy=edge: Use this when NGINX terminates HTTPS and forwards requests to Keycloak over HTTP.
    • If NGINX forwards requests over HTTPS to Keycloak, use proxy=reencrypt.
  • Why is it important?

    • Keycloak needs to know it’s behind a proxy to correctly handle headers like X-Forwarded-For and X-Forwarded-Proto.
  • Trust the X-Forwarded-* headers from the reverse proxy:

    proxy-headers=xforwarded
    • proxy=edge: Tells Keycloak it is behind a reverse proxy.
    • proxy-headers=xforwarded: Trusts the X-Forwarded-* headers from Nginx.
  • Update the CSP:

    Update the CSP in your keycloak.conf file to allow framing over HTTPS:

    # Content Security Policy configuration
    spi-events-listener=csp
    spi-events-listener-csp-policy-directives=frame-src 'self' https://www.keytomarvel.com
    • frame-src 'self' https://www.keytomarvel.com: Allows framing for the Keycloak admin console over HTTPS.

The complete keycloak.conf​

db=postgres
db-username=username
db-password=password
db-url=jdbc:postgresql://192.168.2.128:5432/k2m

# Hostname for the Keycloak server. IS MANDATORY FOR PROD!!!
hostname=www.keytomarvel.com

# The proxy address forwarding mode if the server is behind a reverse proxy.
proxy=edge

# Content Security Policy configuration
spi-events-listener=csp
spi-events-listener-csp-policy-directives=frame-src 'self' https://www.keytomarvel.com
#
# Trust the X-Forwarded-* headers from the reverse proxy
proxy-headers=xforwarded

quarkus.hibernate-orm.persistence-xml.ignore=true

3. docker-compose for PROD​

networks:
database:
external: true

services:
keycloak:
build:
context: .
dockerfile: Dockerfile
environment:
KEYCLOAK_ADMIN: admin
KEYCLOAK_ADMIN_PASSWORD: admin
KC_HTTP_ENABLED: 'true'
KC_HTTP_PORT: 8080
KC_LOG: console,file
KC_LOG_LEVEL: DEBUG
KC_LOG_FILE: /opt/keycloak/data/log/keycloak.log
volumes:
- ./volumes/keycloak/conf:/opt/keycloak/conf
- ./volumes/keycloak/log:/opt/keycloak/data/log
- ./volumes/keycloak/providers:/opt/keycloak/providers
- ./volumes/keycloak/themes:/opt/keycloak/themes
networks:
- database
ports:
- 8888:8080
command:
- start

4. NGINX Configuration​

Here’s an example NGINX configuration for routing traffic to Keycloak:

NGINX Configuration Example​

--- /etc/nginx/site-available/keytomarvel.com

server {
root /var/www/html;

index index.html index.htm index.nginx-debian.html;

server_name keytomarvel.com www.keytomarvel.com;

location / {
# Proxy requests to the Keycloak application running on port 8888
proxy_pass http://localhost:8888;
proxy_set_header Host $host;
proxy_set_header X-Real-IP $remote_addr;
proxy_set_header X-Forwarded-For $proxy_add_x_forwarded_for;
proxy_set_header X-Forwarded-Proto $scheme;
proxy_set_header X-Forwarded-Host $host;
proxy_set_header X-Forwarded-Port $server_port;
}

listen [::]:443 ssl ipv6only=on; # managed by Certbot
listen 443 ssl; # managed by Certbot
ssl_certificate /etc/letsencrypt/live/keytomarvel.com/fullchain.pem; # managed by Certbot
ssl_certificate_key /etc/letsencrypt/live/keytomarvel.com/privkey.pem; # managed by Certbot
include /etc/letsencrypt/options-ssl-nginx.conf; # managed by Certbot
ssl_dhparam /etc/letsencrypt/ssl-dhparams.pem; # managed by Certbot
}

server {
if ($host = www.keytomarvel.com) {
return 301 https://$host$request_uri;
} # managed by Certbot

if ($host = keytomarvel.com) {
return 301 https://$host$request_uri;
} # managed by Certbot

listen 80 default_server;
listen [::]:80 default_server;

server_name keytomarvel.com www.keytomarvel.com;
return 404; # managed by Certbot
}
  • Key Points:
    • NGINX terminates HTTPS and forwards requests to Keycloak over HTTP.
    • The proxy_set_header directives ensure Keycloak receives the correct client IP and protocol information.
    • Ensure Nginx Passes Correct Headers
      • proxy_set_header X-Forwarded-Proto $scheme;: Tells Keycloak that the original request was HTTPS.
      • proxy_set_header X-Forwarded-Host $host;: Passes the original hostname to Keycloak.
      • proxy_set_header X-Forwarded-Port $server_port;: Passes the original port to Keycloak.

5. Additional Production Considerations​

Here are some additional settings and best practices for a production deployment:

a. Database Connection Pooling​

Ensure the database connection pool is configured for production workloads:

db-pool-initial-size=10
db-pool-max-size=100

b. Caching​

Enable distributed caching for high availability:

cache=ispn
cache-stack=kubernetes # or 'tcp' for non-Kubernetes environments

c. Health Checks and Metrics​

Enable health checks and metrics for monitoring:

health-enabled=true
metrics-enabled=true

d. Token and Session Timeouts​

Adjust token and session timeouts for security and usability:

token-lifespan=3600 # Access token lifespan (1 hour)
refresh-token-lifespan=86400 # Refresh token lifespan (24 hours)
session-max-lifespan=86400 # Maximum session lifespan (24 hours)
session-idle-timeout=1800 # Session idle timeout (30 minutes)

e. Logging​

Configure logging for production:

log-level=INFO
log-console-output=json
log-file=/var/log/keycloak/keycloak.log

f. Email Configuration​

Set up email for password resets and notifications:

smtp-host=smtp.example.com
smtp-port=587
smtp-username=user@example.com
smtp-password=changeit
smtp-from=keycloak@example.com
smtp-ssl=false
smtp-starttls=true

g. Security Headers​

Ensure NGINX adds security headers:

add_header Strict-Transport-Security "max-age=31536000; includeSubDomains" always;
add_header X-Content-Type-Options "nosniff" always;
add_header X-Frame-Options "SAMEORIGIN" always;
add_header X-XSS-Protection "1; mode=block" always;

6. Full keycloak.conf for Production​

Here’s a complete keycloak.conf tailored for your setup:

# Keycloak Production Configuration
# Database Configuration
db=postgres
db-url=jdbc:postgresql://localhost:5432/keycloak
db-username=username
db-password=password
db-pool-initial-size=10
db-pool-max-size=100

# HTTP and HTTPS Configuration
http-enabled=true
http-port=8080
hostname=www.keytomarvel.com
proxy=edge

# Cache Configuration
cache=ispn
cache-stack=kubernetes # or 'tcp' for non-Kubernetes environments

# Logging Configuration
log-level=INFO
log-console-output=json
log-file=/var/log/keycloak/keycloak.log

# Health and Metrics
health-enabled=true
metrics-enabled=true

# Token and Session Configuration
token-lifespan=3600
refresh-token-lifespan=86400
session-max-lifespan=86400
session-idle-timeout=1800

# Email Configuration
smtp-host=smtp.example.com
smtp-port=587
smtp-username=user@example.com
smtp-password=changeit
smtp-from=keycloak@example.com
smtp-ssl=false
smtp-starttls=true

7. Deployment Checklist​

  1. Set hostname: Ensure hostname is set to the public-facing URL (www.keytomarvel.com).
  2. Configure NGINX: Terminate HTTPS at NGINX and forward requests to Keycloak over HTTP.
  3. Enable Proxy Mode: Set proxy=edge in keycloak.conf.
  4. Database Tuning: Configure connection pooling and ensure the database is optimized.
  5. Caching: Enable distributed caching for high availability.
  6. Monitoring: Enable health checks and metrics.
  7. Security: Add security headers in NGINX and ensure tokens/sessions are securely configured.

Customizing Keycloak Themes with Keycloakify: A Modern Approach

· 阅读需 4 分钟

Keycloak is a powerful Open Source Identity and Access Management (IAM) solution widely adopted by organizations and companies. However, customizing its theme can be challenging due to limited documentation and the use of FreeMarker, an older templating technology that lacks modern developer-friendly features. Enter Keycloakify, a one-stop solution for customizing Keycloak themes using modern web technologies like React, TypeScript, Tailwind CSS, and Vite. This article explores how Keycloakify simplifies Keycloak theme customization and why it’s the best choice for developers looking to modernize their Keycloak UI.


Why Customize Keycloak Themes?​

Keycloak is highly customizable, but its default UI may not align with your organization's branding or design requirements. Customizing the theme allows you to:

  • Add your logo and branding elements.
  • Align the UI with your application’s design system.
  • Improve user experience with modern, responsive designs.
  • Add custom functionality or workflows.

However, Keycloak’s reliance on FreeMarker for theming makes customization cumbersome. FreeMarker lacks the flexibility and developer experience offered by modern front-end frameworks like React.


What is Keycloakify?​

Keycloakify is a toolchain designed to simplify Keycloak theme customization. It abstracts the complexities of FreeMarker and provides a modern development workflow using:

  • React: For building dynamic, component-based UIs.
  • TypeScript: For type safety and better developer experience.
  • Tailwind CSS: For utility-first, responsive styling.
  • Vite: For fast development and bundling.

Keycloakify acts as a lightweight middleware layer, allowing you to customize Keycloak’s UI while maintaining compatibility with its backend services. It supports all Keycloak theme types (Login, Registration, Account, etc.) and ensures seamless integration with the latest Keycloak versions.


Why Keycloakify is the Best Solution​

1. Modern Tech Stack​

Keycloakify replaces FreeMarker with React, enabling developers to use modern tools like Vite, Tailwind CSS, and TypeScript. This makes the development process faster, more efficient, and enjoyable.

2. Active Maintenance​

Keycloakify is actively maintained and keeps up with the latest Keycloak releases. This ensures compatibility and access to new features.

3. End-to-End Toolchain​

Keycloakify provides a complete development workflow, from local development to integration testing with Keycloak running in Docker. This eliminates the need for manual setup and reduces friction.

4. Abstraction Layer​

Keycloakify abstracts the communication between the front-end and Keycloak’s backend, ensuring that your customizations don’t break when Keycloak’s backend changes.


My Experience with Keycloakify​

I wanted to customize Keycloak to align with my organization’s branding and add new Service Providers. My tech stack included Keycloakify, Tailwind CSS, and React. Here’s how I approached the customization:

Challenges Faced​

  • PatternFly Dependency: Keycloak’s default UI components are built on PatternFly, which is not very customization-friendly.
  • Component Rewriting: I decided to rewrite Keycloak’s UI components using plain React and Tailwind CSS, modularizing them for reusability.

Work Done​

Here’s a glimpse of the before-and-after results:

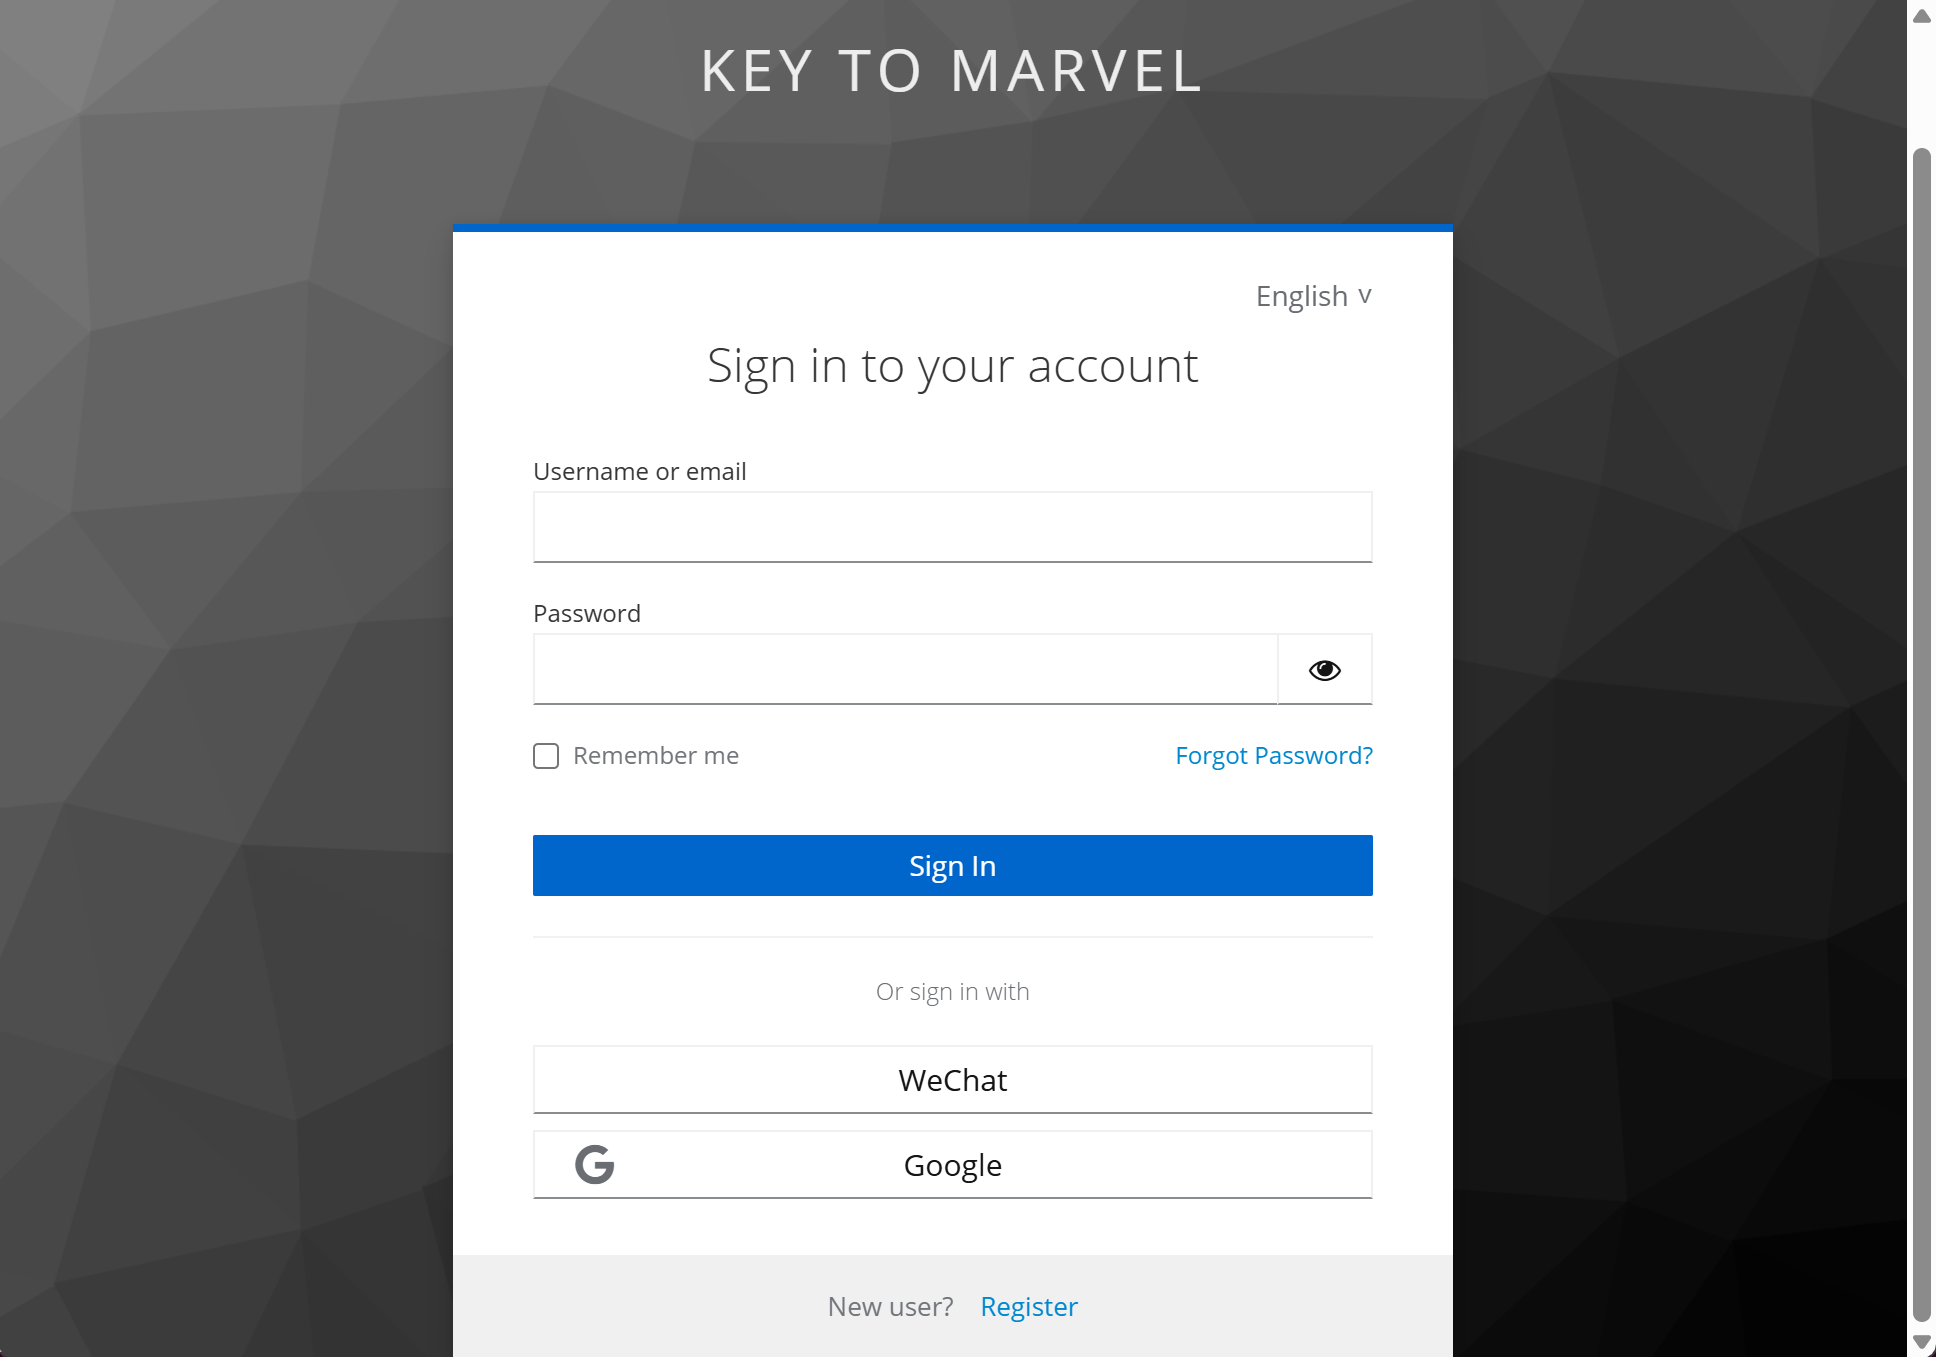
Login Page​

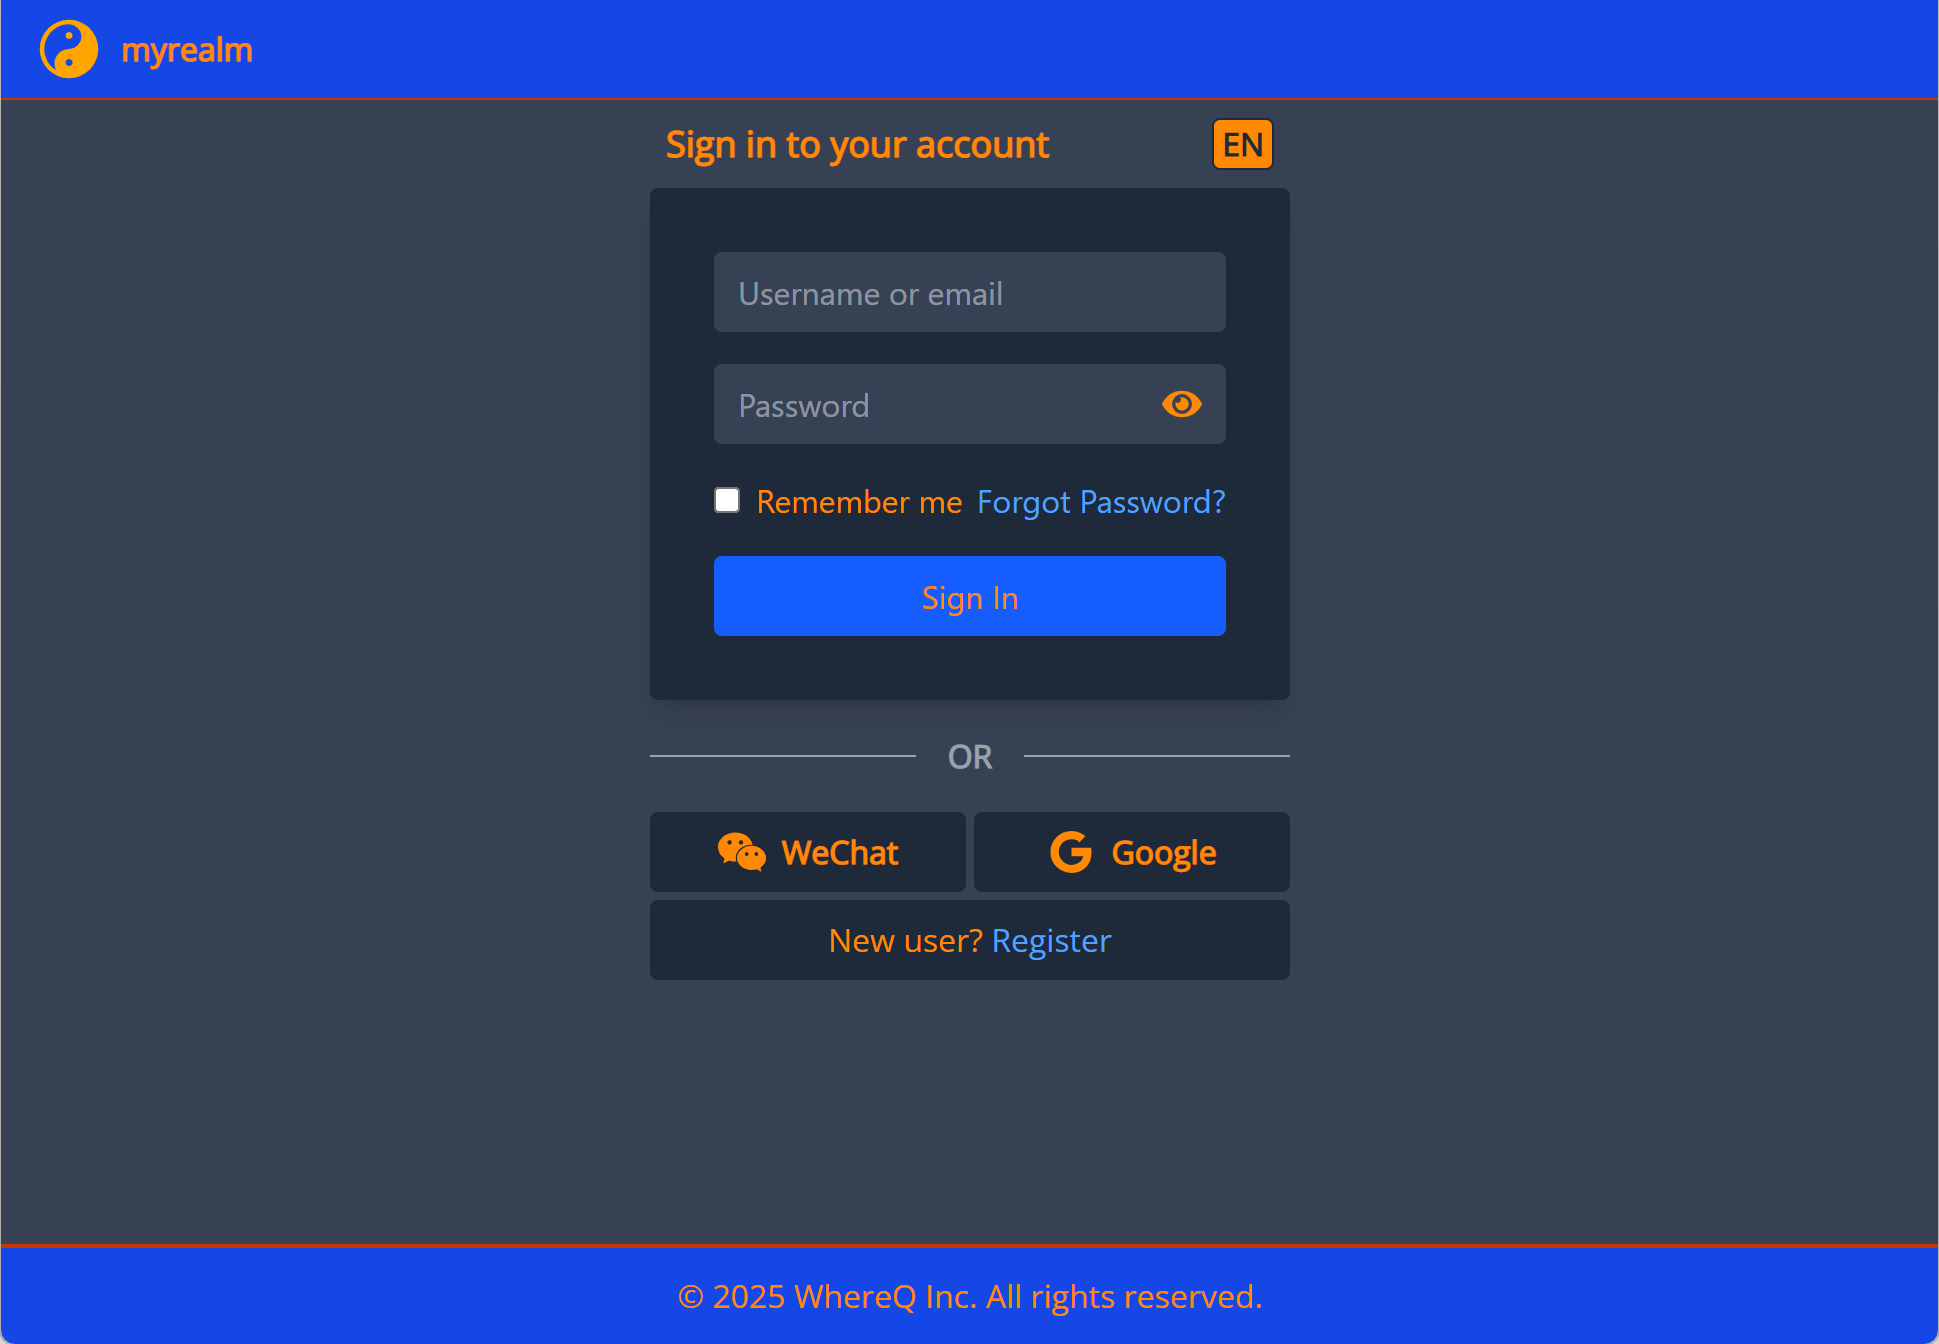
  • Before: Default Keycloak login form with PatternFly styling. Login-before

  • After: Custom login form with Tailwind CSS, aligned with our branding. Login-after

Registration Page​

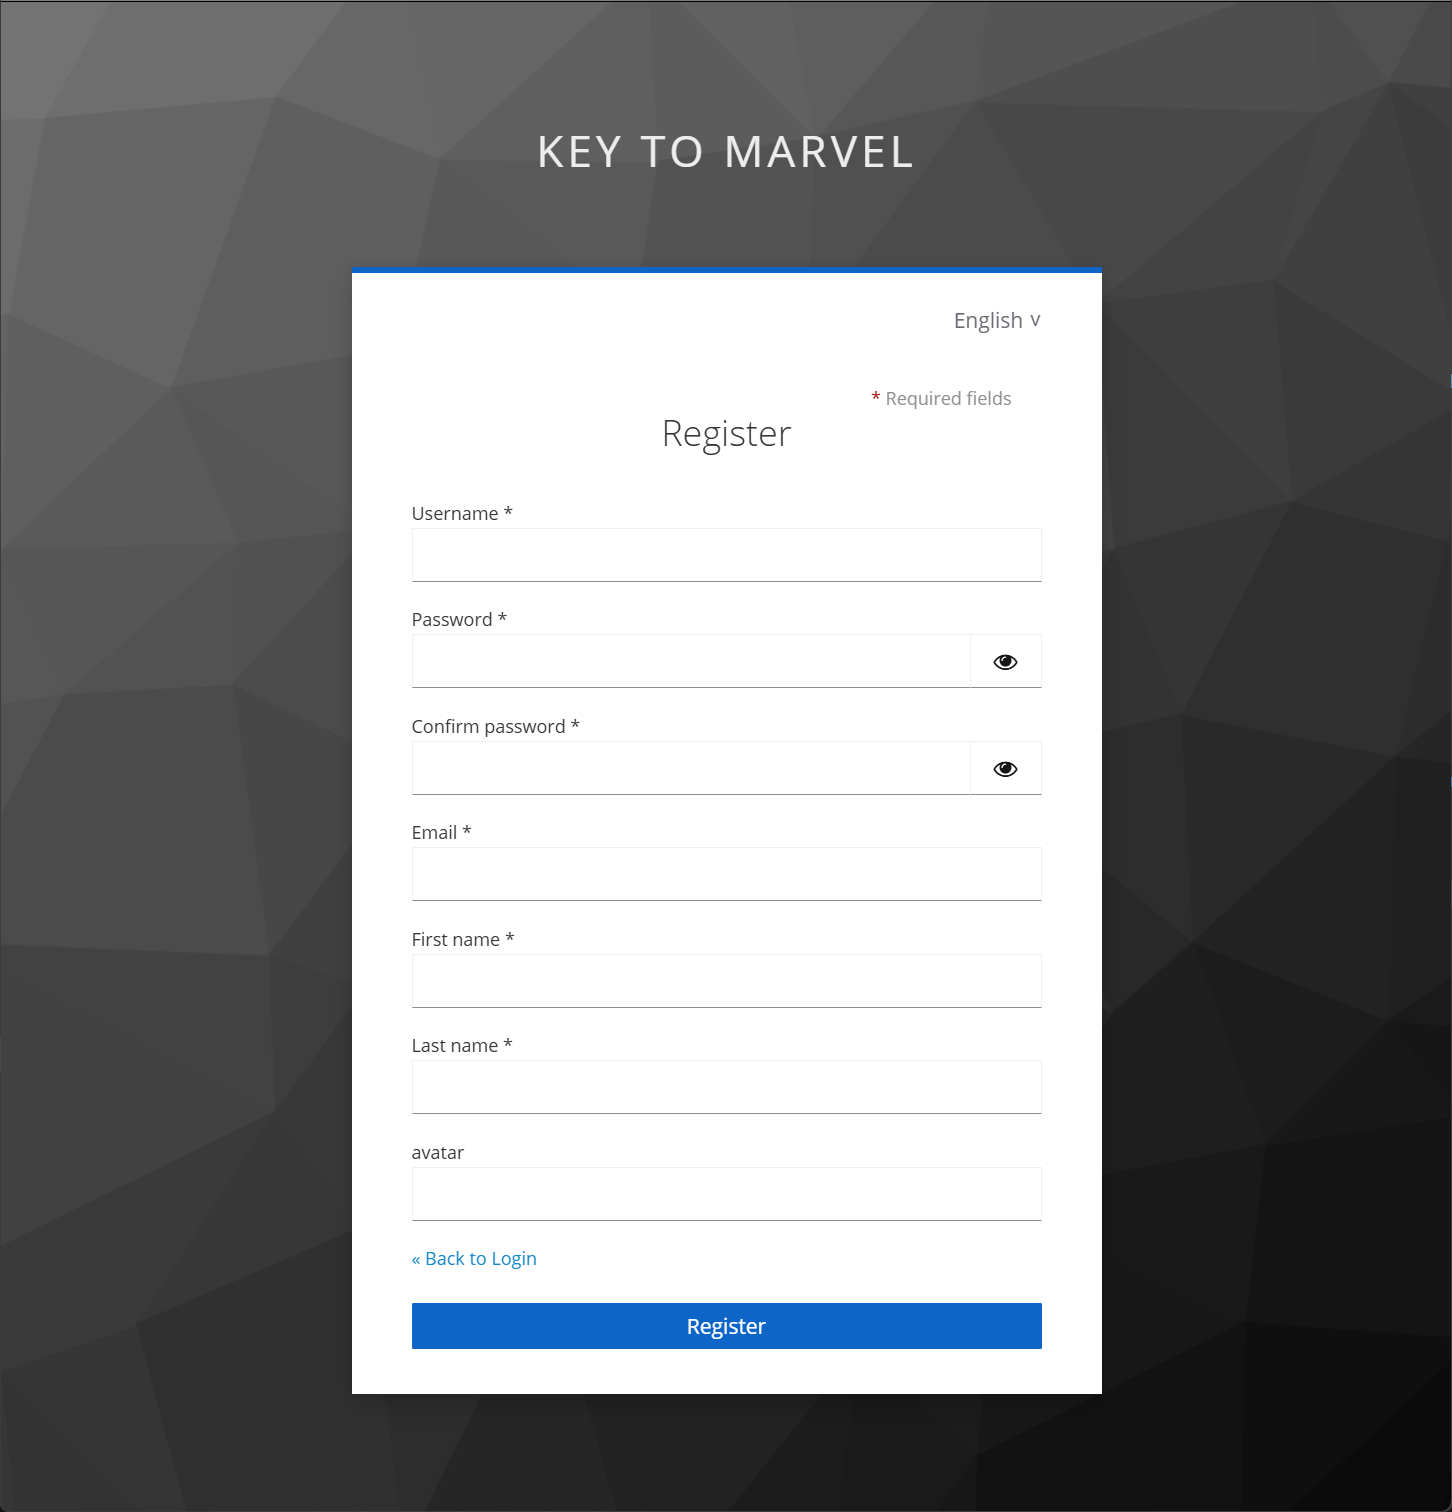
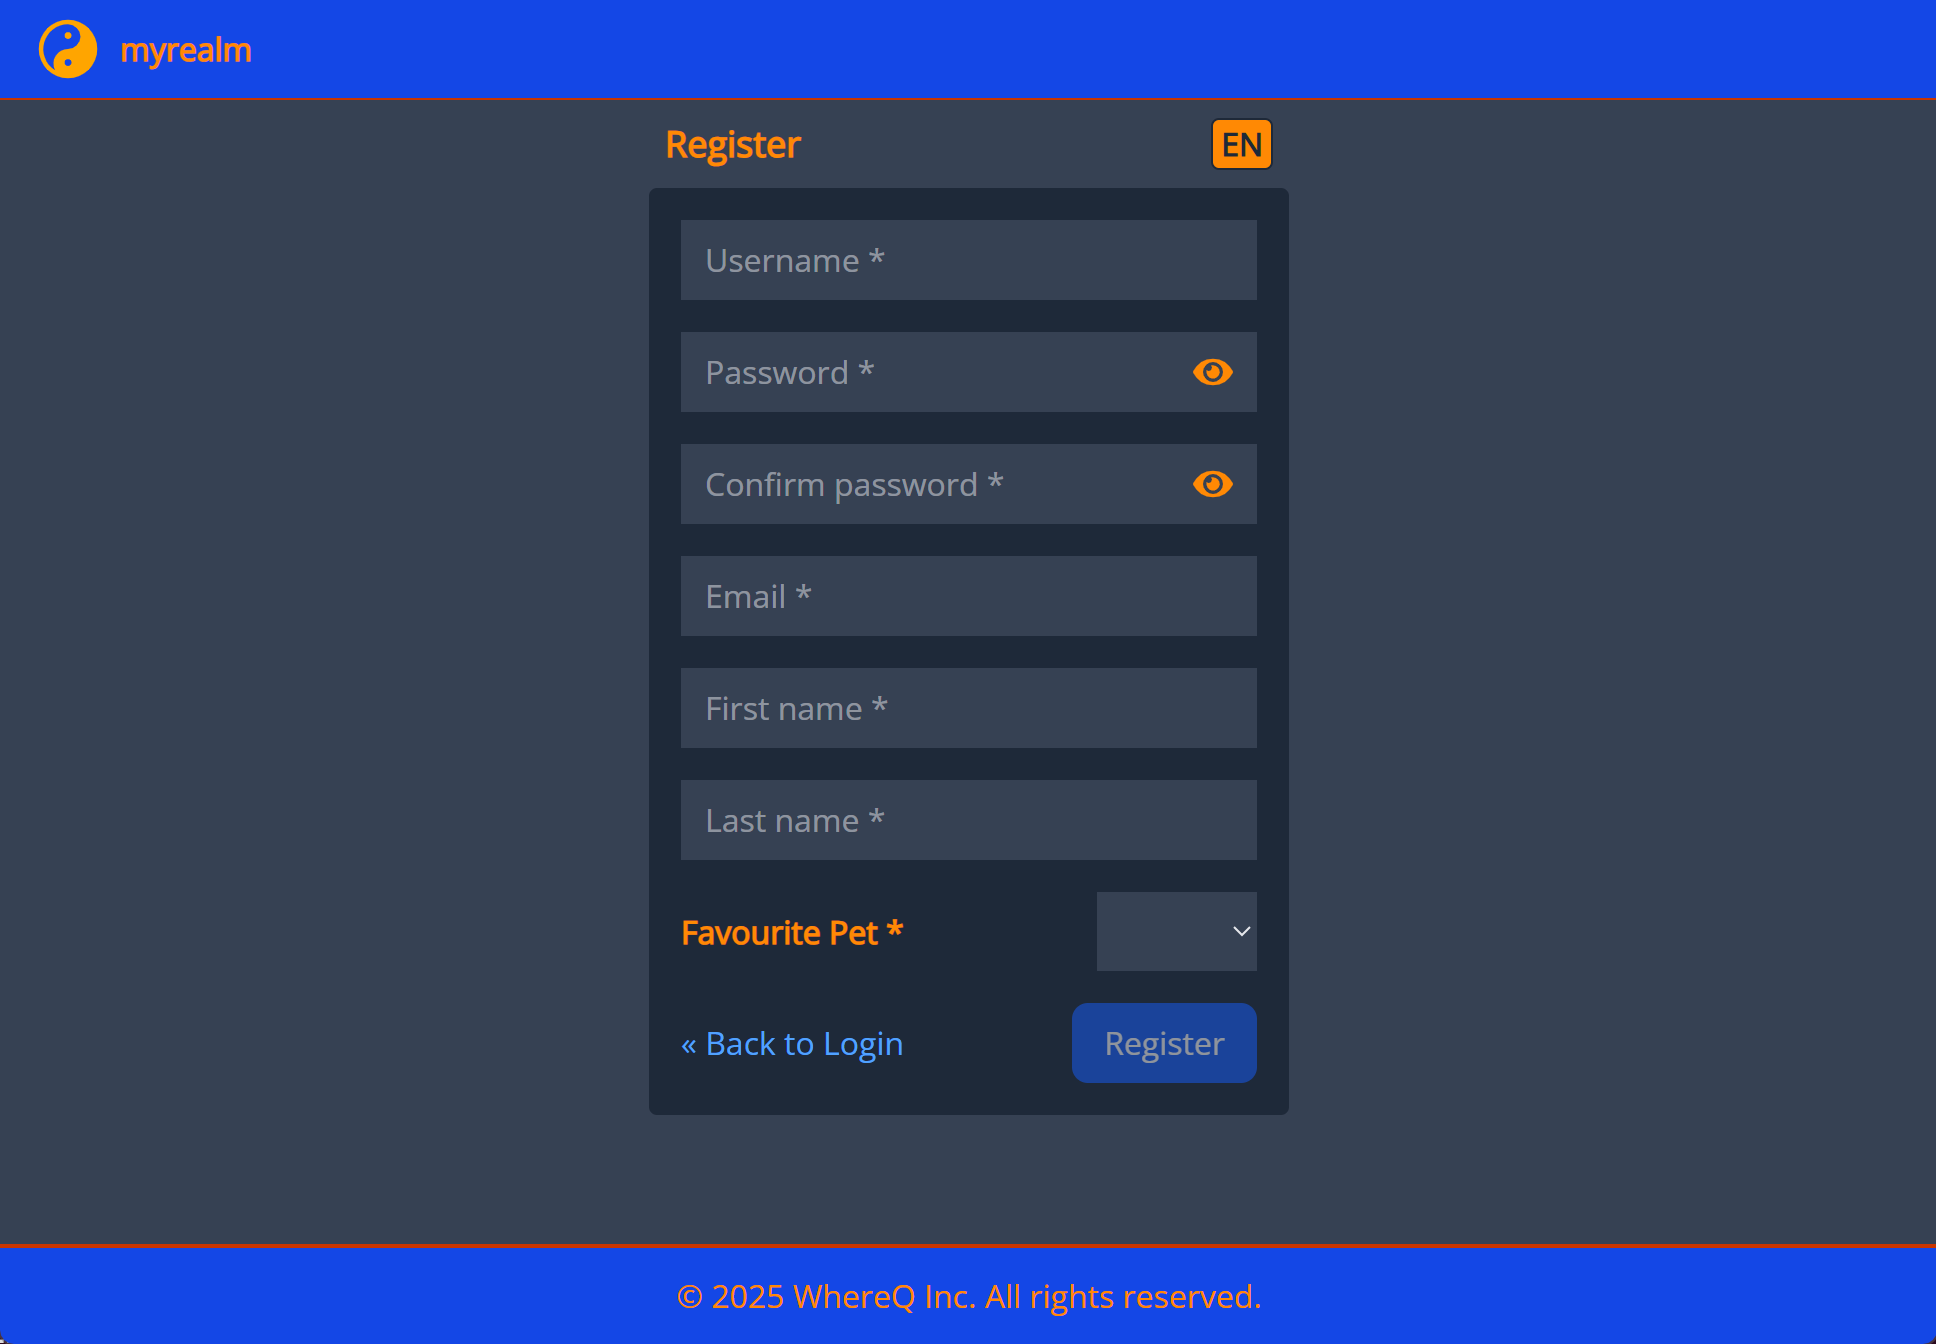
  • Before: Standard Keycloak registration form. Register-before
  • After: Modern, responsive registration form with custom fields and styling. Register-before

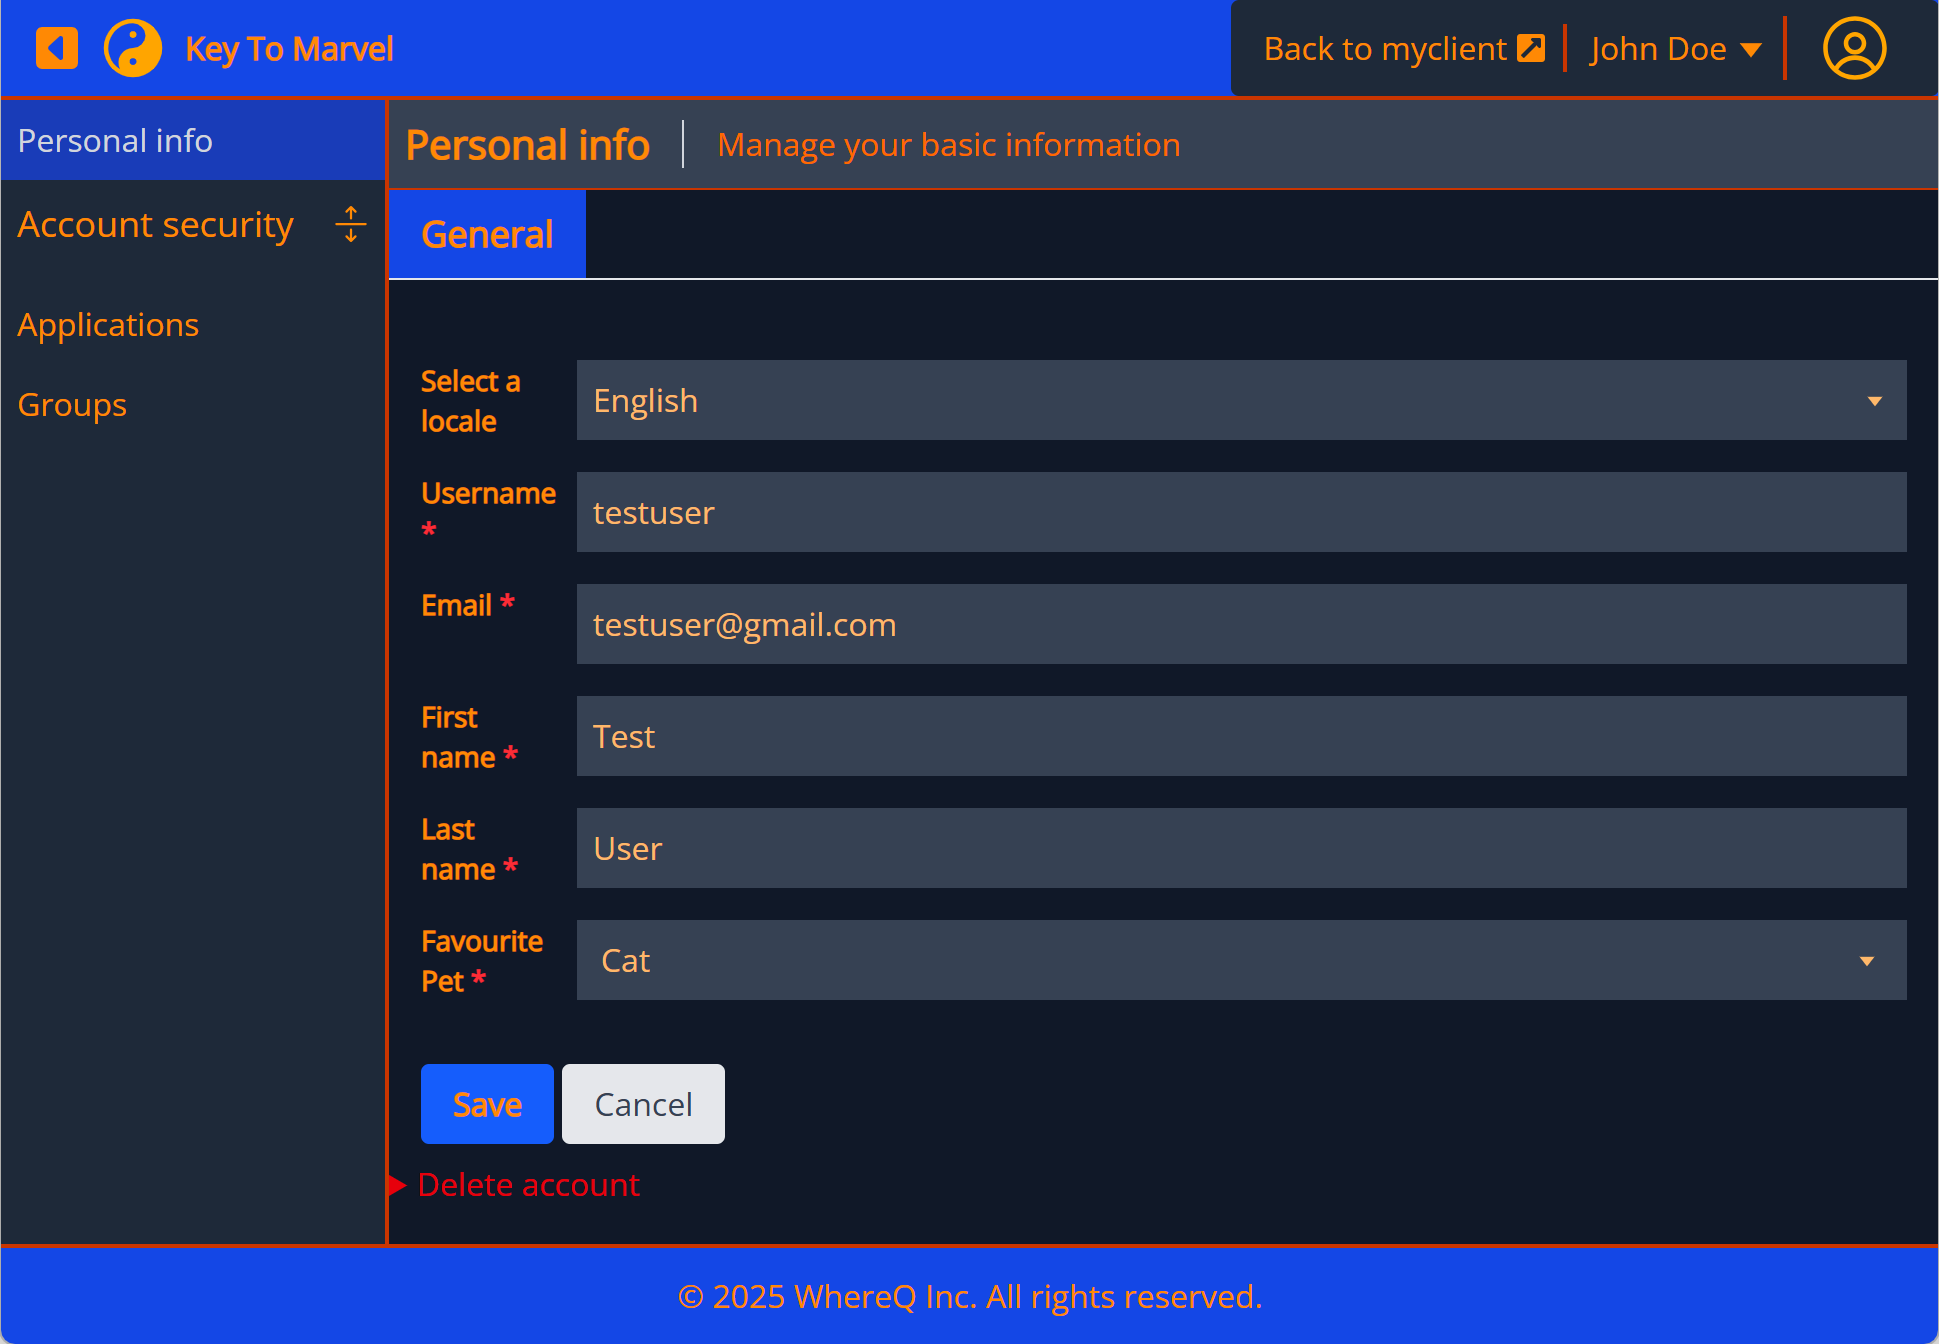
Account (User Profile) Page​

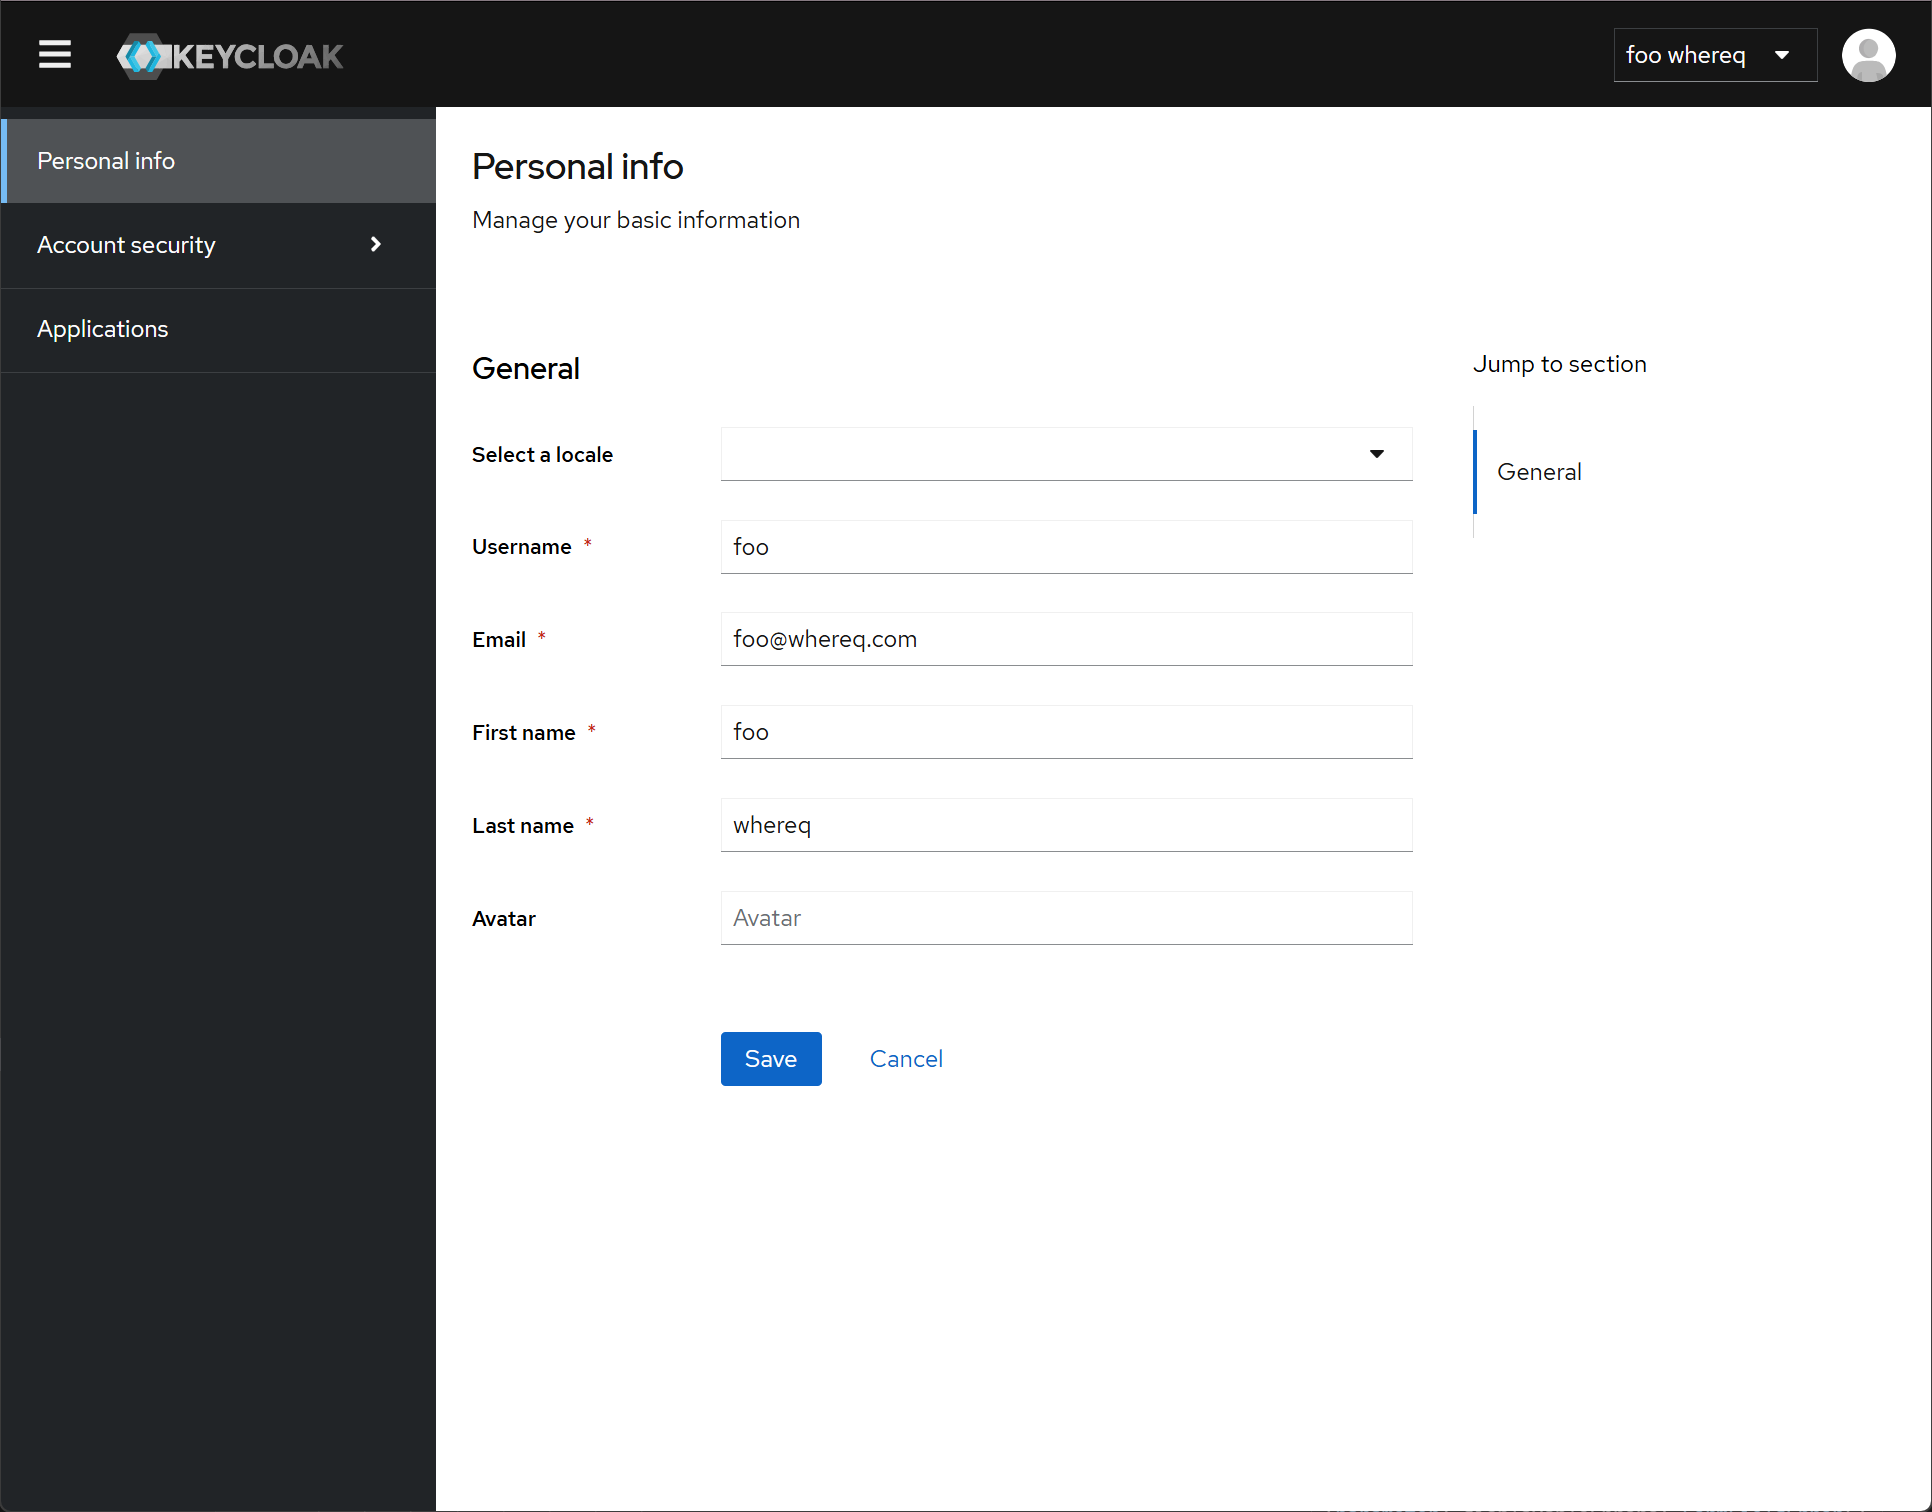
  • Before: Basic user profile interface. Account User Profile-before
  • After: Enhanced profile page with improved UX and branding. Account User Profile-after

Why Not Build a Custom Front-End from Scratch?​

While it’s technically possible to build a custom front-end and communicate with Keycloak via its RESTful API, this approach has significant drawbacks:

  1. Lack of Documentation: Keycloak’s front-end fields and requirements are not well-documented. You’d need to reverse-engineer the UI or inspect the runtime to understand the required fields.
  2. Dynamic Requirements: Keycloak’s backend can dynamically change the required fields (e.g., switching between username and email for login). A hardcoded front-end would break if these requirements change.
  3. Maintenance Overhead: Keeping a custom front-end in sync with Keycloak’s backend updates would require significant effort.

Keycloakify solves these problems by encapsulating the communication logic and providing a stable interface for customization.


References​

How the PersonalInfo Form Rendered --- KeyCloakify

· 阅读需 13 分钟

How the Form is Rendered​

  1. Component Structure:
    • The UserProfileFields component is the main entry point, receiving props like t (translation function), form (React Hook Form instance), userProfileMetadata (attribute metadata), and others.
    • It renders a ScrollForm component, which takes a sections prop to display grouped form fields.

  1. Grouping Attributes:
    • Logic: Inside UserProfileFields, groupsWithAttributes is computed using useMemo:
      • If userProfileMetadata.attributes is empty, it returns an empty array.
      • Filters attributes based on hideReadOnly (excludes read-only fields if true).
      • Groups attributes by their group property, including an "ungrouped" category ({ name: undefined }) for attributes without a group.
      • Result: An array of GroupWithAttributes objects, each containing a group and its attributes.
    • Outcome: Only groups with attributes are rendered (filtered by .filter((group) => group.attributes.length > 0)).

  1. Rendering Sections:
    • ScrollForm: The ScrollForm component receives sections, where each section is an object with:
      • title: Derived from group.displayHeader or group.name, falling back to t("general").
      • panel: A <div className="space-y-4"> containing:
        • Optional group description (<p> with pb-6 text-gray-700) if group.displayDescription exists.
        • A list of FormField components, one per attribute in the group.
    • Rendering: ScrollForm likely renders these sections as collapsible or navigable panels (exact behavior depends on ScrollForm implementation, not shown here).

  1. FormField Rendering:
    • Logic: The FormField component determines how each attribute is rendered:
      • Special Case: If attribute.name === "locale", it renders a LocaleSelector.
      • General Case: Otherwise, it selects a component from FIELDS based on inputType:
        • inputType is computed by determineInputType (see below).
        • If attribute.multivalued or the value is multi-valued (isMultiValue), it defaults to MultiInputComponent.
        • Otherwise, it uses the mapped component from FIELDS (e.g., TextComponent for "text", SelectComponent for "select").
    • Component Props: Each FIELDS component receives t, form, inputType, attribute, and renderer.
    • Outcome: Each attribute is rendered as a form field (e.g., text input, select dropdown) based on its metadata.

  1. Field Types:
    • Mapping: The FIELDS object maps InputType to components:
      • "text", "html5-*" → TextComponent.
      • "textarea" → TextAreaComponent.
      • "select", "multiselect" → SelectComponent.
      • "select-radiobuttons", "multiselect-checkboxes" → OptionComponent.
      • "multi-input" → MultiInputComponent.
    • Dynamic Selection: determineInputType checks:
      • Root attributes (username, firstName, etc.) → "text".
      • attribute.annotations?.inputType if valid (e.g., "select", "textarea").
      • Default: "text".

  1. Visual Layout:
    • TailwindCSS: <div className="space-y-4"> adds vertical spacing between fields; <p className="pb-6 text-gray-700"> styles group descriptions.
    • Result: A scrollable form with sections, each containing a group title, optional description, and a list of input fields.

1. Form Rendering​

The UserProfileFields component is responsible for rendering the form. Here's how it works:

Step 1: Group Attributes​

  • The userProfileMetadata object contains metadata about the user profile, including attributes and groups.
  • The groupsWithAttributes array is created by grouping attributes based on their group property. If an attribute doesn't belong to any group, it's placed in a default group.
const groupsWithAttributes = useMemo(() => {
if (!userProfileMetadata.attributes) {
return [];
}

const attributes = hideReadOnly
? userProfileMetadata.attributes.filter(({ readOnly }) => !readOnly)
: userProfileMetadata.attributes;

return [
{ name: undefined }, // Default group for attributes without a group
...(userProfileMetadata.groups ?? []),
].map<GroupWithAttributes>((group) => ({
group,
attributes: attributes.filter(
(attribute) => attribute.group === group.name,
),
}));
}, [hideReadOnly, userProfileMetadata.groups, userProfileMetadata.attributes]);

Step 2: Render the Form​

  • The ScrollForm component is used to render the form sections. Each section corresponds to a group of attributes.
  • For each group, the title is derived from the group's displayHeader or a fallback (e.g., "general").
  • The panel contains the form fields for the group's attributes.
return (
<ScrollForm
label={t("jumpToSection")}
sections={groupsWithAttributes
.filter((group) => group.attributes.length > 0)
.map(({ group, attributes }) => ({
title: label(t, group.displayHeader, group.name) || t("general"),
panel: (
<div className="space-y-4">
{group.displayDescription && (
<p className="pb-6 text-gray-700">
{label(t, group.displayDescription, "")}
</p>
)}
{attributes.map((attribute) => (
<FormField
key={attribute.name}
t={t}
form={form}
supportedLocales={supportedLocales}
currentLocale={currentLocale}
renderer={renderer}
attribute={attribute}
/>
))}
</div>
),
}))}
/>
);

How Field Values are Populated​

  1. Form State:
    • Source: The form prop is a UseFormReturn<UserFormFields> from React Hook Form, managing the form state.
    • Type: UserFormFields (from utils.ts) includes user properties (e.g., username, email) and an attributes object or array for custom fields.

  1. Value Retrieval:
    • Logic: In FormField, form.watch(fieldName(attribute.name)) retrieves the current value of each field:
      • fieldName (from utils.ts) transforms the attribute name:
        • Root attributes (username, firstName, etc.) → direct property (e.g., "username").
        • Custom attributes → prefixed with "attributes." and dots replaced with "🍺" (e.g., "attributes.my.field" → "attributes.my🍺field").
      • Result: value reflects the current form state for that attribute (e.g., "john.doe" for username, ["option1"] for a multivalued field).

  1. Initial Population:
    • Not Shown: The initial values aren’t set in this file. They’re likely passed to form via useForm({ defaultValues }) in a parent component (e.g., a user profile editor).
    • Assumption: defaultValues would match UserFormFields, populated from a UserRepresentation object (e.g., { username: "john.doe", attributes: { "custom.field": "value" } }).

  1. Dynamic Behavior:
    • Watching Values: form.watch ensures the rendered component reflects real-time updates (e.g., user typing in a TextComponent).
    • Multi-Valued Check: isMultiValue(value) determines if the value is an array with multiple items, influencing the choice of MultiInputComponent.

  1. Component Role:
    • Field Components: Each FIELDS component (e.g., TextComponent) uses form to register its input (via register, control, etc., not shown here) and display the value.
    • Example: For TextComponent, it might render <input {...form.register(fieldName(attribute.name))} value={value} />.

2. Field Rendering and Value Population​

The FormField component is responsible for rendering individual form fields and populating their values. Here's how it works:

Step 1: Determine the Input Type​

  • The inputType is determined based on the attribute's metadata. For example, if the attribute is multivalued, the multi-input type is used.
  • The determineInputType function checks the attribute's annotations.inputType or falls back to a default type (text).
const inputType = useMemo(() => determineInputType(attribute), [attribute]);

const determineInputType = (attribute: UserProfileAttributeMetadata): InputType => {
if (isRootAttribute(attribute.name)) {
return "text";
}

const inputType = attribute.annotations?.inputType;

if (isValidInputType(inputType)) {
return inputType;
}

return DEFAULT_INPUT_TYPE;
};

Step 2: Render the Field​

  • The Component variable holds the appropriate component for the field based on the inputType. For example, if the inputType is text, the TextComponent is used.
  • If the attribute is locale, the LocaleSelector component is used instead.
const Component =
attribute.multivalued ||
(isMultiValue(value) && attribute.annotations?.inputType === undefined)
? FIELDS["multi-input"]
: FIELDS[inputType];

if (attribute.name === "locale")
return (
<LocaleSelector
form={form}
supportedLocales={supportedLocales}
currentLocale={currentLocale}
t={t}
attribute={attribute}
/>
);

return (
<Component
t={t}
form={form}
inputType={inputType}
attribute={attribute}
renderer={renderer}
/>
);

Step 3: Populate Field Values​

  • The form.watch method from react-hook-form is used to watch the value of the field. This ensures that the field's value is always in sync with the form state.
  • The fieldName function generates the field name based on the attribute's name. For example, if the attribute is username, the field name is username. If the attribute is customAttribute, the field name is attributes.customAttribute.
const value = form.watch(
fieldName(attribute.name) as FieldPath<UserFormFields>,
);

3. Form State Management​

The react-hook-form library manages the form state. Here's how it works:

Step 1: Form Initialization​

  • The form object is passed down from the parent component. It contains methods like watch, setValue, and register for managing form state.

Step 2: Field Registration​

  • Each field component (e.g., TextComponent, SelectComponent) registers itself with the form using the register method. This allows react-hook-form to track the field's value and validation state.

Step 3: Value Updates​

  • When a user interacts with a field (e.g., types in a text input), the onChange event updates the form state via react-hook-form.

4. Utility Functions​

The utils.ts file contains utility functions that support form rendering and value population:

fieldName​

  • Generates the field name based on the attribute's name. For root attributes (e.g., username), the field name is the attribute name. For custom attributes, the field name is prefixed with attributes..
export const fieldName = (name?: string) =>
`${isRootAttribute(name) ? "" : "attributes."}${name?.replaceAll(
".",
"🍺",
)}` as FieldPath<UserFormFields>;

label​

  • Generates the label for a field based on the attribute's displayName or a fallback.
export const label = (
t: TFunction,
text: string | undefined,
fallback?: string,
prefix?: string,
) => {
const value = text || fallback;
const bundleKey = isBundleKey(value) ? unWrap(value!) : value;
const key = prefix ? `${prefix}.${bundleKey}` : bundleKey;
return t(key || "");
};

Summary​

  1. Form Rendering:

    • The UserProfileFields component groups attributes and renders them in sections using the ScrollForm component.
    • Each section contains fields rendered by the FormField component.
  2. Field Rendering:

    • The FormField component determines the input type and renders the appropriate field component (e.g., TextComponent, SelectComponent).
    • The LocaleSelector component is used for the locale attribute.
  3. Value Population:

    • The form.watch method from react-hook-form ensures that field values are always in sync with the form state.
    • The fieldName function generates the correct field name for each attribute.
  4. Form State Management:

    • The react-hook-form library manages the form state, including field registration, value updates, and validation.
  5. Utility Functions:

    • Functions like fieldName and label support form rendering and value population.

Reference:​

// src/keycloak-theme/shared/keycloak-ui-shared/user-profile/UserProfileFields.tsx
import {
UserProfileAttributeGroupMetadata,
UserProfileAttributeMetadata,
UserProfileMetadata,
} from "@keycloak/keycloak-admin-client/lib/defs/userProfileMetadata";
import { TFunction } from "i18next";
import { ReactNode, useMemo, type JSX } from "react";
import { FieldPath, UseFormReturn } from "react-hook-form";

import { ScrollForm } from "../scroll-form/ScrollForm";
import { LocaleSelector } from "./LocaleSelector";
import { MultiInputComponent } from "./MultiInputComponent";
import { OptionComponent } from "./OptionsComponent";
import { SelectComponent } from "./SelectComponent";
import { TextAreaComponent } from "./TextAreaComponent";
import { TextComponent } from "./TextComponent";
import { UserFormFields, fieldName, isRootAttribute, label } from "./utils";

export type UserProfileError = {
responseData: { errors?: { errorMessage: string }[] };
};

export type Options = {
options?: string[];
};

export type InputType =
| "text"
| "textarea"
| "select"
| "select-radiobuttons"
| "multiselect"
| "multiselect-checkboxes"
| "html5-email"
| "html5-tel"
| "html5-url"
| "html5-number"
| "html5-range"
| "html5-datetime-local"
| "html5-date"
| "html5-month"
| "html5-time"
| "multi-input";

export type UserProfileFieldProps = {
t: TFunction;
form: UseFormReturn<UserFormFields>;
inputType: InputType;
attribute: UserProfileAttributeMetadata;
renderer?: (attribute: UserProfileAttributeMetadata) => ReactNode;
};

export type OptionLabel = Record<string, string> | undefined;

export const FIELDS: {
[type in InputType]: (props: UserProfileFieldProps) => JSX.Element;
} = {
text: TextComponent,
textarea: TextAreaComponent,
select: SelectComponent,
"select-radiobuttons": OptionComponent,
multiselect: SelectComponent,
"multiselect-checkboxes": OptionComponent,
"html5-email": TextComponent,
"html5-tel": TextComponent,
"html5-url": TextComponent,
"html5-number": TextComponent,
"html5-range": TextComponent,
"html5-datetime-local": TextComponent,
"html5-date": TextComponent,
"html5-month": TextComponent,
"html5-time": TextComponent,
"multi-input": MultiInputComponent,
} as const;

export type UserProfileFieldsProps = {
t: TFunction;
form: UseFormReturn<UserFormFields>;
userProfileMetadata: UserProfileMetadata;
supportedLocales: string[];
currentLocale: string;
hideReadOnly?: boolean;
renderer?: (
attribute: UserProfileAttributeMetadata,
) => JSX.Element | undefined;
};

type GroupWithAttributes = {
group: UserProfileAttributeGroupMetadata;
attributes: UserProfileAttributeMetadata[];
};

export const UserProfileFields = ({
t,
form,
userProfileMetadata,
supportedLocales,
currentLocale,
hideReadOnly = false,
renderer,
}: UserProfileFieldsProps) => {
// Group attributes by group, for easier rendering.
const groupsWithAttributes = useMemo(() => {
// If there are no attributes, there is no need to group them.
if (!userProfileMetadata.attributes) {
return [];
}

// Hide read-only attributes if 'hideReadOnly' is enabled.
const attributes = hideReadOnly
? userProfileMetadata.attributes.filter(({ readOnly }) => !readOnly)
: userProfileMetadata.attributes;

return [
// Insert an empty group for attributes without a group.
{ name: undefined },
...(userProfileMetadata.groups ?? []),
].map<GroupWithAttributes>((group) => ({
group,
attributes: attributes.filter(
(attribute) => attribute.group === group.name,
),
}));
}, [
hideReadOnly,
userProfileMetadata.groups,
userProfileMetadata.attributes,
]);

if (groupsWithAttributes.length === 0) {
return null;
}

return (
<ScrollForm
label={t("jumpToSection")}
sections={groupsWithAttributes
.filter((group) => group.attributes.length > 0)
.map(({ group, attributes }) => ({
title: label(t, group.displayHeader, group.name) || t("general"),
panel: (
<div className="space-y-4"> {/* Replaced pf-v5-c-form with Tailwind CSS */}
{group.displayDescription && (
<p className="pb-6 text-gray-700"> {/* Replaced pf-v5-u-pb-lg with Tailwind CSS */}
{label(t, group.displayDescription, "")}
</p>
)}
{attributes.map((attribute) => (
<FormField
key={attribute.name}
t={t}
form={form}
supportedLocales={supportedLocales}
currentLocale={currentLocale}
renderer={renderer}
attribute={attribute}
/>
))}
</div>
),
}))}
/>
);
};

type FormFieldProps = {
t: TFunction;
form: UseFormReturn<UserFormFields>;
supportedLocales: string[];
currentLocale: string;
attribute: UserProfileAttributeMetadata;
renderer?: (
attribute: UserProfileAttributeMetadata,
) => JSX.Element | undefined;
};

const FormField = ({
t,
form,
renderer,
supportedLocales,
currentLocale,
attribute,
}: FormFieldProps) => {
const value = form.watch(
fieldName(attribute.name) as FieldPath<UserFormFields>,
);
const inputType = useMemo(() => determineInputType(attribute), [attribute]);

const Component =
attribute.multivalued ||
(isMultiValue(value) && attribute.annotations?.inputType === undefined)
? FIELDS["multi-input"]
: FIELDS[inputType];

if (attribute.name === "locale")
return (
<LocaleSelector
form={form}
supportedLocales={supportedLocales}
currentLocale={currentLocale}
t={t}
attribute={attribute}
/>
);
return (
<Component
t={t}
form={form}
inputType={inputType}
attribute={attribute}
renderer={renderer}
/>
);
};

const DEFAULT_INPUT_TYPE = "text" satisfies InputType;

function determineInputType(
attribute: UserProfileAttributeMetadata,
): InputType {
// Always treat the root attributes as a text field.
if (isRootAttribute(attribute.name)) {
return "text";
}

const inputType = attribute.annotations?.inputType;

// if we have an valid input type use that to render
if (isValidInputType(inputType)) {
return inputType;
}

// In all other cases use the default
return DEFAULT_INPUT_TYPE;
}

const isValidInputType = (value: unknown): value is InputType =>
typeof value === "string" && value in FIELDS;

const isMultiValue = (value: unknown): boolean =>
Array.isArray(value) && value.length > 1;
###

### src/keycloak-theme/shared/keycloak-ui-shared/user-profile/utils.ts
import { UserProfileAttributeMetadata } from "@keycloak/keycloak-admin-client/lib/defs/userProfileMetadata";
import UserRepresentation from "@keycloak/keycloak-admin-client/lib/defs/userRepresentation";
import { TFunction } from "i18next";
import { FieldPath } from "react-hook-form";

export type KeyValueType = { key: string; value: string };

export type UserFormFields = Omit<
UserRepresentation,
"attributes" | "userProfileMetadata"
> & {
attributes?: KeyValueType[] | Record<string, string | string[]>;
};

type FieldError = {
field: string;
errorMessage: string;
params?: string[];
};

type ErrorArray = { errors?: FieldError[] };

export type UserProfileError = {
responseData: ErrorArray | FieldError;
};

const isBundleKey = (displayName?: string) => displayName?.includes("${");
const unWrap = (key: string) => key.substring(2, key.length - 1);

export const label = (
t: TFunction,
text: string | undefined,
fallback?: string,
prefix?: string,
) => {
const value = text || fallback;
const bundleKey = isBundleKey(value) ? unWrap(value!) : value;
const key = prefix ? `${prefix}.${bundleKey}` : bundleKey;
return t(key || "");
};

export const labelAttribute = (
t: TFunction,
attribute: UserProfileAttributeMetadata,
) => label(t, attribute.displayName, attribute.name);

const ROOT_ATTRIBUTES = ["username", "firstName", "lastName", "email"];

export const isRootAttribute = (attr?: string) =>
attr && ROOT_ATTRIBUTES.includes(attr);

export const fieldName = (name?: string) =>
`${isRootAttribute(name) ? "" : "attributes."}${name?.replaceAll(
".",
"🍺",
)}` as FieldPath<UserFormFields>;

export const beerify = <T extends string>(name: T) =>
name.replaceAll(".", "🍺");

export const debeerify = <T extends string>(name: T) =>
name.replaceAll("🍺", ".");

export function setUserProfileServerError<T>(
error: UserProfileError,
setError: (field: keyof T, params: object) => void,
t: TFunction,
) {
(
((error.responseData as ErrorArray).errors !== undefined
? (error.responseData as ErrorArray).errors
: [error.responseData]) as FieldError[]
).forEach((e) => {
const params = Object.assign(
{},
e.params?.map((p) => (isBundleKey(p.toString()) ? t(unWrap(p)) : p)),
);
setError(fieldName(e.field) as keyof T, {
message: t(
isBundleKey(e.errorMessage) ? unWrap(e.errorMessage) : e.errorMessage,
{
...params,
defaultValue: e.errorMessage || e.field,
},
),
type: "server",
});
});
}

export function isRequiredAttribute({
required,
validators,
}: UserProfileAttributeMetadata): boolean {
// Check if required is true or if the validators include a validation that would make the attribute implicitly required.
return required || hasRequiredValidators(validators);
}

/**
* Checks whether the given validators include a validation that would make the attribute implicitly required.
*/
function hasRequiredValidators(
validators?: UserProfileAttributeMetadata["validators"],
): boolean {
// If we don't have any validators, the attribute is not required.
if (!validators) {
return false;
}

// If the 'length' validator is defined and has a minimal length greater than zero the attribute is implicitly required.
// We have to do a lot of defensive coding here, because we don't have type information for the validators.
if (
"length" in validators &&
"min" in validators.length &&
typeof validators.length.min === "number"
) {
return validators.length.min > 0;
}

return false;
}

export function isUserProfileError(error: unknown): error is UserProfileError {
// Check if the error is an object with a 'responseData' property.
if (
typeof error !== "object" ||
error === null ||
!("responseData" in error)
) {
return false;
}

const { responseData } = error;

if (isFieldError(responseData)) {
return true;
}

// Check if 'responseData' is an object with an 'errors' property that is an array.
if (
typeof responseData !== "object" ||
responseData === null ||
!("errors" in responseData) ||
!Array.isArray(responseData.errors)
) {
return false;
}

// Check if all errors are field errors.
return responseData.errors.every(isFieldError);
}

function isFieldError(error: unknown): error is FieldError {
// Check if the error is an object.
if (typeof error !== "object" || error === null) {
return false;
}

// Check if the error object has a 'field' property that is a string.
if (!("field" in error) || typeof error.field !== "string") {
return false;
}

// Check if the error object has an 'errorMessage' property that is a string.
if (!("errorMessage" in error) || typeof error.errorMessage !== "string") {
return false;
}

return true;
}
Customize kc-* css classes

· 阅读需 3 分钟

Summary of the Debugging Process, and Solutions about Customzing Template.tsx​

Customize kc-header-wrapper clss

In this case, the issue stemmed from the kc-header-wrapper class, which is part of Keycloak's original default theme (login.css). This class had predefined styles (e.g., padding, line-height, font-size, etc.) that were overriding the Tailwind CSS styles applied via inline classes in the React component. The kc- prefixed classes are part of Keycloak's default theme, and customizing them with Tailwind CSS can be challenging because Tailwind's utility classes are often overridden by these predefined styles.

Debugging Process:​

  1. Initial Observation:

    • The kc-header-wrapper was exceeding the height of its parent (kc-header), causing layout issues.
    • The h-full Tailwind class was not working as expected.
  2. Root Cause Identification:

    • The kc-header-wrapper class from Keycloak's login.css was overriding the Tailwind styles with its own padding, line-height, and other properties.
  3. Attempted Fixes:

    • Initially, Tailwind CSS classes like p-0, m-0, and h-full were used inline, but they were ineffective due to the higher specificity of the login.css styles.
    • The !important rule was considered to force override the styles.
  4. Final Solution:

    • A separate CSS file (template.css) was created to reset the problematic properties of #kc-header-wrapper using !important. This ensured that the styles from login.css were overridden.
    • The template.css file was imported into the Template.tsx component to apply the reset styles.

Final Solution Code:​

/* template.css */
#kc-header-wrapper {
padding: 0 !important;
margin: 0 !important;
line-height: normal !important;
font-size: inherit !important;
text-transform: none !important;
letter-spacing: normal !important;
white-space: normal !important;
}
{/* Header */}
<div id="kc-header" className={clsx(kcClsx("kcHeaderClass"), "bg-blue-700 border-b border-orange-700 h-[3.125rem] flex items-center px-4 fixed top-0 left-0 right-0 z-50 w-full")}>
<div id="kc-header-wrapper" className={clsx(kcClsx("kcHeaderWrapperClass"), "flex items-center h-full")}>
<img src={logoPngUrl} width={40} height={40} className="mr-2" />
{msg("loginTitleHtml", realm.displayNameHtml)}
</div>
</div>

Alternatives:​

  1. Inline Styles:

    • As a temporary debugging measure, inline styles can be used to override the login.css styles:
      <div id="kc-header-wrapper" style={{ padding: 0, margin: 0, lineHeight: "normal", fontSize: "inherit", textTransform: "none", letterSpacing: "normal", whiteSpace: "normal" }}>
      <img src={logoPngUrl} width={40} height={40} className="mr-2" />
      {msg("loginTitleHtml", realm.displayNameHtml)}
      </div>
  2. Tailwind !important Utility:

    • Tailwind CSS supports the !important utility (e.g., p-0!), but this may not always work due to specificity issues with Keycloak's default styles.
  3. Custom CSS File:

    • The most robust solution is to use a separate CSS file to reset or override the kc- prefixed classes, as shown in the final solution.

Customizing Keycloak Themes with Keycloakify and Tailwind CSS

· 阅读需 8 分钟

What is Keycloakify?​

Keycloakify is a library that simplifies the process of creating custom Keycloak themes using modern frontend tools like React and Tailwind CSS. It provides:

  • A set of utility functions (e.g., clsx, kcClsx) to combine Keycloak's default classes with custom styles.
  • Predefined classes (e.g., kcLoginClass, kcHeaderClass) to ensure compatibility with Keycloak's theming system.
  • Tools to integrate custom themes with Keycloak's login, registration, and account management pages.

Keycloakify is particularly useful for developers who want to use React and Tailwind CSS to create custom Keycloak themes without dealing with Keycloak's legacy theming system.


Keycloakify's kc* Classes​

Structure of kc* Classes​

Keycloakify provides a set of predefined classes prefixed with kc* (e.g., kcLoginClass, kcHeaderClass). These classes are designed to:

  • Ensure compatibility with Keycloak's default theming system.
  • Provide a base set of styles for common components (e.g., headers, forms, buttons).
  • Allow developers to extend or override styles using custom CSS or Tailwind CSS.

Common kc* Classes​

Here are some of the most common kc* classes provided by Keycloakify:

Class NameDescription
kcLoginClassApplied to the root container of the login page.
kcHeaderClassApplied to the header section of the login page.
kcFormCardClassApplied to the form container (e.g., login form, registration form).
kcFormHeaderClassApplied to the header of forms (e.g., "Login to Your Account").
kcFormGroupClassApplied to form groups (e.g., username/password fields).
kcAlertClassApplied to alert messages (e.g., error messages, success messages).
kcSignUpClassApplied to the footer section of the login page.

Pros and Cons of Using Keycloakify Classes​

Pros​

  1. Compatibility:

    • Keycloakify's kc* classes ensure compatibility with Keycloak's default theming system, reducing the risk of layout issues.
  2. Quick Start:

    • Using Keycloakify's default classes allows developers to quickly create custom themes without starting from scratch.
  3. Consistency:

    • The predefined classes provide a consistent structure for common components (e.g., headers, forms, buttons).
  4. Integration with Keycloak:

    • Keycloakify handles the integration between custom themes and Keycloak's theming system, simplifying the deployment process.

Cons​

  1. Styling Conflicts:

    • Keycloakify's default classes often come with predefined styles (e.g., padding, margins) that can conflict with custom Tailwind CSS styles.
  2. Complexity:

    • Combining Keycloakify's default classes with custom styles can introduce unnecessary complexity, especially when using utility-first frameworks like Tailwind CSS.
  3. Limited Flexibility:

    • Relying on Keycloakify's default classes can limit your ability to fully customize the theme, as you may need to override or work around the predefined styles.
  4. Performance Overhead:

    • Including unnecessary default styles can increase the size of your CSS bundle, impacting performance.

Cleaning Up Keycloakify Classes​

Why Clean Up Keycloakify Classes?​

Keycloakify's default classes (e.g., kcLoginClass, kcHeaderClass) are designed to ensure compatibility with Keycloak's theming system. However, they come with several drawbacks:

  1. Avoid Styling Conflicts:

    • Removing Keycloakify's default classes eliminates the risk of conflicts with custom Tailwind CSS styles.
  2. Simplify the Codebase:

    • Relying solely on Tailwind CSS makes the codebase cleaner and easier to maintain.
  3. Full Control Over Styling:

    • Using only Tailwind CSS gives you complete control over the theme's appearance and behavior.
  4. Reduce Complexity:

    • Removing unnecessary classes and functions simplifies the development process.
  5. Limited Flexibility:

    • Relying on Keycloakify's default classes limits your ability to fully customize the theme, as you may need to override or work around the predefined styles.
  6. Performance Overhead:

    • Including unnecessary default styles increases the size of your CSS bundle, impacting performance.

Steps to Clean Up Keycloakify Classes​

  1. Remove clsx and kcClsx:
    • Keycloakify provides clsx and kcClsx functions to combine its default classes with custom styles. Since we're removing the default classes, these functions are no longer needed.

Before:​

<div id="template-full" className={clsx(kcClsx("kcLoginClass"), "h-screen flex flex-col overflow-hidden")}>

After:​

<div id="template-full" className="h-screen flex flex-col overflow-hidden bg-gray-700">
  1. Replace kc* Classes with Tailwind CSS:
    • Replace all instances of clsx(kcClsx(...)) with plain Tailwind CSS classes. For example:

Before:​

<div id="kc-header" className={clsx(kcClsx("kcHeaderClass"), "bg-blue-700 border-b border-orange-700 h-[3.125rem] flex items-center px-4 fixed top-0 left-0 right-0 z-50 w-full")}>

After:​

<div id="kc-header" className="bg-blue-700 border-b border-orange-700 h-[3.125rem] flex items-center px-4 fixed top-0 left-0 right-0 z-50 w-full">
  1. Remove Unnecessary Imports:
    • Remove imports like clsx, getKcClsx, and useSetClassName since they are no longer needed.

Before:​

import { clsx } from "keycloakify/tools/clsx";
import { getKcClsx } from "keycloakify/login/lib/kcClsx";
import { useSetClassName } from "keycloakify/tools/useSetClassName";

After:​

// These imports are no longer needed
  1. Ensure Consistent Styling:
    • Use Tailwind CSS utility classes to define all styles, ensuring consistency and avoiding conflicts. For example:

Before:​

<div id="kc-header-wrapper" className={clsx(kcClsx("kcHeaderWrapperClass"), "flex items-center h-full")}>

After:​

<div id="kc-header-wrapper" className="flex items-center h-full">

Example: Fully Customized Keycloak Theme with Tailwind CSS​

Here’s an example of a fully customized Keycloak theme using only Tailwind CSS:

import { useEffect } from "react";
import { kcSanitize } from "keycloakify/lib/kcSanitize";
import type { TemplateProps } from "keycloakify/login/TemplateProps";
import { useInitialize } from "keycloakify/login/Template.useInitialize";
import type { I18n } from "./i18n";
import type { KcContext } from "./KcContext";

import "./template.css"; // Import the CSS file

import logoPngUrl from "../../assets/img/logo-s.png";

export default function Template(props: TemplateProps<KcContext, I18n>) {
const {
displayMessage = true,
displayRequiredFields = false,
headerNode,
socialProvidersNode = null,
documentTitle,
kcContext,
i18n,
children
} = props;

const { msg, msgStr, currentLanguage, enabledLanguages } = i18n;

const { realm, auth, url, message, isAppInitiatedAction } = kcContext;

useEffect(() => {
document.title = documentTitle ?? msgStr("loginTitle", kcContext.realm.displayName);
}, [documentTitle, kcContext.realm.displayName, msgStr]);

const { isReadyToRender } = useInitialize({ kcContext, doUseDefaultCss: false });

if (!isReadyToRender) {
return null;
}

return (
<div id="template-full" className="h-screen flex flex-col overflow-hidden bg-gray-700">
{/* Header */}
<div id="kc-header" className="bg-blue-700 border-b border-orange-700 h-[3.125rem] flex items-center px-4 fixed top-0 left-0 right-0 z-50 w-full">
<div id="kc-header-wrapper" className="flex items-center h-full">
<img src={logoPngUrl} width={40} height={40} className="mr-2" />
<span className="text-white">{msg("loginTitleHtml", realm.displayNameHtml)}</span>
</div>
</div>

{/* Main Content */}
<div id="template-main-content" className="flex-grow mt-[3.125rem] mb-[3.125rem] bg-gray-700">
<header className="border-b border-orange-700">
{enabledLanguages.length > 1 && (
<div id="kc-locale">
<div id="kc-locale-wrapper" className="flex gap-2">
{enabledLanguages
.filter(({ languageTag }) => languageTag === "en" || languageTag === "zh-CN")
.map(({ languageTag, label, href }) => (
<button
key={languageTag}
className="px-3 py-1 rounded-md bg-gray-200 text-gray-700 hover:bg-gray-300"
onClick={() => (window.location.href = href)}
aria-label={label}
>
{languageTag === "en" ? "🇺🇸" : "🇨🇳"}
</button>
))}
</div>
</div>
)}
{(() => {
const node = !(auth !== undefined && auth.showUsername && !auth.showResetCredentials) ? (
<h1 id="kc-page-title">{headerNode}</h1>
) : (
<div id="kc-username">
<label id="kc-attempted-username">{auth.attemptedUsername}</label>
<a id="reset-login" href={url.loginRestartFlowUrl} aria-label={msgStr("restartLoginTooltip")}>
<div className="kc-login-tooltip">
<i className="kcResetFlowIcon"></i>
<span className="kc-tooltip-text">{msg("restartLoginTooltip")}</span>
</div>
</a>
</div>
);

if (displayRequiredFields) {
return (
<div>
<div className="subtitle">
<span className="required">*</span>
{msg("requiredFields")}
</div>
<div>{node}</div>
</div>
);
}

return node;
})()}
</header>

{/* Content */}
<div id="kc-content" className="border-b border-orange-700">
<div id="kc-content-wrapper">
{displayMessage && message !== undefined && (message.type !== "warning" || !isAppInitiatedAction) && (
<div className={`alert-${message.type}`}>
<div className="pf-c-alert__icon">
{message.type === "success" && <span className="kcFeedbackSuccessIcon"></span>}
{message.type === "warning" && <span className="kcFeedbackWarningIcon"></span>}
{message.type === "error" && <span className="kcFeedbackErrorIcon"></span>}
{message.type === "info" && <span className="kcFeedbackInfoIcon"></span>}
</div>
<span
className="kcAlertTitleClass"
dangerouslySetInnerHTML={{
__html: kcSanitize(message.summary)
}}
/>
</div>
)}
{children}
{auth !== undefined && auth.showTryAnotherWayLink && (
<form id="kc-select-try-another-way-form" action={url.loginAction} method="post">
<div>
<input type="hidden" name="tryAnotherWay" value="on" />
<a
href="#"
id="try-another-way"
onClick={() => {
document.forms["kc-select-try-another-way-form" as never].submit();
return false;
}}
>
{msg("doTryAnotherWay")}
</a>
</div>
</form>
)}
{socialProvidersNode}
</div>
</div>
</div>

{/* Footer */}
<div id="kc-footer" className="bg-blue-700 border-t border-orange-700 h-[3.125rem] flex items-center justify-center fixed bottom-0 left-0 right-0 z-50">
<div>
<span className="text-white">© 2025 WhereQ Inc. All rights reserved.</span>
</div>
</div>
</div>
);
}

Again, benefits of Using Tailwind CSS Exclusively​

  1. No Styling Conflicts:

    • By removing Keycloakify's default classes, you eliminate the risk of conflicts with custom Tailwind CSS styles.
  2. Full Control Over Styling:

    • Using only Tailwind CSS gives you complete control over the theme's appearance and behavior.
  3. Simplified Codebase:

    • The code is cleaner and easier to maintain, with no reliance on Keycloakify's default theming system.
  4. Improved Performance:

    • Removing unnecessary default styles reduces the size of your CSS bundle, improving performance.

Developing a Customized Keycloak Theme with Keycloakify, Storybook, Tailwind CSS and more...

· 阅读需 12 分钟

1. Introduction​

What is Keycloakify?​

Keycloakify is a tool that allows you to create custom themes for Keycloak using modern web technologies like React.js and TypeScript. It simplifies the process of building and deploying Keycloak themes by providing a streamlined workflow and integration with tools like Vite.

Why Customize Keycloak Themes?​

Customizing Keycloak themes allows you to:

  • Match the look and feel of your application.
  • Improve user experience with modern design and responsiveness.
  • Add custom functionality to Keycloak pages (e.g., login, registration).

2. Prerequisites​

Tools and Dependencies​

  • Node.js (v18 or higher)
  • Yarn
  • Keycloak (latest version)
  • React.js, TypeScript, Vite, Tailwind CSS, Open Sans Font, Storybook

Setting Up the Development Environment​

  1. Install Node.js: Download Node.js
  2. Install Yarn (if not already installed):
npm install -g yarn

3. Project Setup​

Initialize a Vite + React + TypeScript Project​

  1. Create a new project using Vite:
yarn create vite keycloakify-poc --template react-ts
cd keycloakify-poc

Install Required Dependencies​

Install additional dependencies for Tailwind CSS, Open Sans, Storybook, and dark theme support:

yarn add keycloakify react react-dom
yarn add -D typescript vite vite-plugin-react
yarn add -D storybook @storybook/react-vite @storybook/addon-essentials @storybook/react
yarn add -D tailwindcss postcss autoprefixer @tailwindcss/postcss @tailwindcss/vite
yarn add @fontsource/open-sans
yarn add zustand

4. Set Up Storybook for Local Testing​

Initialize Storybook​

  1. Initialize Storybook:
npx storybook init
  1. Start Storybook:
yarn storybook

Configure Storybook​

Ensure Storybook is configured to serve static files from the public directory. Update .storybook/main.ts:

import type { StorybookConfig } from "@storybook/react-vite";

const config: StorybookConfig = {
stories: [
"../src/**/*.mdx",
"../src/**/*.stories.@(js|jsx|mjs|ts|tsx)",
],
addons: [
"@storybook/addon-essentials",
"@storybook/addon-onboarding",
"@chromatic-com/storybook",
"@storybook/experimental-addon-test",
],
framework: {
name: "@storybook/react-vite",
options: {},
},
staticDirs: ["../public"], // Add this line
};

export default config;

5. Integrate Keycloakify with Vite​

Create the src/keycloak-theme Directory​

Keycloakify expects a keycloak-theme directory in your src folder. This directory will contain all the theme-related files.

The keycloak-theme directory will be created in the next step

Migrate the Source Code from Keycloakify Starter​

To scaffold your project, you can use the Keycloakify Starter repository as a template.

  1. Clone the Keycloakify Starter repository into a temporary directory:
git clone https://github.com/keycloakify/keycloakify-starter tmp
  1. Move the src folder from the cloned repository into your project's src/keycloak-theme directory:
mv tmp/src src/keycloak-theme
  1. Clean up the temporary directory:
rm -rf tmp
rm src/keycloak-theme/vite-env.d.ts

Rename src/main.tsx to src/main.app.tsx​

The main.tsx file is the entry point for your application. Rename it to main.app.tsx to avoid conflicts with Keycloakify's main.tsx.

mv src/main.tsx src/main.app.tsx

Update the content of src/main.app.tsx to ensure it exports a valid React component:

import { StrictMode } from "react";
import { createRoot } from "react-dom/client";
import "./index.css";
import App from "./App";

// Define a React component that wraps the App component
const MainApp = () => (
<StrictMode>
<App />
</StrictMode>
);

// Export the MainApp component as the default export
export default MainApp;

// Render the MainApp component to the DOM
const root = createRoot(document.getElementById("root")!);
root.render(<MainApp />);

Migrate Keycloakify Starter's main.tsx​

Move the main.tsx file from the keycloak-theme directory to the root src directory:

mv src/keycloak-theme/main.tsx src/main.tsx

Update the content of src/main.tsx to lazily load the MainApp component and handle Keycloak context:

import { createRoot } from "react-dom/client";
import { lazy, StrictMode, Suspense } from "react";
import { KcPage, type KcContext } from "./keycloak-theme/kc.gen";

// Lazy load the MainApp component
const AppEntrypoint = lazy(() => import("./main.app"));

createRoot(document.getElementById("root")!).render(
<StrictMode>
{!window.kcContext ? (
<Suspense fallback={<div>Loading...</div>}>
<AppEntrypoint />
</Suspense>
) : (
<KcPage kcContext={window.kcContext} />
)}
</StrictMode>
);

declare global {
interface Window {
kcContext?: KcContext;
}
}

Update index.html​

Exclude elements from the HTML <head> that are not relevant in the context of Keycloak pages. Use the keycloakify-ignore meta tags to achieve this.

Update index.html:

<!doctype html>
<html lang="en">
<head>
<meta charset="UTF-8" />
<link rel="icon" type="image/svg+xml" href="/vite.svg" />
<meta name="viewport" content="width=device-width, initial-scale=1.0" />

<meta name="keycloakify-ignore-start">
<title>WhereQ --- Keycloakify POC</title>
<script>
window.ENV = {
API_ADDRESS: '${API_ADDRESS}',
SENTRY_DSN: '${SENTRY_DSN}'
};
</script>
<meta name="keycloakify-ignore-end">
</head>
<body>
<div id="root"></div>
<script type="module" src="/src/main.tsx"></script>
</body>
</html>

6. Customizing the Theme​

Adding Tailwind CSS​

  1. Create a tailwind.config.js file:
/** @type {import('tailwindcss').Config} */
export default {
darkMode: "class",
content: [
"./index.html",
"./src/**/*.{js,ts,jsx,tsx}",
],
theme: {
extend: {
fontFamily: {
sans: ['"Open Sans"', 'sans-serif'],
},
},
},
plugins: [],
};
  1. Create a postcss.config.js file:

    export default {
    plugins: {
    "@tailwindcss/postcss": {},
    autoprefixer: {},
    },
    };
  2. Update vite.config.ts with the tailwindcss and keycloakify plugin

vite.config.ts​

import { defineConfig } from "vite";
import react from "@vitejs/plugin-react";
import tailwindcss from "@tailwindcss/vite";
import { keycloakify } from "keycloakify/vite-plugin";

export default defineConfig({
plugins: [
react(),
tailwindcss(),
keycloakify({
accountThemeImplementation: "none",
}),
],
});
  1. Create a CSS file (src/index.css) and add Tailwind directives:
@import "tailwindcss";

@import "@fontsource/open-sans";

body {
font-family: "Open Sans", sans-serif;
}

@layer components {
.dark {
@apply bg-gray-900 text-white;
}
}

NOTE: In Tailwind CSS v4 (which introduces the new tailwindcss function instead of @tailwind), so @import "tailwindcss"; is enough

  1. Import the CSS file in src/main.tsx:
import { createRoot } from "react-dom/client";
import { lazy, StrictMode, Suspense } from "react";
import { KcPage, type KcContext } from "./keycloak-theme/kc.gen";

import "./index.css";

// Lazy load the MainApp component
const AppEntrypoint = lazy(() => import("./main.app"));

// The following block can be uncommented to test a specific page with `yarn dev`
// Don't forget to comment back or your bundle size will increase
import { getKcContextMock } from "./login/KcPageStory";

if (import.meta.env.DEV) {
window.kcContext = getKcContextMock({
// pageId: "register.ftl",
pageId: "login.ftl",
overrides: {}
});
}

createRoot(document.getElementById("root")!).render(
<StrictMode>
{!window.kcContext ? (
<Suspense fallback={<div>Loading...</div>}>
<AppEntrypoint />
</Suspense>
) : (
<KcPage kcContext={window.kcContext} />
)}
</StrictMode>
);

declare global {
interface Window {
kcContext?: KcContext;
}
}

NOTE: To facilitate debugging during development with yarn dev, the if (import.meta.env.DEV) block has been uncommented, enabling development-specific functionality outside of the Storybook environment.

Setting Up the Open Sans Font​

  1. Install the Open Sans font:
yarn add @fontsource/open-sans
  1. Import the font in src/index.css:
@import "@fontsource/open-sans";

body {
font-family: "Open Sans", sans-serif;
}

Implementing a Dark Theme​

  1. Enable dark mode in tailwind.config.js:
export default {
darkMode: "class", // or 'media' for system preference
content: [
"./index.html",
"./src/**/*.{js,ts,jsx,tsx}",
],
theme: {
extend: {},
},
plugins: [],
};

Customizing Login Page​

Customize kc-header-wrapper clss

In this case, the issue stemmed from the kc-header-wrapper class, which is part of Keycloak's original default theme (login.css). This class had predefined styles (e.g., padding, line-height, font-size, etc.) that were overriding the Tailwind CSS styles applied via inline classes in the React component. The kc- prefixed classes are part of Keycloak's default theme, and customizing them with Tailwind CSS can be challenging because Tailwind's utility classes are often overridden by these predefined styles.

Solution:

  • A separate CSS file (template.css) was created to reset the problematic properties of #kc-header-wrapper using !important. This ensured that the styles from login.css were overridden.
  • The template.css file was imported into the Template.tsx component to apply the reset styles.

Final Solution Code:​

/* template.css */
#kc-header-wrapper {
padding: 0 !important;
margin: 0 !important;
line-height: normal !important;
font-size: inherit !important;
text-transform: none !important;
letter-spacing: normal !important;
white-space: normal !important;
}

Customizing Keycloak Pages​

  1. Add story Choose login.ftl
npx keycloakify add-story
  1. Eject a Keycloak page (e.g., login page):
npx keycloakify eject-page login
  1. Modify KcPage.tsx according to the eject-page command Note: Make sure import the index.css
import { Suspense, lazy } from "react";
import type { ClassKey } from "keycloakify/login";
import type { KcContext } from "./KcContext";
import { useI18n } from "./i18n";
import DefaultPage from "keycloakify/login/DefaultPage";
import Template from "./Template";
import "../../index.css"

const UserProfileFormFields = lazy(
() => import("keycloakify/login/UserProfileFormFields")
);

const doMakeUserConfirmPassword = true;

const Login = lazy(() => import("./pages/Login"));

export default function KcPage(props: { kcContext: KcContext }) {
const { kcContext } = props;

const { i18n } = useI18n({ kcContext });

return (
<Suspense>
{(() => {
switch (kcContext.pageId) {
case "login.ftl": return (
<Login
{...{ kcContext, i18n, classes }}
Template={Template}
doUseDefaultCss={true}
/>
);
default:
return (
<DefaultPage
kcContext={kcContext}
i18n={i18n}
classes={classes}
Template={Template}
doUseDefaultCss={true}
UserProfileFormFields={UserProfileFormFields}
doMakeUserConfirmPassword={doMakeUserConfirmPassword}
/>
);
}
})()}
</Suspense>
);
}

const classes = {} satisfies { [key in ClassKey]?: string };
  1. Customize the ejected page (src/pages/Login.tsx): Replace the original submit button (kcButtonClass) with tailwindcss button
<div id="kc-form-buttons" className={kcClsx("kcFormGroupClass")}>
<input type="hidden" id="id-hidden-input" name="credentialId" value={auth.selectedCredential} />
{/* <input
tabIndex={7}
disabled={isLoginButtonDisabled}
className={kcClsx("kcButtonClass", "kcButtonPrimaryClass", "kcButtonBlockClass", "kcButtonLargeClass")}
name="login"
id="kc-login"
type="submit"
value={msgStr("doLogIn")}
/> */}
<button
tabIndex={7}
disabled={isLoginButtonDisabled}
className="w-full px-4 py-2 text-white bg-gray-600 rounded-lg hover:bg-blue-700 focus:outline-none focus:ring-2 focus:ring-blue-500 focus:ring-offset-2 disabled:opacity-50 disabled:cursor-not-allowed"
name="login"
id="kc-login"
type="submit"
>
{msgStr("doLogIn")}
</button>
</div>
  1. Test
yarn storybook

7. Configuration Files​

vite.config.ts​

import { defineConfig } from "vite";
import react from "@vitejs/plugin-react";
import tailwindcss from "@tailwindcss/vite";
import { keycloakify } from "keycloakify/vite-plugin";

export default defineConfig({
plugins: [
react(),
tailwindcss(),
keycloakify({
accountThemeImplementation: "none",
}),
],
});

tailwind.config.js​

/** @type {import('tailwindcss').Config} */
export default {
darkMode: "class",
content: [
"./index.html",
"./src/**/*.{js,ts,jsx,tsx}",
],
theme: {
extend: {},
},
plugins: [],
};

postcss.config.js​

export default {
plugins: {
"@tailwindcss/postcss": {},
autoprefixer: {},
},
};

.eslintrc.js​

export default {
env: {
node: true,
es2022: true,
},
parserOptions: {
ecmaVersion: "latest",
sourceType: "module",
},
rules: {
// Your ESLint rules...
},
};

tsconfig.json​

{
"compilerOptions": {
"target": "ES2020",
"useDefineForClassFields": true,
"lib": ["ES2020", "DOM", "DOM.Iterable"],
"module": "ESNext",
"skipLibCheck": true,
"moduleResolution": "bundler",
"allowImportingTsExtensions": true,
"resolveJsonModule": true,
"isolatedModules": true,
"noEmit": true,
"jsx": "react-jsx",
"strict": true,
"noUnusedLocals": true,
"noUnusedParameters": true,
"noFallthroughCasesInSwitch": true
},
"include": ["src"],
"references": [{ "path": "./tsconfig.node.json" }]
}

8. Building and Deploying the Theme​

**Make sure you added the command build-keycloak-theme in package.json

"scripts": {
"dev": "vite",
"build": "tsc -b && vite build",
"build-keycloak-theme": "npm run build && keycloakify build",
"lint": "eslint .",
"preview": "vite preview",
"storybook": "storybook dev -p 6006",
"build-storybook": "storybook build"
},

Building the Theme​

Run the following command to build the theme:

yarn build-keycloak-theme

Generating the JAR File​

  1. Package the theme into a JAR file:
yarn keycloakify build
  1. The JAR file will be generated in the build/keycloak-theme directory.

Deploying to Keycloak​

  1. Copy the generated JAR file to your Keycloak server's themes directory.
  2. Restart Keycloak to apply the new theme.

9. Advanced Customizations​

Adding Custom Pages​

You can add custom pages (e.g., a custom error page) by ejecting and modifying the corresponding page:

npx keycloakify eject-page error

This will generate the necessary files for the error page in the src/keycloak-theme directory. You can then customize the page as needed.


Theming Keycloak Emails​

Keycloakify also supports customizing email templates. To customize email templates:

  1. Eject the email template you want to modify:
npx keycloakify eject-email <email-template-name>

Replace <email-template-name> with the name of the email template (e.g., verify-email, password-reset).

  1. Customize the ejected email template in the src/keycloak-theme directory.

Localization and Internationalization​

Keycloak supports multiple languages out of the box. To add localization to your theme:

  1. Add language files to the src/keycloak-theme/messages directory. For example:

    • messages_en.properties for English
    • messages_fr.properties for French
  2. Use the msg() function in your components to display localized text:

const Login = () => {
const { msg } = useI18n();

return (
<div>
<h1>{msg("loginTitle")}</h1>
<p>{msg("loginDescription")}</p>
</div>
);
};
  1. Add translations to your language files:
    # messages_en.properties
    loginTitle=Login
    loginDescription=Please enter your credentials.

    # messages_fr.properties
    loginTitle=Connexion
    loginDescription=Veuillez entrer vos identifiants.

10. Troubleshooting​

Common Issues and Fixes​

  • Tailwind CSS Not Working:

    • Ensure postcss.config.js and tailwind.config.js are correctly configured.
    • Verify that the @import "tailwindcss"; directive is included in src/index.css.
  • Font Not Loading:

    • Verify the font import path in index.css.
    • Ensure the @fontsource/open-sans package is installed.
  • Dark Mode Not Applying:

    • Ensure darkMode: "class" is set in tailwind.config.js.
    • Verify that the dark class is applied to the root element (e.g., <html>).
  • Storybook Not Rendering Components:

    • Ensure the staticDirs configuration in .storybook/main.ts points to the public directory.
    • Verify that the index.css file is imported in your components.
  • Keycloakify Build Fails:

    • Ensure the keycloak-theme directory exists and contains valid theme files.
    • Check for errors in the terminal output and resolve them.

Deep Dive into Keycloak

· 阅读需 5 分钟

Introduction​

Keycloak is an open-source Identity and Access Management (IAM) solution that provides authentication, authorization, and user management for modern applications and services. It is designed to be easy to integrate with existing systems and supports a wide range of protocols and standards, including OAuth 2.0, OpenID Connect, and SAML. This article will delve into the architecture of Keycloak, exploring its components, features, and practical applications.

Keycloak Architecture​

2.1 Overview​

Keycloak is built on a modular architecture that allows for flexibility and extensibility. It consists of several key components that work together to provide a comprehensive IAM solution. The architecture can be divided into the following main areas:

  • Authentication: Handles user authentication and session management.
  • Authorization: Provides fine-grained access control and permissions management.
  • User Federation: Integrates with external user stores.
  • Identity Brokering: Allows users to authenticate using external identity providers.
  • Admin Console: Provides a web-based interface for managing Keycloak.

2.2 Key Components​

+-------------------+ +-------------------+ +-------------------+
| Client Application| | Keycloak Server | | External Identity |
| (e.g., Web App) | | (Auth Server) | | Provider (e.g., |
| | | | | Google, Facebook)|
+-------------------+ +-------------------+ +-------------------+
| | |
| (1) Authentication Request| |
|-------------------------->| |
| | (2) Redirect to Auth Server|
| |-------------------------->|
| | |
| | (3) User Authentication |
| |<--------------------------|
| | |
| | (4) Authorization Grant |
| |<--------------------------|
| | |
| | (5) Access Token Request |
| |-------------------------->|
| | |
| | (6) Access Token Response|
| |<--------------------------|
| | |
| (7) Access Resource | |
|<--------------------------| |
| | |
+-------------------+ +-------------------+ +-------------------+
| Resource Server | | Keycloak Server | | External Identity |
| (e.g., API) | | (Auth Server) | | Provider (e.g., |
| | | | | Google, Facebook)|
+-------------------+ +-------------------+ +-------------------+

2.3 Authentication Flows​

Keycloak supports various authentication flows, including:

  • Standard Flow: The default flow where the client redirects the user to the Keycloak server for authentication.
  • Implicit Flow: Suitable for client-side applications where the access token is returned directly to the client.
  • Direct Access Grants: Allows clients to obtain an access token using the resource owner's credentials.
  • Client Credentials: Used for machine-to-machine communication.

2.4 Authorization Services​

Keycloak provides fine-grained authorization services, including:

  • Role-Based Access Control (RBAC): Assigns roles to users and defines permissions based on those roles.
  • Policy-Based Access Control (PBAC): Uses policies to define complex access control rules.
  • Permission Management: Allows administrators to manage permissions for resources and users.

2.5 User Federation​

Keycloak supports user federation, allowing integration with external user stores such as LDAP and Active Directory. This enables organizations to manage users in their existing user stores while leveraging Keycloak for authentication and authorization.

2.6 Identity Brokering​

Keycloak supports identity brokering, allowing users to authenticate using external identity providers such as Google, Facebook, and GitHub. This enables organizations to provide a seamless authentication experience for users who prefer to use their existing accounts.

2.7 Admin Console​

Keycloak provides a web-based admin console that allows administrators to manage users, roles, clients, and other Keycloak entities. The admin console is a powerful tool for configuring and managing Keycloak.

Practical Applications​

3.1 Single Sign-On (SSO)​

Keycloak enables Single Sign-On (SSO), allowing users to authenticate once and access multiple applications without re-entering their credentials. This is particularly useful in enterprise environments where users need to access multiple internal applications.

3.2 API Security​

Keycloak is widely used to secure APIs by providing access tokens that grant limited access to resources. This is essential for building secure microservices architectures.

3.3 User Management​

Keycloak provides comprehensive user management features, including user registration, profile management, and password management. It also supports user federation, allowing integration with external user stores.

3.4 Custom Extensions​

Keycloak is highly extensible, allowing developers to create custom extensions to meet specific requirements. This includes custom authentication flows, custom user federation providers, and custom identity providers.

Conclusion​

Keycloak is a powerful and flexible Identity and Access Management solution that provides comprehensive authentication, authorization, and user management capabilities. Its modular architecture and support for various protocols and standards make it a popular choice for securing modern applications and services.

Understanding the architecture and features of Keycloak is essential for developers and administrators who want to leverage its capabilities to build secure and scalable applications. By leveraging Keycloak, organizations can provide a seamless and secure authentication and authorization experience for their users.

References​


This article provides a comprehensive overview of Keycloak, covering its architecture, components, and practical applications. By understanding Keycloak, developers and administrators can build secure and scalable applications that meet the demands of today's digital landscape.