
Reactive Programming in Spring WebFlux Series - XVI

· 4 min read

In the previous fifteen articles, we have covered the foundational concepts of Spring WebFlux, Reactor, error handling, data stream transformation, reactive database access, performance optimization, security, testing, deployment and operations, best practices, common pitfalls, integration with microservices architecture, and real-time data push. This article will delve into implementing effective logging and monitoring in Spring WebFlux applications to ensure system observability and stability.


Logging and Monitoring


Introduction to Logging​

Logging is a critical component of application development. It helps developers understand the system's operational state, diagnose issues, and perform performance analysis. Spring WebFlux can integrate with various logging frameworks such as SLF4J, Logback, and Log4j2.

Adding Dependencies​

To begin, add the Logback dependency to your project (Spring Boot uses Logback by default):

<dependencies>
<dependency>
<groupId>org.springframework.boot</groupId>
<artifactId>spring-boot-starter-webflux</artifactId>
</dependency>
<dependency>
<groupId>org.springframework.boot</groupId>
<artifactId>spring-boot-starter-logging</artifactId>
</dependency>
</dependencies>

Configuring Logback​

Create or modify the logback-spring.xml file in the src/main/resources directory:

<configuration>
<include resource="org/springframework/boot/logging/logback/base.xml"/>

<logger name="org.springframework.web" level="DEBUG"/>
<logger name="com.example" level="DEBUG"/>

<appender name="STDOUT" class="ch.qos.logback.core.ConsoleAppender">
<encoder>
<pattern>%d{yyyy-MM-dd HH:mm:ss.SSS} [%thread] %-5level %logger{36} - %msg%n</pattern>
</encoder>
</appender>

<root level="INFO">
<appender-ref ref="STDOUT"/>
</root>
</configuration>

Using Logging in Code​

Use SLF4J to log messages in your code:

import org.slf4j.Logger;
import org.slf4j.LoggerFactory;
import org.springframework.stereotype.Service;

@Service
public class BookService {
private static final Logger logger = LoggerFactory.getLogger(BookService.class);

public void addBook(Book book) {
logger.info("Adding book: {}", book.getTitle());
// Other logic
}
}

Introduction to Monitoring​

Monitoring is crucial for ensuring system stability and performance. By monitoring, we can promptly detect and address system issues. Spring Boot Actuator and Prometheus are commonly used monitoring tools.

Spring Boot Actuator​

Spring Boot Actuator provides a wealth of monitoring and management endpoints, making it easier for developers to monitor and manage applications.

Adding Actuator Dependencies​

Add the Actuator dependency to your project:

<dependencies>
<dependency>
<groupId>org.springframework.boot</groupId>
<artifactId>spring-boot-starter-actuator</artifactId>
</dependency>
</dependencies>

Configuring Actuator​

Enable Actuator endpoints in application.properties:

management.endpoints.web.exposure.include=health,info,metrics,loggers,httptrace
management.endpoint.health.show-details=always

Using Actuator Endpoints​

Access http://localhost:8080/actuator to view all available Actuator endpoints, such as health checks (health), application information (info), and loggers (loggers).

Monitoring with Prometheus and Grafana​

Prometheus and Grafana are popular open-source monitoring and visualization tools suitable for monitoring Spring WebFlux applications.

Adding Prometheus Dependencies​

Add the Prometheus dependency to your project:

<dependencies>
<dependency>
<groupId>io.micrometer</groupId>
<artifactId>micrometer-registry-prometheus</artifactId>
</dependency>
</dependencies>

Configuring Prometheus​

Configure Prometheus in application.properties:

management.endpoints.web.exposure.include=prometheus
management.metrics.export.prometheus.enabled=true

Configuring Prometheus Server​

Add the Spring WebFlux application's monitoring configuration to Prometheus's prometheus.yml file:

scrape_configs:
- job_name: 'spring-webflux-app'
metrics_path: '/actuator/prometheus'
static_configs:
- targets: ['localhost:8080']

Visualizing with Grafana​

Add the Prometheus data source in Grafana and create dashboards to monitor key metrics of the Spring WebFlux application, such as response times, request counts, and error rates.

Conclusion​

In this article, we explored how to implement effective logging and monitoring in Spring WebFlux applications. By using Logback for logging and Spring Boot Actuator, Prometheus, and Grafana for monitoring, we can ensure system observability and stability. These practices are essential for maintaining the health and performance of modern reactive applications.
Reactive Programming in Spring WebFlux Series - XVII

· 4 min read

In the previous sixteen articles, we have covered the foundational concepts of Spring WebFlux, Reactor, data stream transformation, reactive database access, performance optimization, security, testing, deployment and operations, best practices, common pitfalls, integration with microservices architecture, and real-time data push. This article will delve into implementing effective error handling strategies in Spring WebFlux applications to ensure system robustness and user experience.


Error Handling Strategies


Importance of Error Handling​

In any application, errors are inevitable. How these errors are handled not only affects system stability but also directly impacts user experience. In Spring WebFlux, due to its asynchronous and non-blocking nature, error handling is particularly crucial.

Basic Concepts of Error Handling​

In Spring WebFlux, error handling typically involves the following levels:

  • Global Error Handling: Captures unhandled exceptions in the application and provides a unified error response.
  • Controller-Level Error Handling: Handles errors specific to requests in controllers.
  • Error Handling in Reactive Streams: Manages and recovers from errors within reactive data streams.

Global Error Handling​

Global error handling can be achieved by implementing the ErrorWebExceptionHandler interface.

Creating a Global Error Handler​

import org.springframework.boot.web.reactive.error.ErrorWebExceptionHandler;
import org.springframework.context.annotation.Bean;
import org.springframework.context.annotation.Configuration;
import org.springframework.core.annotation.Order;
import org.springframework.http.HttpStatus;
import org.springframework.http.MediaType;
import org.springframework.web.reactive.function.server.ServerRequest;
import org.springframework.web.reactive.function.server.ServerResponse;
import org.springframework.web.server.ServerWebExchange;
import reactor.core.publisher.Mono;

@Configuration
public class GlobalErrorHandlerConfig {

@Bean
@Order(-2)
public ErrorWebExceptionHandler globalErrorHandler() {
return new GlobalErrorHandler();
}

private static class GlobalErrorHandler implements ErrorWebExceptionHandler {

@Override
public Mono<Void> handle(ServerWebExchange exchange, Throwable ex) {
ServerRequest request = ServerRequest.create(exchange, HandlerStrategies.withDefaults().messageReaders());
return renderErrorResponse(request, ex)
.flatMap(response -> response.writeTo(exchange, HandlerStrategies.withDefaults()));
}

private Mono<ServerResponse> renderErrorResponse(ServerRequest request, Throwable ex) {
return ServerResponse.status(HttpStatus.INTERNAL_SERVER_ERROR)
.contentType(MediaType.APPLICATION_JSON)
.bodyValue(new ErrorResponse(ex.getMessage()));
}
}

private static class ErrorResponse {
private final String message;

public ErrorResponse(String message) {
this.message = message;
}

public String getMessage() {
return message;
}
}
}

Configuration Class Explanation​

In the above configuration, we define a global error handler GlobalErrorHandler that captures all unhandled exceptions and returns a unified error response. By implementing the ErrorWebExceptionHandler interface, we can customize the error handling logic.

Controller-Level Error Handling​

At the controller level, we can use the @ExceptionHandler annotation to handle specific exceptions.

import org.springframework.web.bind.annotation.ExceptionHandler;
import org.springframework.web.bind.annotation.RestControllerAdvice;
import org.springframework.http.ResponseEntity;

@RestControllerAdvice
public class ControllerExceptionHandler {

@ExceptionHandler(BookNotFoundException.class)
public ResponseEntity<ErrorResponse> handleBookNotFound(BookNotFoundException ex) {
ErrorResponse errorResponse = new ErrorResponse(ex.getMessage());
return ResponseEntity.status(HttpStatus.NOT_FOUND).body(errorResponse);
}

// Handle other exceptions
@ExceptionHandler(Exception.class)
public ResponseEntity<ErrorResponse> handleException(Exception ex) {
ErrorResponse errorResponse = new ErrorResponse("Internal Server Error");
return ResponseEntity.status(HttpStatus.INTERNAL_SERVER_ERROR).body(errorResponse);
}
}

Error Handling in Reactive Streams​

In reactive streams, we can use various operators to handle errors.

Using onErrorResume​

The onErrorResume operator allows switching to another Publisher when an error occurs.

public Mono<Book> findBookById(String id) {
return bookRepository.findById(id)
.onErrorResume(ex -> {
log.error("Error finding book", ex);
return Mono.empty();
});
}

Using onErrorReturn​

The onErrorReturn operator allows returning a default value when an error occurs.

public Mono<Book> findBookById(String id) {
return bookRepository.findById(id)
.onErrorReturn(new Book("default", "Default Book", "Unknown Author", 0.0));
}

Using onErrorMap​

The onErrorMap operator allows converting the error to another type of error.

public Mono<Book> findBookById(String id) {
return bookRepository.findById(id)
.onErrorMap(ex -> new CustomException("Custom error message", ex));
}

Conclusion​

In this article, we explored how to implement effective error handling strategies in Spring WebFlux applications. By using global error handling, controller-level error handling, and error handling in reactive streams, we can build more robust and user-friendly applications. Proper error handling is essential for maintaining the reliability and performance of modern reactive applications.

Deep Dive Backpressure Flow Control with WebClient in Spring Boot

· 5 min read

1. Introduction to Backpressure​

Backpressure is the mechanism in reactive systems that helps manage the flow of data between producers and consumers. In systems where data is produced at high rates, backpressure allows consumers to signal how much data they can process, preventing overload.

Without backpressure, if the producer emits data faster than the consumer can process, it can lead to memory overflows, crashes, or degraded system performance.


2. Why Backpressure is Important​

Backpressure ensures:

  • Efficient resource management
  • Prevents overwhelming downstream services
  • Provides resilience against data surges
  • Allows consumers to control the data inflow rate

Reactive systems like Spring’s WebClient use backpressure to provide flow control, especially when dealing with streaming data or high-throughput APIs.


3. WebClient: Enabling Backpressure​

WebClient, built on Project Reactor, supports backpressure natively through Flux and Mono types. By controlling the rate at which data is processed, WebClient ensures that reactive streams can handle large datasets or slow consumers.

Example initialization:

WebClient webClient = WebClient.builder()
.baseUrl("https://dummy.restapiexample.com/api/v1/employees")
.build();

WebClient operates on non-blocking, reactive pipelines where consumers can request more data as needed, unlike traditional blocking REST clients.


4. Use Case​

Example: Streaming Large Dataset with Backpressure​

Imagine you're building a data ingestion service that consumes streaming data from an external API, such as real-time stock market prices. The API provides thousands of updates per second. Your system must process this data without overwhelming downstream services (e.g., databases or other microservices).

You can use WebClient with backpressure to process these updates at a controlled rate, avoiding memory overloads and ensuring stability.

Code Example:​

WebClient webClient = WebClient.create("https://dummy.restapiexample.com/api/v1/employees");

Flux<StockPrice> stockPriceStream = webClient.get()
.uri("/stream")
.retrieve()
.bodyToFlux(StockPrice.class)
.limitRate(100); // Limit the rate of data processing

stockPriceStream
.doOnNext(stock -> processStockPrice(stock))
.doOnError(error -> handleError(error))
.subscribe();

Here, limitRate(100) ensures that only 100 stock price updates are processed at a time, preventing overload.


5. Backpressure Strategies in WebClient​

Strategy 1: limitRate​

The simplest method to apply backpressure is by limiting the rate at which data is processed using limitRate().

Example:

Flux<StockPrice> stockPriceStream = webClient.get()
.uri("/stream")
.retrieve()
.bodyToFlux(StockPrice.class)
.limitRate(50); // Controls backpressure with 50 items at a time

This limits the number of items requested and processed at a time.


Strategy 2: onBackpressureBuffer​

The onBackpressureBuffer operator buffers data when backpressure occurs, until the downstream can handle it.

Flux.range(1, 1000)
.onBackpressureBuffer(50)
.subscribe(System.out::println);

Strategy 3: onBackpressureDrop​

The onBackpressureDrop operator discards data when backpressure occurs to prevent downstream overload.

Flux.range(1, 1000)
.onBackpressureDrop()
.subscribe(System.out::println);

Strategy 4: Using Flux.window()​

Another method is using window(), which batches items into smaller chunks for processing.

Example:

Flux<StockPrice> stockPriceStream = webClient.get()
.uri("/stream")
.retrieve()
.bodyToFlux(StockPrice.class)
.window(10) // Process in windows of 10
.flatMap(window -> window.collectList())
.doOnNext(batch -> processBatch(batch))
.subscribe();

This groups items into windows of 10 before processing, providing an additional layer of control.


Strategy 5: Combining flatMap with Concurrency​

For more complex backpressure control, you can combine flatMap() with concurrency settings. This allows concurrent processing of items with backpressure.

Example:

webClient.get()
.uri("/stream")
.retrieve()
.bodyToFlux(StockPrice.class)
.flatMap(price -> processStockPrice(price), 5) // Concurrently process 5 items
.subscribe();

Here, flatMap() ensures that a maximum of 5 stock prices are processed concurrently at any given time.


6. Diagrams​

Diagram 1: Basic Backpressure Flow​

[Producer] ---> [Backpressure Mechanism (limitRate, window)] ---> [Consumer]
^ |
| v
+--------------------------------------------------------------
  1. Producer sends data.
  2. Backpressure mechanism (e.g., limitRate) controls the flow.
  3. Consumer processes data at a controlled rate.

Diagram 2: Streaming Data with Concurrency and Backpressure​

[API] ---> [WebClient (Stream)] ---> [Backpressure] ---> [Concurrent Processing] ---> [Final Consumer]
^ ^ | | |
| | | +---> [Worker 1] |
| +------------------------+ +---> [Worker 2] |
+------------------------------------------------------------------------------------------------+

7. Conclusion​

In reactive systems, backpressure is a key mechanism that prevents overload and ensures stable operation by allowing consumers to control the rate of data consumption. With WebClient, backpressure can be easily managed using strategies like limitRate, window, and flatMap with concurrency.

Compared to traditional, blocking clients like RestTemplate, WebClient’s backpressure control is a major advantage for high-throughput, non-blocking operations.

By implementing these techniques, you can design robust, scalable applications that handle large datasets and high-velocity data streams with ease.

Deep Dive Spring Boot Retry Mechanism and Implementation

· 9 min read

Spring Boot Retry Mechanism - Detailed Guide with Sample Code


1. Introduction to Spring Retry​

Spring Boot provides a robust retry mechanism through the Spring Retry module. This module allows developers to automatically retry operations that fail due to certain exceptions, making it highly useful for handling transient faults in distributed systems, such as network issues, service unavailability, and more.

Spring Retry can be implemented in two primary ways:

  • Programmatically using RetryTemplate.
  • Declaratively using the @Retryable annotation.

Additionally, Spring Retry supports recovery methods using the @Recover annotation, which can be invoked when all retry attempts are exhausted.

Key Features:​

  • Retry Policies: Define the number of retry attempts and conditions for retrying.
  • Backoff Policies: Implement delays between retries, including fixed, exponential, and custom backoff strategies.
  • Exception Handling: Retry based on specific exceptions or generic conditions.
  • Recovery Mechanism: Gracefully handle failures using @Recover methods.

2. How Retry Mechanism Works​

The retry mechanism in Spring operates as follows:

  • When a method annotated with @Retryable or executed via RetryTemplate encounters an exception, Spring can automatically retry that method a configurable number of times.
  • The retry logic can be customized based on specific exceptions or broader conditions.
  • Spring supports various backoff policies, such as fixed delays, exponential backoff, and custom backoff strategies, to manage the interval between retry attempts.
  • After exhausting the maximum retry attempts, a @Recover method can be invoked to handle the failure gracefully.

Flow of Retry Mechanism:​

  1. Method Invocation: The retryable method is invoked.
  2. Exception Occurs: If an exception occurs, Spring checks if the method is retryable.
  3. Retry Policy: The retry policy determines whether to retry the method.
  4. Backoff Policy: If retries are allowed, the backoff policy defines the delay before the next retry.
  5. Retry Execution: The method is retried according to the defined policy.
  6. Recovery: If all retries fail, the @Recover method is invoked.

3. Plain Retry Implementation using RetryTemplate​

The RetryTemplate is used to implement the retry mechanism programmatically. This approach provides fine-grained control over the retry logic and is ideal for complex scenarios.

Step-by-Step Guide:​

  1. Add Dependencies in pom.xml (if using Maven):
<dependency>
<groupId>org.springframework.retry</groupId>
<artifactId>spring-retry</artifactId>
</dependency>
<dependency>
<groupId>org.springframework.boot</groupId>
<artifactId>spring-boot-starter-aop</artifactId>
</dependency>
  1. Define RetryTemplate Bean:
@Configuration
public class RetryConfig {
@Bean
public RetryTemplate retryTemplate() {
RetryTemplate retryTemplate = new RetryTemplate();

// Define retry policy (e.g., 3 attempts for any exception)
SimpleRetryPolicy retryPolicy = new SimpleRetryPolicy();
retryPolicy.setMaxAttempts(3);

// Define backoff policy (e.g., 2 seconds between retries)
FixedBackOffPolicy backOffPolicy = new FixedBackOffPolicy();
backOffPolicy.setBackOffPeriod(2000); // 2000 ms = 2 seconds

retryTemplate.setRetryPolicy(retryPolicy);
retryTemplate.setBackOffPolicy(backOffPolicy);

return retryTemplate;
}
}
  1. Use RetryTemplate in Business Logic:
@Service
public class MyService {

@Autowired
private RetryTemplate retryTemplate;

public void performTask() {
retryTemplate.execute(context -> {
// Logic that might fail
System.out.println("Attempting task...");
if (new Random().nextInt(10) < 8) {
throw new RuntimeException("Failed task");
}
System.out.println("Task succeeded");
return null;
});
}
}
  1. Main Application:
@SpringBootApplication
public class RetryApplication {
public static void main(String[] args) {
ApplicationContext context = SpringApplication.run(RetryApplication.class, args);
MyService service = context.getBean(MyService.class);
service.performTask();
}
}

Key Points:​

  • RetryTemplate: Provides a flexible way to define retry policies and backoff strategies.
  • SimpleRetryPolicy: Defines the maximum number of retry attempts.
  • FixedBackOffPolicy: Sets a fixed delay between retry attempts.
  • execute() Method: Executes the retry logic within a lambda expression.

4. Annotation-Based Retry Implementation using @Retryable​

The annotation-based approach uses the @Retryable annotation to automatically retry methods without explicitly defining a RetryTemplate. This method is simpler and more concise, making it ideal for straightforward retry scenarios.

Step-by-Step Guide:​

  1. Add Dependencies (same as in RetryTemplate approach).

  2. Enable Retry in Spring Boot Application:

@SpringBootApplication
@EnableRetry
public class RetryApplication {
public static void main(String[] args) {
SpringApplication.run(RetryApplication.class, args);
}
}
  1. Use @Retryable Annotation:
@Service
public class MyService {

@Retryable(
value = { RuntimeException.class }, // Retry on specific exceptions
maxAttempts = 3, // Retry up to 3 times
backoff = @Backoff(delay = 2000) // 2 seconds delay between retries
)
public void performTask() {
System.out.println("Attempting task...");
if (new Random().nextInt(10) < 8) {
throw new RuntimeException("Task failed");
}
System.out.println("Task succeeded");
}
}
  1. Recover from Failure using @Recover: You can define a recovery method that will be called when all retry attempts are exhausted.
@Service
public class MyService {

@Retryable(
value = { RuntimeException.class },
maxAttempts = 3,
backoff = @Backoff(delay = 2000)
)
public void performTask() {
System.out.println("Attempting task...");
if (new Random().nextInt(10) < 8) {
throw new RuntimeException("Task failed");
}
System.out.println("Task succeeded");
}

@Recover
public void recover(RuntimeException e) {
System.out.println("Recovering from failure: " + e.getMessage());
}
}

Key Points:​

  • @Retryable: Specifies the method to be retried, along with the retry conditions and backoff policy.
  • @Recover: Defines a fallback method to handle failures after all retries are exhausted.
  • @EnableRetry: Enables the retry mechanism in the Spring Boot application.

5. Recovering from Failure using @Recover​

The @Recover annotation is used to define a fallback method that will be called when all retry attempts fail. This method allows you to handle the failure gracefully and provide a fallback response.

Key Points:​

  • The method annotated with @Recover must have the same return type as the retryable method.
  • It must accept the exception type being handled as a parameter.

Example:

@Recover
public String recoverFromFailure(RuntimeException e) {
System.out.println("Recovery logic for exception: " + e.getMessage());
return "Fallback result";
}

In the above example, when all retries fail, the recoverFromFailure() method will be called, and the fallback result will be returned.

Advanced Recovery:​

  • Multiple @Recover Methods: You can define multiple recovery methods for different exception types, allowing for more granular error handling.
  • Parameter Matching: The recovery method's parameters must match the retryable method's parameters, except for the first parameter, which must be the exception type.

6. Flowchart: Retry Mechanism​

Below is a textual representation of the Spring Boot retry mechanism flowchart:

+------------------------------------------+
| Start Application |
+------------------------------------------+
|
V
+------------------------------------------+
| Method Invoked (e.g., performTask) |
+------------------------------------------+
|
V
+---------------------------------------------------+
| Is Retryable? (Check @Retryable or RT) |
+---------------------------------------------------+
Yes | No |
V V
+-------------------------------------+ +-----------------------------+
| Try Method Execution | | No retry, continue normal |
| | | method execution |
+-------------------------------------+ +-----------------------------+
|
V
+--------------------------------------------------+
| Method Execution Fails? |
+--------------------------------------------------+
Yes | No |
V V
+------------------------------------------+ +-----------------------------+
| Retry Policy Check (max attempts?) | | Method succeeds, continue |
+------------------------------------------+ +-----------------------------+
Yes | No |
V V
+------------------------------------------+ +-----------------------------+
| Retry Backoff (delay before retry) | | Call @Recover method |
+------------------------------------------+ +-----------------------------+
|
V
+------------------------------------------+
| Retry Method Execution |
+------------------------------------------+
|
V
+-------------------------------------------------------+
| Retry Limit Reached or Success? |
+-------------------------------------------------------+
Retry Limit | Success |
V V
+------------------------------------------+ +-----------------------------+
| Call @Recover method | | Continue normal execution |
+------------------------------------------+ +-----------------------------+

Key Points:​

  • Retryable Check: Determines if the method is eligible for retries.
  • Retry Policy: Defines the number of retry attempts and conditions.
  • Backoff Policy: Manages the delay between retry attempts.
  • Recovery Method: Handles failures after all retries are exhausted.

7. Multiple Recover Methods​

In Spring Retry, while it might seem like there is no explicit way to specify a "recover" method in the @Retryable annotation itself, you can still have multiple recover methods in the same class. Spring Retry allows you to define different recovery methods by relying on method signatures.

The framework will match the appropriate recovery method based on the parameters of the method, so each @Recover method corresponds to a specific exception type (or a list of exception types) that it's designed to handle.

Example: Multiple @Recover Methods​

@Service
public class ApiService {

private final RestTemplate restTemplate;

@Autowired
public ApiService(RestTemplateBuilder restTemplateBuilder) {
this.restTemplate = restTemplateBuilder.build();
}

// Retryable method for HTTP client errors
@Retryable(
value = { HttpClientErrorException.class },
maxAttempts = 4,
backoff = @Backoff(delay = 1000)
)
public String invokeClientApi(String url) {
return restTemplate.getForObject(url, String.class);
}

// Retryable method for HTTP server errors
@Retryable(
value = { HttpServerErrorException.class },
maxAttempts = 4,
backoff = @Backoff(delay = 1000)
)
public String invokeServerApi(String url) {
return restTemplate.getForObject(url, String.class);
}

// Recovery method for HTTP client errors
@Recover
public String recoverClientError(HttpClientErrorException e, String url) {
return "Client error fallback for URL: " + url;
}

// Recovery method for HTTP server errors
@Recover
public String recoverServerError(HttpServerErrorException e, String url) {
return "Server error fallback for URL: " + url;
}
}

Key Points:​

  • Different @Recover methods are defined based on the exception type (e.g., HttpClientErrorException vs. HttpServerErrorException).
  • The recovery method's first parameter is the exception type that triggered the retry failure. This is how Spring determines which recover method to invoke.
  • Additional parameters (like url in the example) must match the parameters of the corresponding retryable method.

How It Works:​

  1. If the retryable method (invokeClientApi or invokeServerApi) fails after exhausting the retry attempts, Spring will look for a recovery method based on the exception type.
  2. The recovery method (recoverClientError or recoverServerError) will be called depending on whether a HttpClientErrorException or a HttpServerErrorException occurred.

Summary:​

A class can have multiple @Recover methods. Spring matches the correct recovery method based on the exception type and method signature, so you can create recover methods for different types of exceptions in the same class.


8. Conclusion​

Spring Boot’s retry mechanism provides a simple and powerful way to retry failed operations, with both programmatic (RetryTemplate) and declarative (@Retryable) support. Additionally, recovery methods allow handling failure gracefully after retry attempts are exhausted.

Whether you choose to use RetryTemplate or @Retryable, both approaches are robust solutions for retrying failed methods in Spring applications.

Key Takeaways:​

  • RetryTemplate: Offers fine-grained control over retry logic.
  • @Retryable: Provides a simpler, declarative approach to retries.
  • @Recover: Enables graceful handling of failures after retries are exhausted.
  • Multiple Recover Methods: Allows for granular error handling based on exception types.

By leveraging Spring Retry, developers can build resilient applications that can handle transient faults effectively, ensuring higher availability and reliability.

Differences Between pem csr key crt and Other File Extensions

· 7 min read

Differences Between .pem, .csr, .key, .crt, and Other File Extensions


1. Introduction​

When dealing with SSL/TLS certificates, you often encounter various file extensions like .pem, .csr, .key, and .crt. Each serves a different purpose in the certificate creation, signing, and installation process. Understanding these files and how they interrelate is essential for setting up secure communications.

Key Points:​

  • SSL/TLS Certificates: Secure communication over the internet.
  • File Extensions: Different formats for storing cryptographic data.
  • Certificate Lifecycle: From generation to deployment.

2. What is a .pem File?​

A PEM (Privacy Enhanced Mail) file is a container format used for encoding certificates, keys, and other related data in Base64. It is often used to store the root, intermediate, and server certificates in SSL communication.

Characteristics:

  • Encoded in Base64 (ASCII-readable).
  • Enclosed between -----BEGIN CERTIFICATE----- and -----END CERTIFICATE-----.

PEM can store:

  • Certificate authority (CA) certificates.
  • Server certificates.
  • Private keys.

Example Content of a .pem file:

-----BEGIN CERTIFICATE-----
MIIDdzCCAl+gAwIBAgIE...
-----END CERTIFICATE-----

Key Points:​

  • Base64 Encoding: ASCII-readable format.
  • Multiple Uses: Can store certificates and private keys.
  • Commonly Used: Widely supported across different platforms.

3. What is a .csr File?​

A CSR (Certificate Signing Request) is a file generated when applying for an SSL certificate. It contains information about the domain and organization and is submitted to the Certificate Authority (CA) to request a signed certificate.

Key Points:

  • It includes public key information and information about the organization.
  • The CA uses it to generate a signed certificate.

Example Content of a .csr file:

-----BEGIN CERTIFICATE REQUEST-----
MIICzDCCAbQCAQAw...
-----END CERTIFICATE REQUEST-----

Key Points:​

  • Public Key: Included in the CSR.
  • Organization Info: Details about the domain and organization.
  • CA Submission: Sent to the CA for certificate issuance.

4. What is a .key File?​

A KEY file contains the private key used to encrypt and decrypt information. Private keys must remain confidential and should never be shared. They are used to secure communication between clients and servers, and they are essential for creating CSRs and decrypting SSL traffic.

Key Points:

  • It is used to sign the CSR and decrypt the certificate.
  • Stored in PEM format but holds private key data.

Example Content of a .key file:

-----BEGIN PRIVATE KEY-----
MIIEvAIBADANBgkq...
-----END PRIVATE KEY-----

Key Points:​

  • Confidentiality: Must be kept secret.
  • Encryption/Decryption: Used to secure communication.
  • CSR Generation: Required for creating a CSR.

5. What is a .crt File?​

A CRT (Certificate) file contains the SSL certificate issued by a CA. This certificate is used to secure communication between a client and a server. It contains the public key of the entity and is signed by the Certificate Authority.

Key Points:

  • Often used interchangeably with .pem.
  • It may be in PEM or DER format.
  • Typically contains the public key of the certificate holder.

Example Content of a .crt file:

-----BEGIN CERTIFICATE-----
MIIC+DCCAeCgAwIBAgIJALfZc1...
-----END CERTIFICATE-----

Key Points:​

  • Public Key: Included in the certificate.
  • CA Signature: Ensures the certificate's authenticity.
  • Interchangeable: Often used with .pem format.

6. Other Common Certificate Formats​

DER (.der):

  • Binary version of PEM.
  • Commonly used in Windows.
  • Can store certificates and private keys.

PFX/PKCS12 (.pfx or .p12):

  • Binary format for storing the certificate, intermediate certificates, and private key in one file.
  • Often used in Windows IIS servers.

Key Points:​

  • DER: Binary format for certificates.
  • PFX/PKCS12: Bundles certificates and private keys.
  • Platform-Specific: Used in different operating systems.

7. File Extensions and Corresponding Commands​

Here are some common OpenSSL commands for generating, converting, and inspecting certificate files:

Generate a Private Key (.key):​

openssl genrsa -out private.key 2048

Generate a CSR (.csr):​

openssl req -new -key private.key -out request.csr

View CSR Content:​

openssl req -in request.csr -noout -text

Generate a Self-Signed Certificate (.crt):​

openssl req -x509 -new -nodes -key private.key -sha256 -days 365 -out certificate.crt

Convert a PEM to DER:​

openssl x509 -outform der -in certificate.pem -out certificate.der

Convert a PEM to PFX:​

openssl pkcs12 -export -out certificate.pfx -inkey private.key -in certificate.crt -certfile ca.crt

View Certificate Content (.crt, .pem):​

openssl x509 -in certificate.crt -noout -text

Key Points:​

  • OpenSSL: Command-line tool for managing certificates.
  • Generation: Creating private keys and CSRs.
  • Conversion: Converting between different formats.
  • Inspection: Viewing certificate details.

8. Diagram: Certificate Workflow​

Here's a diagram to illustrate the typical workflow from generating a private key to receiving a certificate from a Certificate Authority:

+-----------------------+ +--------------------+ +---------------------+
| Private Key (.key) | -----> | CSR (.csr) | -----> | Certificate (.crt)|
+-----------------------+ +--------------------+ +---------------------+
| ^
| |
| Certificate Signing |
+--------------------------------------+
  1. Generate Private Key: The .key file is generated first, which is necessary for creating a CSR.
  2. Generate CSR: A .csr is generated using the private key and sent to the CA.
  3. Receive Certificate: The CA signs the CSR and returns a .crt or .pem certificate file.

Key Points:​

  • Workflow: From key generation to certificate issuance.
  • CA Role: Signing the CSR to produce a certificate.
  • End Result: A signed certificate for secure communication.

9. Conclusion​

Understanding the differences between certificate-related files like .pem, .csr, .key, and .crt is essential for managing SSL certificates. Each of these files has a unique role in the certificate lifecycle, from generating requests to securing communications. These files work together to ensure the integrity and security of encrypted data transmissions over the web.

Key Takeaways:​

  • File Types: Understand the purpose of each file extension.
  • Lifecycle: Follow the certificate lifecycle from generation to deployment.
  • Security: Ensure proper handling and protection of private keys.

By mastering these concepts, you can effectively manage SSL certificates and ensure secure communication in your applications.

How to Elegantly Invoke 3rd Party APIs in Spring Boot

· 6 min read

How to Elegantly Invoke 3rd Party APIs in Spring Boot with Retries and Circuit Breakers


When integrating with third-party APIs, ensuring robust and fault-tolerant API invocations is crucial for a resilient microservices architecture. In this updated guide, we will expand on retry mechanisms and fallback strategies, introducing annotations for retries and fallbacks. We will also explore enhanced usage of Resilience4j for circuit breaking, along with retry policies via RetryTemplate and Spring's @Retryable annotation.


1. Basic API Invocation Using RestTemplate​

We start with a simple HTTP client in Spring Boot, using RestTemplate to invoke a third-party API. Although basic, this approach lacks resilience for handling errors or failures in the third-party service.

@Service
public class ApiService {
private final RestTemplate restTemplate;

@Autowired
public ApiService(RestTemplateBuilder restTemplateBuilder) {
this.restTemplate = restTemplateBuilder.build();
}

public String invokeExternalApi(String url) {
return restTemplate.getForObject(url, String.class);
}
}

Key Points:​

  • RestTemplate: Basic HTTP client for API invocation.
  • Lack of Resilience: No built-in error handling or retry mechanisms.

2. Elegant Error Handling with RestTemplate​

Error handling can be enhanced by implementing custom error handling for different types of HTTP status codes using ResponseErrorHandler.

@Service
public class ApiService {

private final RestTemplate restTemplate;

@Autowired
public ApiService(RestTemplateBuilder restTemplateBuilder) {
this.restTemplate = restTemplateBuilder
.errorHandler(new CustomErrorHandler()) // custom error handler
.build();
}

public String invokeExternalApi(String url) {
try {
return restTemplate.getForObject(url, String.class);
} catch (HttpClientErrorException ex) {
return "Client error: " + ex.getStatusCode();
} catch (HttpServerErrorException ex) {
return "Server error: " + ex.getStatusCode();
}
}
}

public class CustomErrorHandler implements ResponseErrorHandler {

@Override
public boolean hasError(ClientHttpResponse response) throws IOException {
return response.getStatusCode().is4xxClientError() || response.getStatusCode().is5xxServerError();
}

@Override
public void handleError(ClientHttpResponse response) throws IOException {
// Custom error handling
}
}

Key Points:​

  • Custom Error Handler: Implements ResponseErrorHandler for fine-grained error handling.
  • Exception Handling: Catches specific HTTP exceptions for client and server errors.

3. Retries Using RetryTemplate with Annotations​

Spring Retry provides powerful retry mechanisms that can be applied using annotations for cleaner code. The @Retryable annotation helps trigger automatic retries when exceptions occur.

Using @Retryable Annotation​

@Service
public class ApiService {

private final RestTemplate restTemplate;

@Autowired
public ApiService(RestTemplateBuilder restTemplateBuilder) {
this.restTemplate = restTemplateBuilder.build();
}

@Retryable(
value = { HttpServerErrorException.class },
maxAttempts = 5,
backoff = @Backoff(delay = 2000)
)
public String invokeExternalApiWithRetry(String url) {
return restTemplate.getForObject(url, String.class);
}

@Recover
public String recover(HttpServerErrorException e, String url) {
return "Fallback response for: " + url;
}
}

Explanation:​

  • @Retryable: Specifies retryable exceptions (e.g., HttpServerErrorException), with configurable maximum attempts and backoff strategy.
  • @Recover: Defines a fallback method that triggers when retries are exhausted.

Key Points:​

  • Retry Logic: Automatically retries failed API calls.
  • Fallback Mechanism: Provides a fallback response when retries fail.

4. Circuit Breaker with Resilience4j and Annotations​

Resilience4j is a lightweight, easy-to-use fault tolerance library designed for Java 8 and functional programming. It provides circuit breaking capabilities similar to Hystrix but with a more modern approach.

Dependency Setup​

First, add the necessary dependencies to your pom.xml:

<dependency>
<groupId>io.github.resilience4j</groupId>
<artifactId>resilience4j-spring-boot3</artifactId>
<version>2.0.0</version>
</dependency>
<dependency>
<groupId>org.springframework.boot</groupId>
<artifactId>spring-boot-starter-aop</artifactId>
</dependency>

Circuit Breaker Configuration​

Configure the circuit breaker in your Spring Boot application:

@Configuration
public class Resilience4jConfig {

@Bean
public CircuitBreakerConfig circuitBreakerConfig() {
return CircuitBreakerConfig.custom()
.failureRateThreshold(50)
.waitDurationInOpenState(Duration.ofMillis(1000))
.ringBufferSizeInClosedState(2)
.build();
}

@Bean
public CircuitBreakerRegistry circuitBreakerRegistry(CircuitBreakerConfig circuitBreakerConfig) {
return CircuitBreakerRegistry.of(circuitBreakerConfig);
}

@Bean
public CircuitBreaker circuitBreaker(CircuitBreakerRegistry circuitBreakerRegistry) {
return circuitBreakerRegistry.circuitBreaker("externalApi");
}
}

Using Resilience4j Annotations​

Apply the circuit breaker to your service method:

@Service
public class ApiService {

private final RestTemplate restTemplate;
private final CircuitBreaker circuitBreaker;

@Autowired
public ApiService(RestTemplateBuilder restTemplateBuilder, CircuitBreaker circuitBreaker) {
this.restTemplate = restTemplateBuilder.build();
this.circuitBreaker = circuitBreaker;
}

@CircuitBreaker(name = "externalApi", fallbackMethod = "fallbackMethod")
public String invokeApiWithCircuitBreaker(String url) {
return restTemplate.getForObject(url, String.class);
}

public String fallbackMethod(String url, Throwable t) {
return "Fallback response for: " + url;
}
}

Explanation:​

  • CircuitBreaker: Configures the circuit breaker with custom settings.
  • @CircuitBreaker: Annotates the method to be protected by the circuit breaker.
  • Fallback Method: Provides a fallback response when the circuit breaker trips.

Key Points:​

  • Resilience4j: Modern fault tolerance library replacing Hystrix.
  • Circuit Breaker: Prevents cascading failures by short-circuiting failed API calls.
  • Fallback Method: Provides a fallback response when the circuit breaker trips.

5. Sample Code with Annotations​

Combining both @Retryable and Resilience4j’s @CircuitBreaker, we create a highly resilient service capable of handling third-party API failures.

@Service
public class ApiService {

private final RestTemplate restTemplate;
private final CircuitBreaker circuitBreaker;

@Autowired
public ApiService(RestTemplateBuilder restTemplateBuilder, CircuitBreaker circuitBreaker) {
this.restTemplate = restTemplateBuilder.build();
this.circuitBreaker = circuitBreaker;
}

@Retryable(
value = { HttpServerErrorException.class },
maxAttempts = 5,
backoff = @Backoff(delay = 1000)
)
@CircuitBreaker(name = "externalApi", fallbackMethod = "fallbackMethod")
public String invokeApi(String url) {
return restTemplate.getForObject(url, String.class);
}

@Recover
public String retryRecovery(HttpServerErrorException e, String url) {
return "Retry failed for: " + url;
}

public String fallbackMethod(String url, Throwable t) {
return "Circuit breaker fallback for: " + url;
}
}

Key Points:​

  • Combined Resilience: Combines retries and circuit breaking for improved fault tolerance.
  • Fallback Handling: Provides fallback responses for both retry failures and circuit breaker trips.

Diagrams​

To visualize how retries and circuit breakers work together, the following diagram illustrates the flow:

+-------------------+ +------------------+
| API Call Attempt |----> | Retry Logic |
+-------------------+ +------------------+
|
Retry Success<----+---->Retry Failure
|
Circuit Breaker
|
Success<-----------+------------>Fallback

Key Points:​

  • API Call Attempt: Initial API invocation.
  • Retry Logic: Retries the API call if it fails.
  • Circuit Breaker: Evaluates whether to invoke the fallback method after retries fail.

6. Conclusion​

In Spring Boot, integrating with third-party APIs elegantly involves applying retry mechanisms and circuit breaker patterns. Using @Retryable and Resilience4j annotations simplifies the code, making it more resilient to failures and easier to maintain. The combination of these two approaches ensures that your system can handle both intermittent and persistent issues with third-party APIs.

Key Takeaways:​

  • Resilient API Invocations: Use retries and circuit breakers for fault tolerance.
  • Annotation-Based Configuration: Simplifies implementation and maintenance.
  • Fallback Strategies: Provide graceful degradation when API calls fail.

By mastering these techniques, you can build robust and resilient microservices that gracefully handle third-party API failures.

Kafka Producer Tuning Guide

· 9 min read

Kafka Producer Tuning Guide


1. Introduction​

Apache Kafka is a distributed streaming platform often used for building real-time data pipelines and streaming applications. Kafka producers are responsible for sending records to Kafka brokers, and tuning their performance is essential to achieving high throughput, reliability, and proper data ordering. In this article, we will cover the various aspects of Kafka producer tuning, including optimizing throughput, ensuring reliability, avoiding data duplication, and maintaining data order.


2. Optimizing Producer Throughput​

Throughput optimization focuses on increasing the number of messages the producer can send per second. Kafka producers offer multiple configuration options to improve throughput:

2.1 Batching​

Kafka producers can batch multiple records before sending them to the broker, reducing the number of network requests.

  • Batch size (batch.size): Determines the maximum number of bytes in a batch. Increasing this value allows the producer to group more records in one request, increasing throughput.
props.put("batch.size", 16384); // 16KB per batch

2.2 Compression​

Enabling compression can reduce the size of data being sent, decreasing network traffic and increasing throughput.

  • Compression type (compression.type): Supported types are gzip, snappy, lz4, and zstd.
props.put("compression.type", "snappy");

2.3 Asynchronous Send​

Producers can send data asynchronously to minimize the time spent waiting for broker acknowledgments.

  • Linger time (linger.ms): The producer will wait for up to this time before sending a batch of messages, allowing more records to be added to the batch.
props.put("linger.ms", 10); // Wait 10 ms before sending a batch

2.4 Producer Configuration for High Throughput​

Below is a configuration snippet optimized for throughput:

Properties props = new Properties();
props.put("bootstrap.servers", "localhost:9092");
props.put("acks", "1"); // Leader acknowledgment for faster send
props.put("compression.type", "lz4");
props.put("batch.size", 32768); // 32KB batch size
props.put("linger.ms", 5); // Wait for 5ms before sending
props.put("max.in.flight.requests.per.connection", "5"); // Max concurrent requests

3. Ensuring Data Reliability​

Reliability involves ensuring that messages are delivered and persisted correctly by the Kafka broker. To achieve this, several configurations control how Kafka handles acknowledgment and retries.

3.1 Acknowledgment (acks)​

  • acks configuration: Controls how many replicas must acknowledge the record. The safest setting is acks=all, ensuring the data is replicated to all in-sync replicas (ISR).
props.put("acks", "all");

3.2 Retries and Idempotence​

  • retries: Controls the number of retry attempts if a request fails.
  • enable.idempotence: Ensures that retries don't result in duplicated messages.
props.put("retries", 3); // Retry 3 times on failure
props.put("enable.idempotence", "true"); // Avoid duplicate messages

3.3 Durability with Replication​

Kafka ensures durability with data replication across multiple brokers. Setting the acks=all guarantees that the data is fully replicated before considering the record as successfully sent.

props.put("acks", "all"); // Wait for acknowledgment from all replicas
props.put("min.insync.replicas", 2); // At least 2 replicas must acknowledge

4. Guaranteeing Exactly Once Semantics​

Kafka provides exactly-once semantics (EOS), ensuring that data is neither lost nor duplicated. This is critical for financial systems and applications that cannot tolerate duplicates or lost data.

4.1 Idempotent Producer​

An idempotent producer ensures that duplicate messages are not written to the Kafka log, even in case of retries. This is achieved by enabling the idempotence feature.

props.put("enable.idempotence", "true");

4.2 Transactions​

Transactions allow multiple operations (e.g., sending messages to different partitions) to be treated as a single unit, ensuring that either all messages are written successfully or none are written.

// Configuring a transactional producer
props.put("transactional.id", "my-transaction-id");

KafkaProducer<String, String> producer = new KafkaProducer<>(props);
producer.initTransactions();
producer.beginTransaction();

try {
producer.send(new ProducerRecord<>("topic1", "key", "value"));
producer.send(new ProducerRecord<>("topic2", "key", "value"));
producer.commitTransaction();
} catch (Exception e) {
producer.abortTransaction();
}

5. Maintaining Data Order​

By default, Kafka guarantees that records are written in the order they are sent, but only within a partition. You can control data ordering by correctly configuring partitioning strategies.

5.1 Partitioning​

Kafka producers can partition records using a key. Messages with the same key will always go to the same partition, ensuring their order is maintained.

producer.send(new ProducerRecord<>("topic", "key", "value"));

5.2 Producer Configuration for Ordering​

To maintain message order, especially during retries, the max.in.flight.requests.per.connection setting is crucial. Setting it to 1 ensures that only one request is sent to the broker at a time.

props.put("max.in.flight.requests.per.connection", 1); // Guarantees ordering
props.put("enable.idempotence", "true"); // Ensures no duplicates

6. Conclusion​

Kafka producer tuning involves balancing between throughput, reliability, and data ordering based on the specific requirements of the application. By configuring batching, compression, retries, and idempotence, Kafka producers can achieve high performance while maintaining the necessary level of data reliability and ordering.


Diagram: Kafka Producer Configuration for Throughput and Reliability​

+----------------------+ +----------------------+ +---------------------+
| Producer Properties | -----> | Batch, Compression, | -----> | High Throughput and |
| Configuration | | Asynchronous Send | | Reliable Delivery |
+----------------------+ +----------------------+ +---------------------+
|
v
+----------------------+ +---------------------+ +---------------------+
| Idempotence, | -----> | Exactly-Once | -----> | Guaranteed Message |
| Transactions Enabled | | Semantics | | Ordering and No Dups|
+----------------------+ +---------------------+ +---------------------+

Configuration Parameters​

max.in.flight.requests.per.connection​

The max.in.flight.requests.per.connection configuration in Kafka producers controls how many requests can be sent concurrently to the Kafka broker over a single connection. This setting plays a crucial role in determining how Kafka handles the trade-off between throughput, message ordering, and data reliability.

How it Works:​

  • When a producer sends messages to Kafka, each message is sent in a request to the broker.
  • If the producer has multiple requests to send at the same time (due to batching or high message rates), these requests can either be sent sequentially or in parallel.
  • The max.in.flight.requests.per.connection setting defines how many such requests can be "in-flight" — meaning waiting for a response from the broker — at any given time.
Default Value:​

  • By default, this value is set to 5. This allows the producer to send up to five requests at once before receiving responses for any of them.
props.put("max.in.flight.requests.per.connection", 5);
Impact on Performance and Ordering:​

1. Throughput:​

  • Higher Values: Setting max.in.flight.requests.per.connection to a higher number increases throughput, as the producer can send multiple requests simultaneously without waiting for each one to be acknowledged. This reduces the time spent waiting and maximizes network bandwidth usage.

  • Lower Values: If you lower the value, for example, to 1, the producer will wait for a response from the broker for each request before sending the next one. While this ensures ordering, it can limit throughput because the producer spends more time waiting for acknowledgments.

2. Message Ordering:​

  • Higher Values: When max.in.flight.requests.per.connection is greater than 1, messages can potentially be delivered out of order if a failure occurs. For example, if two requests (Request A and Request B) are sent in parallel, and Request A fails while Request B succeeds, Kafka may retry Request A, leading to message reordering.

  • Lower Values: Setting this value to 1 ensures strict message ordering. This is because the producer waits for each request to be acknowledged before sending the next one, preventing any reordering even in the case of retries.

props.put("max.in.flight.requests.per.connection", 1); // Guarantees strict message order
3. Reliability:​

  • Higher Values: While more concurrent requests can improve throughput, they can lead to situations where retries (in case of failure) result in duplicate messages or out-of-order delivery.

  • Lower Values: With a value of 1, Kafka guarantees that even if a retry occurs (due to network failure, for example), messages will be delivered in the correct order. Coupled with enable.idempotence=true, this ensures that no duplicate messages are sent, and they arrive in the correct sequence.

  • For High Throughput:

    • Use higher values (such as 5 or more). This allows Kafka to send multiple messages simultaneously, maximizing throughput at the potential cost of strict ordering if failures occur.
  • For Exactly Once Semantics (EOS):

    • Use 1 in conjunction with enable.idempotence=true and retries to ensure no duplicates and guarantee strict message ordering.
// High throughput with risk of out-of-order messages on failure
props.put("max.in.flight.requests.per.connection", 5);
props.put("enable.idempotence", "true");

// Strict ordering and exactly-once delivery
props.put("max.in.flight.requests.per.connection", 1);
props.put("enable.idempotence", "true");
props.put("acks", "all");
props.put("retries", Integer.MAX_VALUE);

Summary of Key Points:​

  • Higher max.in.flight.requests.per.connection increases throughput but may lead to message reordering on failure.
  • Lower max.in.flight.requests.per.connection ensures strict ordering but may decrease throughput as the producer waits for each acknowledgment.
  • For exactly-once semantics (EOS) and strict ordering, set it to 1 in conjunction with enable.idempotence=true.

Diagram: Effect of max.in.flight.requests.per.connection on Kafka Producer Behavior​

+------------------------+ +----------------------+ +-----------------------+
| max.in.flight = 5 | ------> | Higher Throughput | -----> | Possible Reordering |
| Multiple concurrent | | Faster message send | | Retries can cause out-|
| requests allowed | | with reduced latency | | of-order delivery |
+------------------------+ +----------------------+ +-----------------------+

+------------------------+ +----------------------+ +-----------------------+
| max.in.flight = 1 | ------> | Strict Ordering | -----> | Lower Throughput |
| One request at a time | | Each message waits | | Wait time for each |
| Strict sequence | | for ack before next | | acknowledgment |
+------------------------+ +----------------------+ +-----------------------+

Kafka Transaction

· 6 min read

Kafka Transaction Workflow


1. Introduction​

Let’s first recall the concept of a transaction: either all operations succeed, or all of them fail. Kafka transactions follow the same rule.

Starting from Kafka 0.11.0.0, two major features were introduced: idempotence and transactions. Understanding transactions requires understanding idempotence because transactions are built on top of idempotence. This article explains how Kafka transactions work in simple terms, without diving too deep into technical details.

The key points we will cover:

  • What is idempotence? How to enable it?
  • How does idempotence work?
  • What are Kafka transactions? How to enable transactions?
  • How do Kafka transactions work?

2. Idempotence in Kafka​

Idempotence ensures that no matter how many times the producer sends the same message, the Kafka broker will only persist it once, ensuring no data duplication. Idempotence is enabled by default and can be configured using the enable.idempotence setting.

2.1 How Idempotence Works​

The idempotence mechanism in Kafka is simple. Each message has a unique key composed of <PID, Partition, SeqNumber>:

  • PID (Producer ID): A unique identifier assigned to each producer when it starts.
  • Partition: The target partition for the message.
  • SeqNumber: An incrementing ID assigned to each message by the producer, ensuring that each message has a unique sequence number.

Kafka prevents duplicate message persistence for messages with the same key. However, idempotence is limited to single partition and single session guarantees. If Kafka restarts and a new PID is assigned, duplicates could occur. This is where Kafka transactions come into play.


3. Kafka Transactions​

Kafka transactions allow for atomic writes across multiple topics and partitions. All messages in the same transaction are either fully committed or fully aborted.

Kafka transactions are primarily concerned with producer transactions, though consumer transactions are also possible. However, consumers rely on the producer’s transaction mechanism, so we will focus on producer transactions here.

3.1 How to Enable Kafka Transactions​

Before delving into the internals of Kafka transactions, let’s start with a simple example.

Example: Creating a Kafka Producer with Transactions​

Properties properties = new Properties();
properties.setProperty(ProducerConfig.BOOTSTRAP_SERVERS_CONFIG, "localhost:9092");
properties.setProperty(ProducerConfig.KEY_SERIALIZER_CLASS_CONFIG, StringSerializer.class.getName());
properties.setProperty(ProducerConfig.VALUE_SERIALIZER_CLASS_CONFIG, StringSerializer.class.getName());

// Set the transactional ID, this is required
properties.setProperty(ProducerConfig.TRANSACTIONAL_ID_CONFIG, "transactional_id_1");

KafkaProducer<String, String> producer = new KafkaProducer<>(properties);

// Initialize transaction
producer.initTransactions();

// Start transaction
producer.beginTransaction();

try {
// Send 10 messages to Kafka, if an error occurs, all messages will be aborted
for (int i = 0; i < 10; i++) {
producer.send(new ProducerRecord<>("topic-test", "a message " + i));
}
// Commit the transaction
producer.commitTransaction();
} catch (Exception e) {
// Abort the transaction if any exception occurs
producer.abortTransaction();
} finally {
producer.close();
}

In this code:

  • The producer is configured with a transactional ID, which is essential for Kafka transactions.
  • The producer starts a transaction with beginTransaction().
  • After sending messages, it commits the transaction using commitTransaction(). If any error occurs, the transaction is aborted with abortTransaction().

3.2 How Kafka Transactions Work​

1) Starting the Producer and Assigning a Transaction Coordinator​

When using transactions, the producer must be assigned a transactional ID. Upon startup, Kafka assigns a Transaction Coordinator based on this ID. Each Kafka broker has a transaction coordinator responsible for assigning Producer IDs (PIDs) and managing transactions.

The allocation of a transaction coordinator involves a special Kafka topic __transaction_state, which by default has 50 partitions. Each partition is responsible for a portion of the transactions. Kafka calculates the hash of the transactional ID and assigns the producer to a specific partition, whose leader broker will become the transaction coordinator.

After assigning a coordinator, the coordinator assigns a PID to the producer, allowing it to start sending messages.

2) Sending Messages​

After receiving its PID, the producer informs the coordinator which partitions the transaction will target. Then, it starts sending messages. These messages are flagged as part of a transaction.

Once the producer has sent all its transactional messages, it sends either a Commit or Abort request to the transaction coordinator, signaling the end of its task.

3) Committing or Aborting the Transaction​

When the producer starts sending messages, the coordinator marks the beginning of the transaction and records it in the __transaction_state topic.

Once all messages are sent, or in case of failure, the coordinator will receive a Commit or Abort request. The coordinator then communicates with all the topics involved in the transaction. If the transaction is successful, the topics confirm receipt of the messages, and the coordinator records the successful transaction.

If the transaction fails, all messages related to the transaction are discarded, and the coordinator records the failure in __transaction_state.


4. Diagram: Kafka Transaction Flow​

Below is a diagram representing the Kafka transaction process:

+---------------------------+ +----------------------+ +---------------------+
| Producer Starts | -----> | Assign Transaction | -----> | Send Messages to |
| (with transactional ID) | | Coordinator & Assign | | Partitions |
+---------------------------+ | PID | +---------------------+
+----------------------+

|
|
v
+------------------------+ +------------------------+ +----------------------+
| Transaction Begins | -----> | Send Commit/Abort | -----> | Coordinator Confirms |
+------------------------+ | Request to Coordinator | | Success or Failure |
+------------------------+ +----------------------+
  1. Producer Starts: The producer is assigned a transactional ID and a transaction coordinator.
  2. Sending Messages: Messages are sent as part of the transaction.
  3. Commit/Abort: The producer sends a Commit or Abort request to the coordinator.
  4. Confirmation: The coordinator confirms the success or failure of the transaction.

5. Conclusion​

Kafka transactions are a powerful feature that enables atomic writes across multiple topics and partitions, ensuring either all messages succeed or all fail. Built on top of Kafka's idempotence mechanism, Kafka transactions provide robust guarantees for message processing, making it a reliable tool for distributed systems.

Key Takeaways:​

  • Idempotence: Ensures that messages are not duplicated, even with retries.
  • Transactions: Allow atomic writes across multiple topics and partitions.
  • Transaction Coordinator: Manages the lifecycle of transactions, including assigning PIDs and handling commit/abort requests.
  • __transaction_state: Special Kafka topic that stores transaction metadata.

By mastering these concepts, you can build robust and reliable Kafka-based applications that handle complex message processing scenarios with ease.

Understanding Root and Intermediate Certificates

· 7 min read

Understanding Root and Intermediate Certificates​


1. What are Certificates?​

Certificates are digital documents that verify the identity of an entity (such as a website) and establish secure communication between servers and clients. A certificate ensures the authenticity of the entity claiming to be what it is.

Key Points:​

  • Digital Signature: Certificates are digitally signed by a Certificate Authority (CA) to ensure their authenticity.
  • Public Key Infrastructure (PKI): Certificates are a fundamental part of the PKI, which is used to secure online communications.
  • Types of Certificates: There are various types of certificates, including SSL/TLS certificates, code signing certificates, and email certificates.

2. Introduction to Certificate Authority (CA)​

A Certificate Authority (CA) is a trusted entity responsible for issuing digital certificates. These certificates bind a public key with an entity's identity, like a domain name or a company. The CA plays a crucial role in the Public Key Infrastructure (PKI) system, which helps to secure online communications.

Key Points:​

  • Issuing Certificates: CAs issue certificates after verifying the identity of the entity requesting the certificate.
  • Trust Model: Browsers and operating systems come pre-installed with a list of trusted Root CAs.
  • Revocation: CAs can revoke certificates if they are compromised or no longer valid.

3. Root Certificates​

A Root Certificate is the foundation of a trust chain. It is issued by a Root Certificate Authority (Root CA), which is a trusted entity pre-installed in web browsers and operating systems. All certificates trust a Root CA, and this trust is propagated through the chain of certificates.

Key Points:​

  • Self-Signed: Root Certificates are self-signed.
  • Ultimate Trust Anchor: They act as the ultimate trust anchor.
  • Reputation: Root CAs are only issued to very reputable organizations, and compromising a root certificate would cause massive security breaches.

4. Intermediate Certificates​

An Intermediate Certificate is issued by a Root CA or another Intermediate CA. Intermediate certificates act as middle layers in the trust chain, allowing the Root CA to delegate the task of issuing end-user certificates.

Key Points:​

  • Delegation: Intermediate Certificates are used to spread the trust of a Root Certificate.
  • Security: They ensure that if an Intermediate CA is compromised, the damage is limited to certificates issued by that Intermediate CA, not the root.
  • Hierarchy: Intermediate Certificates are usually signed by the Root CA or another trusted intermediate CA.

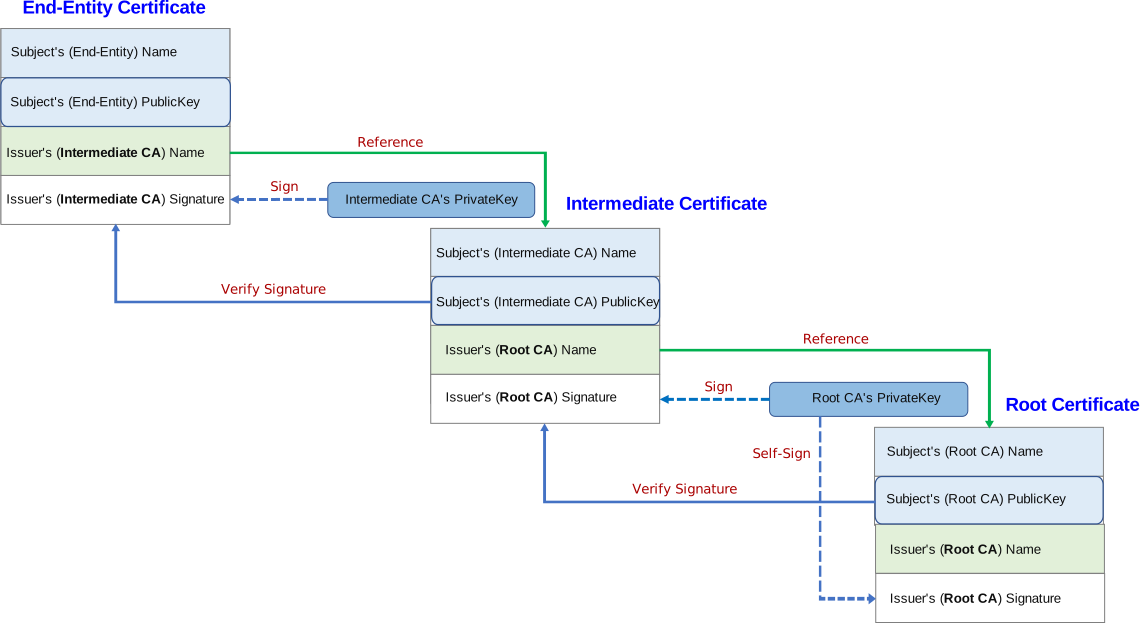
5. Chain of Trust​

The Chain of Trust is the hierarchy of certificates starting from the Root Certificate at the bottom(root), followed by Intermediate Certificates, and finally the End-Entity Certificate (also known as the Leaf Certificate), which is the certificate for the actual entity (e.g., a website).

Chain of Trust
Fanyangxi – CC BY-SA 4.0

Key Points:​

  • Hierarchy: The chain of trust ensures that each certificate in the chain is signed by the next certificate up the chain.
  • Validation: When a client connects to a server, it validates the entire certificate chain up to the trusted Root CA.
  • Security: The chain of trust ensures that only trusted certificates are used for secure communications.

6. Why are Intermediate Certificates Used?​

Intermediate certificates are used for several reasons:

  1. Security: If a root certificate is compromised, all certificates under it are compromised. Intermediate certificates limit the scope of a breach.
  2. Delegation: Root certificates delegate the issuance of certificates to intermediates, spreading out the load and responsibility.
  3. Certificate Revocation: If an Intermediate CA is compromised, only certificates issued by that intermediate can be revoked without affecting the root.

Key Points:​

  • Scalability: Intermediate CAs allow the Root CA to scale its operations by delegating certificate issuance.
  • Flexibility: Intermediate CAs can be managed independently, allowing for more granular control over certificate issuance and revocation.
  • Risk Mitigation: Intermediate CAs reduce the risk of a single point of failure by distributing trust across multiple entities.

7. Sample Certificate Chain​

Let's assume we are visiting a secure website. The browser will validate the certificate using a chain similar to the following:

  1. Root Certificate: Trusted by browsers.
  2. Intermediate Certificate: Signed by the Root CA.
  3. Leaf Certificate: Issued for the website and signed by the Intermediate CA.

Key Points:​

  • Validation Process: The browser validates the entire chain, starting from the Leaf Certificate and moving up to the Root Certificate.
  • Trust Check: If any certificate in the chain is not trusted, the connection will fail.
  • Chain Length: The length of the chain can vary depending on the number of intermediate CAs involved.

8. Diagram: Certificate Chain​

Here's a visual diagram to explain the trust chain:

+--------------------------+
| Root CA |
| (Trusted by OS) |
+--------------------------+
|
v
+--------------------------+
| Intermediate CA 1 |
| (Issued by Root CA) |
+--------------------------+
|
v
+--------------------------+
| Intermediate CA 2 |
| (Issued by Int. CA 1) |
+--------------------------+
|
v
+--------------------------+
| End-Entity Cert |
| (Issued for example.com) |
+--------------------------+

Key Points:​

  • Hierarchy: The diagram shows the hierarchical structure of the certificate chain.
  • Trust Propagation: Trust is propagated from the Root CA down to the End-Entity Certificate.
  • Validation Path: The browser follows this path to validate the certificate chain.

9. Python Code Example for Validating Certificates​

We can use the ssl and cryptography libraries in Python to validate and inspect the certificate chain. Below is an example that uses Python to verify the SSL certificate chain of a given website.

Python Code to Validate a Certificate Chain​

import ssl
import socket
import OpenSSL

def get_certificate_chain(hostname, port=443):
"""Fetch and print the certificate chain for a given hostname."""
context = ssl.create_default_context()
conn = context.wrap_socket(
socket.socket(socket.AF_INET),
server_hostname=hostname,
)
conn.connect((hostname, port))

# Get the certificate chain
cert_bin = conn.getpeercert(True)
cert = ssl.DER_cert_to_PEM_cert(cert_bin)
x509 = OpenSSL.crypto.load_certificate(OpenSSL.crypto.FILETYPE_PEM, cert)

# Print certificates in the chain
chain = conn.getpeercert(True)
print(f"Certificate chain for {hostname}:\n")

for (idx, cert) in enumerate(chain):
print(f"Certificate {idx + 1}:\n")
print(OpenSSL.crypto.dump_certificate(OpenSSL.crypto.FILETYPE_PEM, cert).decode())

conn.close()

# Example: get certificate chain for a website
get_certificate_chain('www.example.com')

Key Points:​

  • SSL Context: The ssl.create_default_context() function creates a default SSL context with secure settings.
  • Socket Connection: The wrap_socket method wraps a standard socket in an SSL socket, allowing secure communication.
  • Certificate Chain: The getpeercert method retrieves the certificate chain from the server.
  • Print Certificates: The certificates in the chain are printed in PEM format for inspection.

10. Conclusion​

Root and Intermediate certificates are crucial to securing communications and establishing trust on the internet. By using a layered approach with Intermediate CAs, Root CAs can safely distribute trust across various entities while minimizing risk in case of a security breach.

Key Takeaways:​

  • Trust Model: The chain of trust ensures that only trusted certificates are used for secure communications.
  • Security: Intermediate certificates limit the scope of a breach, ensuring that if an Intermediate CA is compromised, only certificates issued by that intermediate are affected.
  • Scalability: Intermediate CAs allow the Root CA to scale its operations by delegating certificate issuance.

By mastering these concepts, you can better understand how certificates work and how they are used to secure online communications.

WebClient and RestTemplate in Spring Boot

· 10 min read

WebClient and RestTemplate in Spring Boot


1. Overview​

Spring Boot offers two primary ways to make HTTP requests: RestTemplate and WebClient. While both can be used to interact with external APIs, they differ significantly in features, capabilities, and usage. In this article, we'll explore the key differences, when to use each, and best practices through practical examples.

2. What is RestTemplate?​

RestTemplate is a synchronous client designed to perform HTTP requests and handle responses. It has been around for a long time and is simple to use but is gradually being deprecated in favor of WebClient for reactive programming.

Characteristics:​

  • Synchronous/blocking operations: Each request blocks the thread until the response is received.
  • Easy to use: Simplified API for HTTP interactions.
  • Wide range of RESTful operations: Supports GET, POST, PUT, DELETE, etc.
  • Deprecated: Spring team recommends using WebClient for new applications.

Code Sample:​

RestTemplate restTemplate = new RestTemplate();
String url = "https://catfact.ninja/facts";
ResponseEntity<String> response = restTemplate.getForEntity(url, String.class);

System.out.println("Response: " + response.getBody());

3. What is WebClient?​

WebClient is the successor to RestTemplate, introduced in Spring 5. It supports both synchronous and asynchronous (non-blocking) calls and is designed for reactive programming, making it more suitable for modern web applications.

Characteristics:​

  • Asynchronous and non-blocking: Allows multiple requests to be handled concurrently without blocking threads.
  • Part of Spring WebFlux: Built on top of the reactive stack.
  • Supports backpressure: Crucial for reactive streams to manage data flow.
  • Chaining operations: Allows declarative chaining of multiple operations.

Code Sample:​

WebClient webClient = WebClient.create("https://catfact.ninja");

Mono<String> response = webClient.get()
.uri("/facts")
.retrieve()
.bodyToMono(String.class);

response.subscribe(System.out::println);

4. Key Differences​

FeatureRestTemplateWebClient
TypeSynchronousAsynchronous and Reactive
ConcurrencyBlocking (each request waits)Non-blocking (multiple requests in parallel)
BackpressureNo (Processes whole response at once)Yes, Supports backpressure in reactive systems, flow control
Error HandlingSimple but lacks flexibilityAdvanced error handling with .onStatus()
Support for StreamsNoYes, can handle large streams of data
FlexibilityLimited customizationsHighly flexible and configurable

4.1 Synchronous vs Asynchronous​

  • RestTemplate: Operates in a synchronous/blocking fashion, meaning the thread is blocked until the response arrives.
  • WebClient: Can operate both synchronously and asynchronously, allowing for non-blocking I/O and better scalability.

4.2 Reactive Support​

WebClient is built to support the reactive paradigm of programming, which allows applications to handle a massive number of requests efficiently by leveraging non-blocking I/O operations. RestTemplate does not have this support.

4.3 Error Handling​

WebClient provides more flexible error handling with methods like .onStatus() for dealing with specific HTTP status codes.

4.4 Performance​

Due to its asynchronous nature, WebClient typically offers better performance in handling multiple HTTP requests concurrently, making it more suitable for high-performance applications.

4.5 Flexibility & Features​

WebClient can be configured with timeouts, retries, and fallbacks more easily compared to RestTemplate. It supports streaming large amounts of data and provides reactive streams to manage data flow.

5. Best Practices and Use Cases​

  • When to use RestTemplate:

    • Small applications with minimal requirements for concurrency.
    • Use cases where synchronous/blocking operations are acceptable.
  • When to use WebClient:

    • Modern applications requiring scalability and performance.
    • When working with large-scale microservices architectures.
    • For non-blocking and reactive API calls.

Best Practices:​

  • Use WebClient for new applications that need to scale.
  • Avoid using RestTemplate for large-scale systems due to its synchronous nature.
  • Handle errors properly using onStatus() in WebClient.

6. Real-Life Use Case Example​

Let's assume a situation where you are building a service to fetch data from multiple APIs concurrently. RestTemplate would block on each request, but WebClient would allow you to make all the calls concurrently and return the responses as they come in.

6.1 Using RestTemplate (Synchronous)​

@RestController
public class ApiController {

private RestTemplate restTemplate = new RestTemplate();

@GetMapping("/data")
public String fetchData() {
String api1Response = restTemplate.getForObject("https://catfact.ninja/facts", String.class);
String api2Response = restTemplate.getForObject("https://catfact.ninja/fact", String.class);
return "Data from API1: " + api1Response + " and API2: " + api2Response;
}
}

6.2 Using WebClient (Asynchronous)​

@RestController
public class ApiController {

private WebClient webClient = WebClient.create();

@GetMapping("/data")
public Mono<String> fetchData() {
Mono<String> api1Response = webClient.get().uri("https://catfact.ninja/facts").retrieve().bodyToMono(String.class);
Mono<String> api2Response = webClient.get().uri("https://catfact.ninja/fact").retrieve().bodyToMono(String.class);

return Mono.zip(api1Response, api2Response, (api1, api2) -> "Data from API1: " + api1 + " and API2: " + api2);
}
}

6.3 Adding Retry and Fallback (WebClient)​

public class ApiService {

private WebClient webClient = WebClient.builder()
.baseUrl("https://catfact.ninja")
.filter(ExchangeFilterFunctions.statusError(HttpStatus::is4xxClientError, clientResponse -> new RuntimeException("API Error")))
.build();

@Retryable(value = {RuntimeException.class}, maxAttempts = 3)
public Mono<String> fetchDataWithRetry() {
return webClient.get()
.uri("/data")
.retrieve()
.bodyToMono(String.class)
.onErrorReturn("Fallback Data");
}
}

7. Conclusion​

RestTemplate is simple and suitable for synchronous applications, but for modern, scalable applications, WebClient is the clear choice due to its non-blocking and reactive features. In Spring Boot applications, it's recommended to move towards WebClient for future-proofing your code.

8. Diagrams​

8.1 Synchronous RestTemplate Workflow​

Request -> Server -> Blocking I/O -> Response -> Client

8.2 Asynchronous WebClient Workflow​

Request -> Server -> Non-Blocking I/O -> Reactive Stream -> Response -> Client

9. Deep Dive into Backpressure​

9.1 What is Backpressure in Reactive Systems?​

Backpressure refers to a mechanism used in reactive systems to control the flow of data between producers and consumers. It allows the consumer to handle data at a rate it can manage, preventing overload or crashes. If the producer is emitting data faster than the consumer can process, backpressure signals the producer to slow down or pause until the consumer catches up.

9.2 Is Backpressure Good or Bad?​

Good:

  • Efficient Resource Management: Backpressure prevents resource exhaustion by controlling how much data is in the system.
  • System Stability: It helps prevent overloading a service, ensuring it operates smoothly without being overwhelmed by data.
  • Improved Scalability: In distributed systems, especially when handling streams of real-time data, backpressure enables better scalability and responsiveness.

Challenges:

  • Increased Complexity: While beneficial, backpressure introduces more complexity in system design. Developers need to think carefully about flow control.
  • Latency: If not managed properly, backpressure can introduce latency because the producer has to wait until the consumer is ready to receive more data.

9.3 How WebClient Supports Backpressure​

In Spring WebFlux, WebClient works in a reactive, non-blocking way and is integrated with Project Reactor to support backpressure. When fetching large streams of data, WebClient can handle them without overwhelming the system. Here's how it works:

  • Reactive Streams: WebClient communicates using Publisher and Subscriber patterns, which allows it to handle streams of data asynchronously. If the subscriber (consumer) is slower than the publisher (producer), it can request data at a manageable rate, applying backpressure when needed.

  • Flow Control: In a typical scenario, the subscriber can signal how much data it wants to receive at any given moment. This avoids a flood of data that could cause the system to run out of resources. WebClient ensures that consumers can throttle the data based on their processing capacity.

9.4 Code Example of WebClient Supporting Backpressure​

WebClient webClient = WebClient.create();

Flux<String> response = webClient.get()
.uri("/large-data-stream")
.retrieve()
.bodyToFlux(String.class)
.limitRate(10); // apply backpressure by limiting the rate of consumption

response.subscribe(data -> {
System.out.println("Processing: " + data);
});

In this example, the limitRate() method ensures the consumer processes the data stream at a manageable rate, effectively applying backpressure.

9.5 Why RestTemplate Doesn't Have Backpressure​

RestTemplate is built on a blocking I/O model, which means it waits for each HTTP request to complete before proceeding to the next task. This approach works well for synchronous operations, but it lacks the flow control mechanisms needed for backpressure. Here's why RestTemplate doesn't support backpressure:

  1. Blocking Nature: RestTemplate blocks the current thread while waiting for a response, handling each request in sequence, which inherently prevents a need for backpressure.

  2. Lack of Reactive Streams: Unlike WebClient, which is built around reactive streams and the non-blocking Publisher-Subscriber pattern, RestTemplate doesn't have the underlying architecture to request data in chunks or manage flow control. It processes the entire response in a blocking call and holds it in memory until the response is complete.

  3. Thread-per-request Model: RestTemplate uses a traditional thread-per-request model, which consumes a thread for the entire duration of a request. This model isn't designed to handle large streams of data efficiently or manage backpressure when dealing with data that arrives at varying rates.

9.6 When to Use RestTemplate​

RestTemplate is still useful for simple, synchronous tasks that don’t require fine-grained control over how data is processed, particularly when working with legacy systems or simple API interactions that don't involve heavy real-time data streaming.

However, for reactive programming, high throughput, and complex asynchronous data handling, WebClient is the better choice, as it is designed to handle backpressure effectively.

9.7 Conclusion​

Backpressure is essential in reactive systems for maintaining stability and scalability. Spring WebClient leverages Project Reactor to support it, making it an excellent choice for modern applications handling large streams of data. While it adds some complexity, the benefits of resource management and smooth performance outweigh the drawbacks.

Key Takeaways:​

  • Backpressure: A mechanism to control data flow in reactive systems.
  • WebClient: Supports backpressure and is suitable for modern, scalable applications.
  • RestTemplate: Synchronous and blocking, not suitable for handling large streams of data.
  • Best Practices: Use WebClient for new applications requiring scalability and performance.